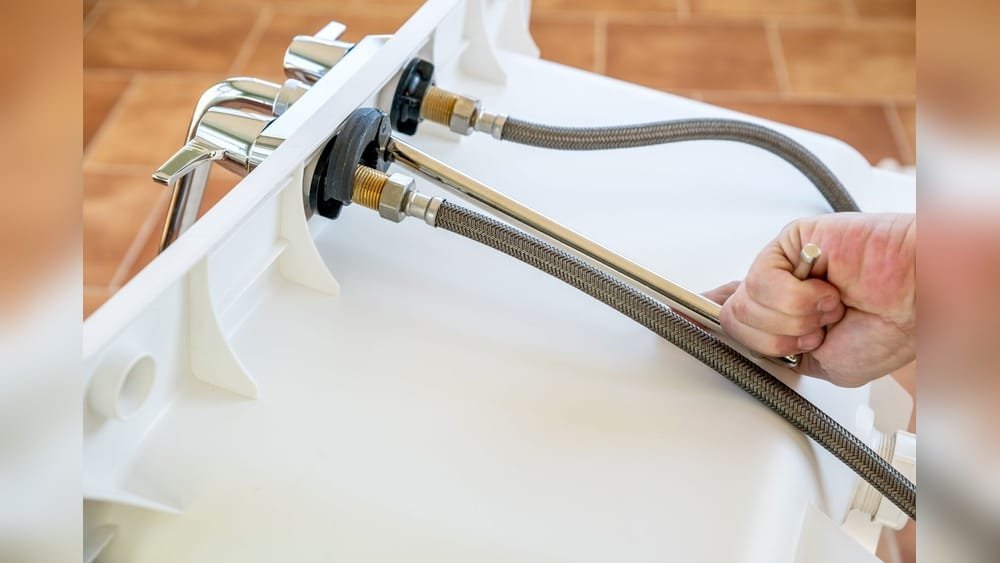
If you’ve ever tried to fix a leaky faucet under the sink, you know how tough those tight spaces can be. I remember my first time squeezing under a kitchen cabinet, flashlight clamped between my teeth, struggling with regular wrenches. My hands cramped, my back ached, and I still couldn’t loosen the nut. That’s when I discovered the telescoping basin wrench—a tool that made me feel like a plumbing pro overnight.
Prime Day Pick
Limited-time Prime Day price. Check current discount on Amazon.
Let me walk you through how to use a telescoping basin wrench, step by step, based on my own hands-on experience. I’ll show you why it’s a must-have for anyone dealing with sinks, and I’ll share some tips that most beginners miss.
What Is A Telescoping Basin Wrench?
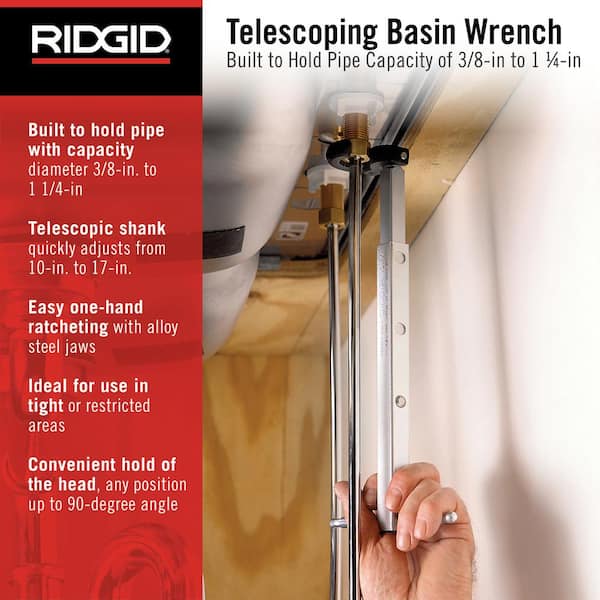
Before I owned one, I didn’t even know what a basin wrench was. Simply put, a telescoping basin wrench is a special tool for loosening and tightening nuts on faucets, especially those tucked way up behind sinks. It has a long, adjustable shaft and a spring-loaded jaw at the end. You can extend or shorten the handle to reach nuts in cramped spots. The jaw grips the nut, and the handle gives you the leverage to turn it.
Prime Day Pick
Limited-time Prime Day price. Check current discount on Amazon.
I realized quickly that this tool is not just for plumbers. Anyone can use it, and it saves a lot of frustration.
Prime Day Pick
Limited-time Prime Day price. Check current discount on Amazon.
When Do You Need A Telescoping Basin Wrench?
Let’s be honest: most of us only think about plumbing tools when something goes wrong. I first needed a basin wrench when my kitchen faucet started dripping. The shutoff valve was stuck, and the supply nut was so high up that my regular wrench couldn’t even reach it. That’s where the telescoping basin wrench shines.
Here are the main times you’ll want one:
- Replacing a faucet: Old nuts are often rusted or tight. The wrench gets up behind the sink with ease.
- Fixing leaks: If water drips from the supply line, the nut may need tightening.
- Installing new supply lines: Those nuts are always in hard-to-reach places.
If you’ve ever tried to use pliers or an adjustable wrench in a tiny cabinet, you know how impossible it feels. Trust me: a telescoping basin wrench solves that problem instantly.
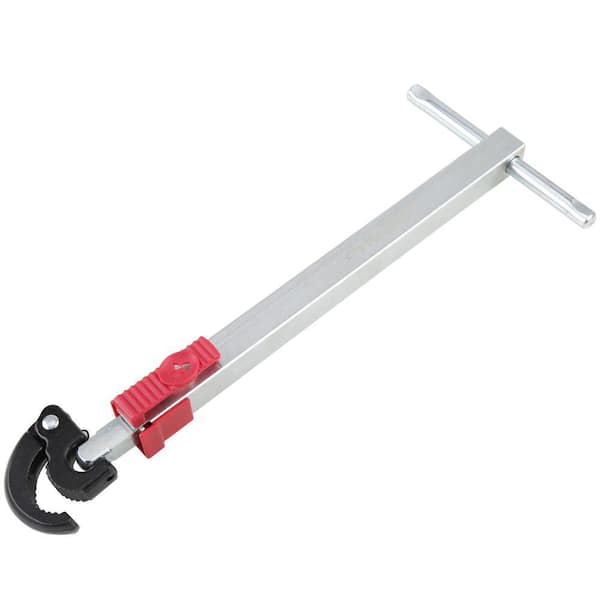
Key Parts Of A Telescoping Basin Wrench
Knowing the parts helps you use it better. When I first picked mine up, the moving parts looked confusing, but here’s what I learned:
- Telescoping handle: Adjusts to different lengths. You can make it short for shallow spaces or long for deep cabinets.
- Spring-loaded jaw: Grabs onto the nut. It can flip to fit different sizes and directions.
- Pivot head: Lets the jaw turn with the nut, even at awkward angles.
- T-handle or crossbar: Gives you a strong grip for turning.
At first, I played around with the wrench on an old nut just to get the feel. That helped me avoid mistakes when I used it for real.
How To Use A Telescoping Basin Wrench: Step-by-step
I’ll walk you through the steps I follow every time. This method has saved me hours of headaches.
1. Get Everything Ready
First, I always clear out the cabinet under the sink. Crawling under there with cleaning bottles and sponges in the way is a recipe for bruised elbows. I grab a flashlight, put down a towel to keep my shirt clean, and keep a small container for any drips.
2. Adjust The Length
I check how deep the nut is by reaching in with my hand. Then I extend the telescoping handle so the wrench reaches the nut easily, but not so long that it’s hard to control. It’s better to start shorter and extend as needed.
This is something I wish I knew the first time—the tool is much steadier at a shorter length.
3. Position The Jaw
I flip the jaw so it faces the direction I want to turn (usually counterclockwise to loosen, clockwise to tighten). The jaw is spring-loaded, so it snaps onto the nut with a little pressure. I make sure the jaw sits flat against the nut, not at an angle.
If it slips, I reposition until it grips tight.
4. Turn The Handle
Holding the T-bar, I twist the handle. Sometimes the nut is stuck, so I use slow, steady pressure. If it doesn’t move, I check the jaw’s position again. For tough nuts, I use both hands on the handle for extra strength.
Usually, after a few turns, the nut comes loose.
5. Remove Or Tighten The Nut
Once the nut is loose, I finish turning it by hand if possible. When tightening, I stop as soon as it feels snug—over-tightening can crack pipes or fittings. This is a mistake I made early on, so now I go slow.
6. Clean Up
After the job, I wipe down the wrench and collapse the handle before storing it. Keeping it clean helps it last longer.
Practical Tips And Common Mistakes
I’ve learned a few lessons the hard way. Here’s what I wish I knew from the start:
Don’t Rush
When you’re cramped under a sink, it’s easy to get frustrated. But hurrying makes you more likely to drop the wrench or strip the nut. Take your time and make sure the jaw is gripping properly before you turn.
Use A Headlamp
Holding a flashlight with my mouth was a bad idea. A cheap headlamp gives you both hands free and lights up the work area.
Mind The Jaw Direction
The jaw flips for a reason. If you’re loosening a nut, the opening of the jaw should face left. If you’re tightening, flip it so it faces right. I sometimes forgot and ended up fighting against myself.
Protect The Pipes
Old pipes, especially plastic ones, can crack if you use too much force. If the nut won’t budge, spray a little penetrating oil and wait a few minutes. Never use a hammer to hit the wrench—it’s not built for that.
Know When To Stop
Once the nut is snug, stop turning. Over-tightening can cause leaks. I learned this after cracking a supply line and spending extra money on repairs.
Comparing Telescoping Basin Wrenches To Other Tools
When I first started, I tried using regular wrenches, pliers, and even adjustable spanners. They all failed in tight spaces. Here’s a quick comparison based on my experience:
| Tool | Reach | Grip on Nut | Ease of Use in Tight Spaces |
|---|---|---|---|
| Telescoping Basin Wrench | Excellent | Strong | Very Easy |
| Adjustable Wrench | Poor | Moderate | Difficult |
| Pliers | Poor | Weak | Very Difficult |
As you can see, nothing beats a telescoping basin wrench for under-sink work.
Types Of Telescoping Basin Wrenches
Not all basin wrenches are the same. When I shopped for mine, I found a few key types:
- Standard telescoping: The most common. Handle extends, jaw flips.
- Ratchet style: Some have a ratcheting mechanism for faster turning.
- LED versions: Built-in light for dark cabinets.
- Fixed length: Cheaper, but less flexible.
Here’s how they compare:
| Type | Main Benefit | Downside |
|---|---|---|
| Standard Telescoping | Adjusts to any depth | May wobble when fully extended |
| Ratchet Style | Speeds up turning | More expensive |
| LED Version | Lights up workspace | Battery can fail |
| Fixed Length | Sturdy and cheap | Limited reach |
I went with a standard telescoping wrench. For most DIYers, that’s the best choice.
Safety And Maintenance Tips
After a few jobs, I picked up some habits that keep me safe and make my tool last longer.
- Wear gloves: Sharp edges under sinks can cut your hands.
- Check for water leaks: Before you start, shut off the water and open the faucet to drain any pressure.
- Store dry: Wipe down the wrench after each use to prevent rust.
- Oil moving parts: A drop of oil on the jaw pivot keeps it working smoothly.
- Inspect before use: If the handle or jaw is bent, replace the tool. Don’t risk a break under pressure.
Real-life Example: Replacing My Bathroom Faucet
Let me share a quick story. Last year, my bathroom faucet started wobbling. I crawled under the sink and saw the mounting nut had loosened. With my telescoping basin wrench, I reached up, gripped the nut, and tightened it in seconds.
No scraped knuckles, no cursing, and no plumber’s bill.
Later, a friend called me for help with her kitchen sink. She didn’t have a basin wrench. We tried every tool in her box but couldn’t budge the old nut. I brought my wrench over, and we had her new faucet installed in under 30 minutes.
She was amazed at how easy it was with the right tool.
Two Insights Most Beginners Miss
Let me give you two tips that aren’t obvious until you’ve used the tool a few times:
- Jaw Angle Matters: The jaw needs to be perfectly flat on the nut. If it’s crooked, it will slip and round off the nut edges. Take a moment to get the alignment just right.
- Shorter Is Stronger: The longer you extend the handle, the harder it is to control. Always use the shortest length that reaches. You’ll have more power and less wobble.

Where To Buy And What To Look For
You can find telescoping basin wrenches at any hardware store or online. Look for a strong steel shaft, a comfortable handle, and a good jaw spring. Some brands include a lifetime warranty, which is a nice bonus. Don’t just pick the cheapest option—quality matters when you’re working in tight spots. For more technical details, you can always check the Wikipedia page on basin wrenches.
Frequently Asked Questions
How Do I Know Which Size Basin Wrench To Get?
Most telescoping basin wrenches fit standard faucet nuts (about 1/2 to 1 inch). If you have a rare or oversized nut, check the wrench’s jaw opening before you buy.
Can I Use A Telescoping Basin Wrench For Other Jobs?
It’s designed for faucet and supply line nuts, but I’ve used mine to loosen nuts on washing machine hoses and in tight corners behind toilets. Just don’t expect it to work like a regular wrench for bigger jobs.
Why Does My Basin Wrench Keep Slipping Off The Nut?
Usually, the jaw isn’t flat against the nut or the nut is rounded. Try cleaning the nut with a rag and repositioning the jaw. If it still slips, you may need a new nut or a wrench with sharper jaws.
Is It Safe To Use Extra Force If The Nut Won’t Move?
Be careful. Too much force can break pipes or damage fittings. If the nut is stuck, use penetrating oil and let it soak. Sometimes gentle rocking back and forth helps loosen stubborn nuts.
How Do I Maintain My Telescoping Basin Wrench?
Wipe it clean after every use, oil the moving parts, and store it in a dry place. If the jaw spring weakens or the handle bends, it’s time for a replacement.
I hope my experience helps you tackle your next plumbing job with confidence. Using a telescoping basin wrench turned my most frustrating repairs into quick, satisfying wins. If you have one handy, you’ll wonder how you ever managed without it!
As an Amazon Associate, We earn from qualifying purchases