If you’ve ever used a Ryobi 18V Cordless Trimmer, you know how great it feels to tidy up your yard without dragging a cord behind you. But after a few uses, the string runs out. The first time this happened to me, I honestly stared at the tool for a few minutes, feeling lost. I worried I’d break something if I tried to fix it myself. But with a little patience (and a few mistakes), I figured out how to replace the string. Now, I can do it in minutes. I want to share every step and trick I learned, so you don’t feel stuck like I did.
Why String Replacement Matters
Let’s start with why replacing the string is important. The trimmer line is what actually cuts the grass and weeds. When it gets too short, the trimmer won’t cut well. If you keep trimming with a short or worn-out line, you work harder for poor results. And if you run the tool with no string, you can even damage the head.
I’ve found that regular string replacement keeps my yard looking sharp and helps the tool last longer. It also saves time: a fresh string cuts more cleanly, so I finish faster.
Tools And Materials You Need
Before you begin, here’s a quick list of what you’ll need. I learned the hard way that it’s best to gather everything first:
- Replacement string: For Ryobi 18V trimmers, use 0.065-inch or 0.080-inch twisted or round trimmer line. Check your manual for the right size.
- Scissors or garden shears: You’ll need to cut the string to length.
- Gloves: Not required, but they save your hands from blisters.
- A clean area: Small parts can roll away, so I like to work on a flat table or pavement.
Most people (including me at first) think they need special tools. You really don’t. The only thing that helps sometimes is a screwdriver, if the cap is tight.

Understanding Your Ryobi Trimmer Head
Ryobi 18V trimmers use an auto-feed spool. That means you don’t have to bump the trimmer on the ground to get more line out. Instead, the string feeds out as you trim. The spool sits inside the trimmer head, and you can either buy pre-wound spools or wind the string yourself.
I tried both ways. Pre-wound spools are easy but cost more. Winding the string yourself is cheaper and gives you more control. If you’re a hands-on person like me, you’ll probably end up winding your own.
Here’s a breakdown of the main parts:
| Part | Description |
|---|---|
| Spool | Plastic reel that holds the string |
| Trimmer Head Cap | Holds the spool in place |
| Eyelets | Small holes where string exits |
| String Line | The cutting line itself |
Knowing these parts helps a lot, especially if the string jams or doesn’t feed out right.
Step-by-step: How To Replace The String
Let me walk you through the process, just like I do it in my garage.
1. Make Sure The Trimmer Is Off
Safety first. I always remove the battery before doing anything. Once, I forgot and almost hit the power button by accident. Lesson learned—don’t skip this step.
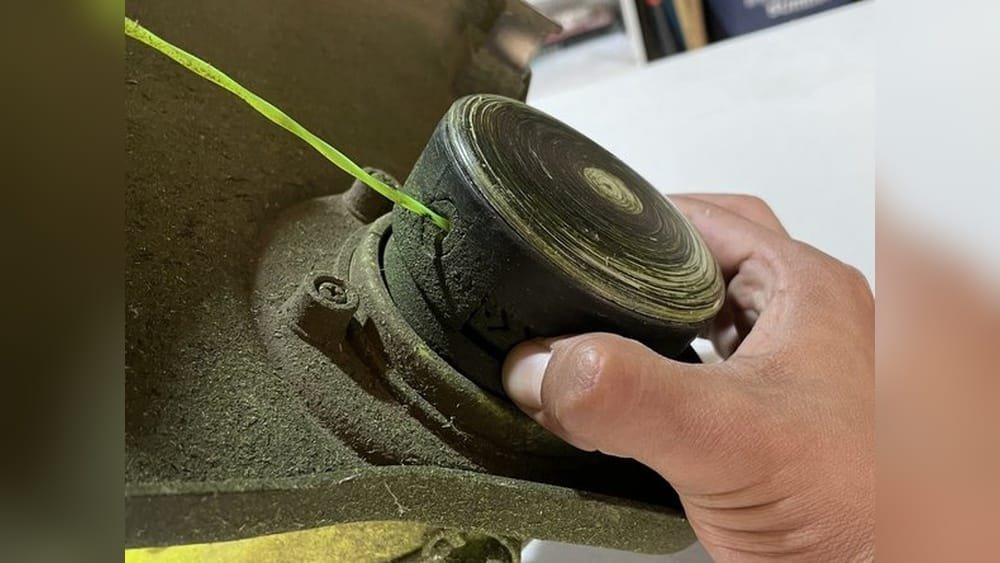
2. Remove The Spool Cap
There are tabs on the side of the trimmer head. Squeeze these tabs and gently pull off the cap. Sometimes dirt makes it sticky, so a little wiggle helps. Don’t force it too hard or you might snap the tabs.
3. Take Out The Old Spool
Pull the spool straight out. If there’s still string left, unwind what you can. Clean out any grass or dirt inside the head. I found that buildup can make the new string jam, so I use a dry rag to wipe it out.
4. Cut The Replacement String
Measure out about 10-12 feet (3-3. 5 meters) of new string. Most Ryobi spools hold up to 18 feet, but I stick with 10-12 feet to prevent jams. Use scissors for a clean cut.
Here’s a quick comparison of string types I’ve tried:
| Type | Durability | Cutting Power | Noise Level |
|---|---|---|---|
| Round | Good | Moderate | Low |
| Twisted | Great | High | Lower |
| Serrated | Very Good | Very High | Medium |
I usually go with twisted line for a good balance of durability and noise.
5. Wind The String On The Spool
Find the little hole or notch on the spool. Push about half an inch of string into this hole to anchor it. Then wind the string in the direction of the arrow (usually clockwise). Keep the wraps tight and even.
If the string overlaps or gets loose, it can jam.
I used to wind carelessly and always got stuck. Now I take my time and make sure the coils are neat. Leave about 6 inches (15 cm) of string unwound at the end.
6. Secure The String
There’s a notch on the spool edge. Tuck the end of the string into this notch to keep it from unwinding. If your spool has two lines, repeat the process for the second side. My Ryobi is a single-line model, but the process is similar for dual-line versions.
7. Replace The Spool
Thread the loose end of string through the eyelet on the trimmer head. Place the spool back into the head, making sure it sits flat. If it’s crooked, the cap won’t go back on.
8. Reattach The Cap
Snap the cap back on by aligning the tabs and pressing until it clicks. Double-check that the string feeds out smoothly. Tug it gently to make sure it moves.
9. Reinstall The Battery And Test
Pop the battery back in. Squeeze the trigger for a second. The string should spin and feed out a bit. If you hear a weird noise, or the string doesn’t come out, turn off and check your winding.

Common Problems (and How I Fixed Them)
The first few times, I made plenty of mistakes. Here are the most common issues I faced, and how I solved them:
- String jams or won’t feed: This happened when I overlapped the string or used too much. Keeping wraps neat and using 10-12 feet solved it.
- Cap won’t go on: I learned to clean out grass and dirt first. Also, making sure the spool sits flat is key.
- String breaks too fast: I once used cheap line. Upgrading to a twisted or branded line made a huge difference in durability.
- String won’t auto-feed: Usually, this means the string is stuck or wound too tight. I unwind and redo it carefully.
An insight I wish I’d known: The quality of string matters more than I thought. Cheap lines break and jam often. Spending a little more saved me time and headaches.
Buying Pre-wound Vs. Winding Yourself
I tried both ways. The pre-wound spools are fast—just pop them in. The downside is cost. Over a season, I realized I was spending way more than if I bought a big roll and wound it myself.
Here’s a quick cost comparison:
| Method | Time to Install | Cost (per season) | Convenience |
|---|---|---|---|
| Pre-wound Spool | 1-2 minutes | $15-25 | Very Easy |
| Self-Wound | 3-5 minutes | $5-8 | Easy |
If you want the fastest option, go pre-wound. If you trim a lot and want to save money, learn to wind your own. I enjoy the process—it’s a small, satisfying DIY job.

My Best Tips For Smooth String Replacement
After doing this many times, here are a few things I wish someone had told me early:
- Always keep extra string on hand. I ran out once in the middle of a job—it’s frustrating.
- Clean the trimmer head often. Grass and dirt build up fast and can cause jams.
- Don’t overfill the spool. Too much line makes it hard for the string to feed properly.
- Use the right string type. Some lines are too thick or thin for your model. Check the manual.
- Wear gloves if you’re trimming rough weeds—string can give you little cuts.
One non-obvious insight: When winding, pull the string tight but not so tight that it stretches. If you overstretch, the string gets weak and snaps more easily during use.
How Often Should You Replace The String?
This depends on how much you trim. I have a medium yard and usually replace the string every 3-4 uses. If you hear the motor spin but it isn’t cutting well, or if you see the string is less than 2 inches outside the head, it’s time.
If you trim along fences or concrete, you’ll go through string faster. That’s normal—it’s better to replace often than to struggle with poor performance.
Safety Reminders
Don’t skip safety. I used to trim in sandals until a pebble flew up and hit my foot. Always wear closed shoes, eye protection, and gloves. And never work on the trimmer with the battery in—one slip and you could get hurt.
Where To Find Official Guides
If you ever get stuck, the official Ryobi manual is a great resource. You can find helpful videos and tips on the Ryobi website or trusted sites like Wikipedia.
Frequently Asked Questions
How Do I Know What Size String To Use?
Check your trimmer’s manual or look for a sticker near the trimmer head. Most Ryobi 18V models use 0.065-inch or 0.080-inch line. Using the wrong size can cause jams.
Can I Use Generic Trimmer Line?
Yes, you can use generic brands, but make sure the size and shape match your trimmer’s specs. I found that twisted or branded lines last longer than very cheap ones.
How Often Should I Change The String?
If you trim weekly, you’ll probably need to replace the string every 3-4 weeks. If you notice the trimmer isn’t cutting well, or the string is very short, it’s time.
Why Does My String Keep Breaking?
This usually means you’re trimming against hard surfaces, using old or cheap string, or winding it too tightly. Try using better quality line and avoid overstretching when winding.
Is It Okay To Trim Wet Grass?
It’s best to avoid trimming wet grass. Wet grass can clog the trimmer head and make the string wear out faster. Wait for the yard to dry for smoother cutting.
Replacing the string on your Ryobi 18V Cordless Trimmer isn’t hard once you know the steps. The first time might take a little patience, but after that, you’ll do it in minutes. I hope my experience helps you avoid the mistakes I made and keeps your yard looking neat with less hassle. Happy trimming!
As an Amazon Associate, We earn from qualifying purchases