If you’re like me, you love a tidy yard but hate when your weed eater runs out of string in the middle of the job. The first time I had to load my Ryobi string trimmer, I felt a bit lost. I remember fumbling with the spool and wondering if I’d ever get it right. Now, after a few summers of trimming edges and cleaning up garden beds, I’ve learned a few tricks that make this task much easier. I want to walk you through exactly how I load the string on my Ryobi weed eater—step by step—so you can get back to work fast and stress-free.
Why You Need To Reload The String
String trimmers are great for cutting grass and weeds in tight spots. But the string wears down quickly. Sometimes you hit rocks or fences, and the line snaps. When that happens, the trimmer can’t cut well. If you see uneven grass or the motor is spinning but not cutting, it’s time to reload the string.
I’ve found that keeping extra string handy saves me a lot of frustration. I used to buy pre-loaded spools, but winding the string myself is cheaper and not hard once you get the hang of it.
What You Need Before You Start
Let me share what I always gather before I begin. Having everything ready makes the whole process smoother.
- Replacement trimmer line (usually 0.065″ or 0.080″ for most Ryobi models)
- Scissors or utility knife (for cutting the line)
- A clean work area (so you don’t lose small parts)
- Protective gloves (optional, but handy if you have sensitive skin)
It’s important to check your Ryobi model. Some require a single-line spool, while others use two lines. The process is similar, but knowing which type you have helps a lot. I made this mistake once and bought the wrong string.
Now, I always check the manual or look at the spool before I head to the store.
Removing The Spool Cap
The first step is to get the old spool out. I remember the first time I did this, I was worried I’d break something. But don’t worry, it’s actually simple.
- Unplug the trimmer if you use an electric model or remove the battery for cordless ones. Safety first!
- Hold the trimmer head steady. Press in the tabs on the side of the spool cap. On most Ryobi trimmers, you’ll find two tabs, one on each side.
- Squeeze both tabs and pull the cap straight off. Sometimes it sticks, so wiggle gently.
- Set the cap aside where it won’t roll away.
One tip I learned: do this part over a towel or in the grass. That way, if a spring pops out, you won’t lose it.
Taking Out The Old Spool
With the cap off, you’ll see the spool sitting in the head. Lift it straight out. If there’s any string left, unwind and throw it away. Sometimes grass or dirt gets trapped inside. I use a cloth to wipe the inside clean.
This keeps the trimmer running smoothly and prevents jams later on.
Choosing The Right Trimmer Line
Ryobi trimmers are picky about line size. Most of mine take 0.080-inch line, but some older models use 0.065-inch. If you use line that’s too thick, the spool won’t spin right. Too thin, and it breaks fast.
Here’s a quick comparison I made to help remember the sizes:
| Line Size | Best For | Notes |
|---|---|---|
| 0.065″ | Light grass | Most electric Ryobi models |
| 0.080″ | Thicker weeds | Most cordless and gas models |
| 0.095″ | Heavy brush | Not for all Ryobi trimmers |
Always check your trimmer head for a sticker with the right size, or look in your manual. Once, I tried 0. 095″ line, and my Ryobi just jammed up. Lesson learned!
Cutting The Right Length Of Line
How much line do you need? For most Ryobi models, 10 to 15 feet is enough. I usually pull the line out next to my arm—one full arm span is about five feet, so I measure two or three spans.
Too much line is hard to wind, and too little won’t last long.
Cut the line with scissors or a utility knife. Be careful; trimmer line can snap back if you pull too hard.
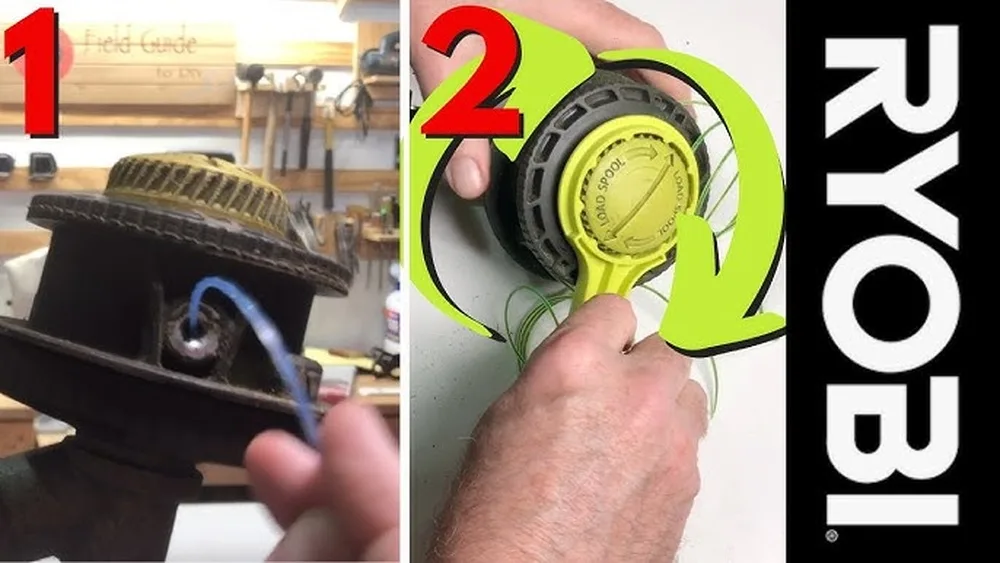
Winding The Line On The Spool
This is the part that confused me at first. But it gets easy with a bit of practice. Here’s how I do it:
- Find the starter hole on the spool. There’s usually a small hole or notch.
- Insert about half an inch of line into this hole. Bend it so it holds in place.
- Hold the spool in one hand. With the other, wind the line in the direction of the arrow printed on the spool. This is important! If you wind it the wrong way, the line will not feed correctly when you use the trimmer.
I keep the wraps neat and tight, laying each coil next to the last. If the line crosses over itself, it can jam or break. When I’m almost done, I leave about six inches of line unwound.
If you have a dual-line spool, repeat with a second piece of line. Each section will have its own starter hole and winding channel.
Here’s a simple comparison of single and dual-line spools:
| Spool Type | Line Pieces | Winding Tip |
|---|---|---|
| Single-line | 1 | Wrap in one direction |
| Dual-line | 2 | Wrap each line in its own channel |
Securing The Line On The Spool
Once the line is wound, you need to keep it from unraveling while you put the spool back. On my spool, there are small notches on the edge. I press the free end of the line into the notch. This holds it tight and prevents the coils from coming loose.
If you have two lines, do the same for both. This step saves a lot of headaches—if the line unspools, you’ll have to start over.

Reinstalling The Spool In The Trimmer Head
This part made me nervous at first, but it’s simple if you go slow.
- Hold the spool so the loose end of the line sticks out.
- Thread the line through the eyelet (the small hole in the trimmer head).
- Set the spool into the head, making sure it sits flat. The line should slide smoothly through the hole.
If you have a dual-line model, do this for each line and eyelet. Make sure you don’t cross the lines. I once did this wrong, and the trimmer wouldn’t feed the string.
Replacing The Spool Cap
Now, pick up the cap you set aside earlier.
- Align the cap with the trimmer head.
- Press it down until you hear a click. Make sure both tabs snap into place.
Give the line a gentle tug. It should move a little but not pull out. If it’s stuck, open the cap and check for tangles.

Testing The Trimmer
Before I start trimming, I like to test the trimmer in a safe spot.
- Plug in or reattach the battery.
- Hold the trimmer away from your body.
- Press the trigger and let the head spin.
The line should extend out, and you should hear a sharp whirring sound. If the line is too short, tap the trimmer head gently on the ground. Most Ryobi models have a bump-feed system that releases more line when you tap.
If the line doesn’t feed, stop and check for jams or winding mistakes. Don’t force the trimmer—it can damage the motor.
Common Mistakes And How To Avoid Them
I’ve made a lot of errors, especially my first summer. Here are a few common ones and how you can dodge them:
- Winding the line the wrong direction – Always follow the arrow on the spool. Going the wrong way means the line won’t feed.
- Using the wrong line size – Check your model number. Too thick or thin line causes jams or quick breaks.
- Overfilling the spool – Too much line makes it hard for the bump-feed to work. Stick to 10-15 feet.
- Not securing the line ends – If you skip the notch, the line unravels, and you have to start over.
- Crossing the lines – On dual-line spools, never let the lines overlap. Keep each in its own channel.
Pro Tips From My Experience
Here are a few things I wish I knew when I started:
- Buy quality trimmer line. Cheap line breaks fast and can jam your trimmer. I spend a bit more for a good brand, and it lasts longer.
- Clean the trimmer head each time. Grass and dirt build up fast. A clean head means smoother feeding.
- Wind slowly and keep coils tight. Rushed winding leads to messy tangles. Take your time.
- Keep spare line handy. I keep a small roll in my garden shed. That way, I never run out mid-project.
When To Replace The Spool Instead
Sometimes, reloading the string isn’t enough. If your spool is cracked, warped, or won’t hold line, it’s time for a new one. I check for cracks every few months, especially if I use the trimmer a lot.
Replacing a spool is simple: just pop the old one out and snap the new one in. Pre-wound spools cost more but save a little time. I use them when I’m in a rush or just feeling lazy.

How Often Should You Reload?
It depends on your yard size and how tough your weeds are. For my small yard, I reload every 3-4 weeks in summer. If you have thick weeds or a big lawn, you might need to reload every couple of uses.
Why Not All String Trimmers Load The Same Way
I’ve used other brands, but Ryobi’s system is one of the easiest. Still, there are differences from model to model. Some have reel-easy heads where you just thread the line and twist. I like those, but the basic method above works for almost all Ryobi trimmers.
If you have a very old or very new model, check your user manual or look up a video from Ryobi’s official site. That’s how I learned my first time—seeing the process made it much clearer. You can also visit the official Ryobi Tools website for diagrams and model specifics.
Frequently Asked Questions
How Do I Know What Size Trimmer Line To Use?
Check your trimmer head or manual. Most Ryobi trimmers use 0.065″ or 0.080″ line. Using the right size helps prevent jams and line breaks.
Why Does My Trimmer Line Keep Breaking?
If your line snaps often, you may be hitting hard surfaces, using the wrong size, or winding the spool incorrectly. Quality line and careful winding help a lot.
Can I Use Any Brand Of Trimmer Line?
Yes, but make sure it’s the correct diameter for your Ryobi model. I’ve used other brands, but I stick to well-known ones for better results.
How Do I Get The Line To Feed Out While Trimming?
Most Ryobi trimmers use a bump-feed system. Tap the trimmer head gently on the ground while it’s running, and more line should come out.
What If The Spool Won’t Fit Back In?
Double-check that you wound the line in the right direction and didn’t overfill the spool. If it still won’t fit, your spool may be damaged and need replacing.
Loading a Ryobi weed eater string trimmer can seem tricky the first time, but it gets much easier with practice. Remember, the key steps are: use the right line, wind it tightly in the right direction, and keep your trimmer head clean. With these tips and a bit of patience, you’ll be back to perfect lawn edges in no time. Happy trimming!
As an Amazon Associate, We earn from qualifying purchases