Testing coaxial cable might sound technical, but it’s something I’ve done many times—sometimes to fix my own TV or to help friends solve internet issues. In my experience, a simple coaxial cable can be the silent reason behind fuzzy pictures, slow internet, or even no connection at all.
The good news is, you don’t need to be an engineer to check if your coaxial cables are working right. With a few tools and a bit of patience, anyone can do it.
Let me walk you through everything I’ve learned about testing coaxial cable, from what tools you need to what mistakes to avoid. I’ll also share some stories and tips that you won’t find in a technical manual. If you’ve ever wondered why your cable isn’t working or how to check it, you’re in the right place.
What Is Coaxial Cable And Why Test It?
I remember the first time I heard the term coaxial cable. I was helping my uncle set up his TV, and we found a thick, round cable with metal ends. He called it “coax.” These cables are everywhere—in TVs, routers, satellite dishes, and security cameras.
A coaxial cable has a single copper wire in the center, covered by insulation, then a layer of metal shield, and finally a plastic cover. The design helps carry signals with less interference. But, like all things, these cables can fail.
Sometimes you get a weak signal, or it stops working altogether.
So why test it? Because a bad coaxial cable can waste hours of troubleshooting. I’ve seen people replace their whole router, only to find out it was just the cable. Testing saves time and money.
Common Reasons To Test Coaxial Cable
Based on my experience, here are the main reasons you might need to check your coaxial cables:
- Signal loss – TV channels look blurry or freeze.
- No connection – Devices can’t find a signal at all.
- Internet problems – Slow speeds or dropped connections.
- Physical damage – Cable looks cut, bent, or crushed.
- After renovations – Cables might get pinched or moved during house work.
Once, I was helping a friend who couldn’t get any TV channels. We spent an hour resetting devices, but the real problem was a cable chewed by his cat! Testing the cable found the issue in minutes.
Tools You Need For Testing
You don’t need a full toolbox, but a few simple items help a lot. Over the years, I’ve used:
- Coax cable tester – Checks continuity and signal.
- Multimeter – Measures resistance and voltage.
- Flashlight – For spotting damage.
- Coax terminators – To safely end a line during testing.
- Screwdriver – To remove wall plates or connectors.
If you want to get a bit more advanced, a signal strength meter can show how much signal is coming through. But for most home testing, a basic tester or multimeter is enough.
How To Visually Inspect A Coaxial Cable
Before using any tester, I always start with my eyes. You’d be surprised how often the problem is visible. Here’s what I do:
- Look for kinks and bends. Sharp bends can break the wire inside, even if the outside looks fine.
- Check for cuts or cracks. Any gap in the plastic can let water in, which ruins the cable.
- Inspect the connectors. The metal ends should be shiny, not rusty or loose.
- Check for animal damage. I’ve seen cables chewed by pets or even mice.
Once, I found a cable with paint on the end—someone painted the wall and covered the connector! That blocked the signal.
Step-by-step: Testing Coaxial Cable With A Cable Tester
This is my favorite method because it’s simple and reliable. Here’s how I do it:
- Unplug the cable from both devices (TV, router, etc. ).
- Connect one end to the main part of the tester.
- Attach the remote part to the other end of the cable.
- Turn on the tester. If the cable is good, you’ll see a green light or a beep.
- Check the results. If you see red or nothing, the cable is bad.
I learned this the hard way when I kept swapping out devices, not knowing my cable was dead. A tester showed me the problem in seconds.
Using A Multimeter To Test Continuity
If you don’t have a cable tester, a multimeter works too. I’ve done this many times, especially before I bought a proper tester.
Steps To Test Continuity
- Set the multimeter to the continuity setting (usually a sound symbol).
- Touch one probe to the center pin on one end.
- Touch the other probe to the center pin on the other end.
- Listen for a beep or watch the display. Beep means the wire is good.
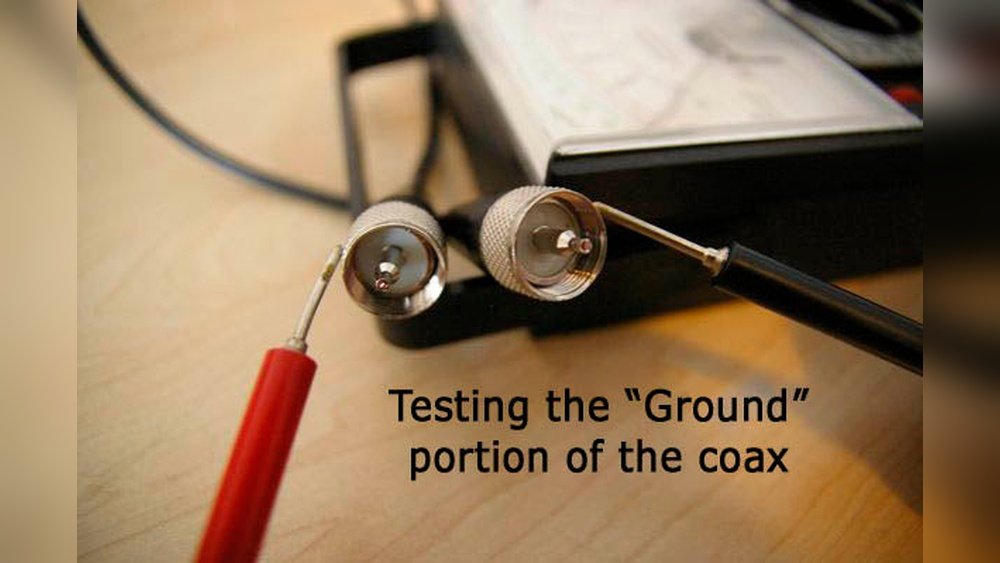
- Repeat for the outer shield by touching the metal part.
- Check for shorts by testing between the center pin and outer shield. There should be no beep.
If you hear a beep when testing between center and shield, the cable is shorted and must be replaced.

Testing Signal Strength
Sometimes, the cable looks fine but the signal is weak. In this case, I use a signal strength meter. You can buy one at most electronics stores.
How I Use A Signal Meter
- Connect the meter between the wall outlet and your device.
- Check the reading. A strong signal means the cable is fine.
- If the signal is low, try another cable. If it improves, you found the problem.
Once, I was helping a neighbor with slow internet. The modem showed weak signal. Swapping cables made the speed jump from 10 Mbps to 60 Mbps. That’s how much a cable matters.
Comparing Testing Methods
Over the years, I’ve tried different ways to test cables. Here’s a quick comparison to help you choose the right method:
| Method | Tools Needed | Best For | Drawbacks |
|---|---|---|---|
| Visual Inspection | Flashlight, eyes | Finding physical damage | Can miss hidden faults |
| Cable Tester | Coax tester | Quick checks | Needs a tester |
| Multimeter | Multimeter | Checking continuity | More steps |
| Signal Meter | Signal strength meter | Signal problems | Can be costly |

Signal Loss And What It Means
Signal loss, or attenuation, happens when the signal gets weaker as it travels through the cable. Long cables, or ones with poor shielding, have more loss. I once measured a 50-foot cable and found the signal dropped by over 20%. That’s a big deal for high-speed internet or HD TV.
Here’s how different cable types compare for signal loss:
| Cable Type | Max Length (ft) | Signal Loss (dB/100ft at 100MHz) |
|---|---|---|
| RG6 | 200 | 5.5 |
| RG59 | 100 | 7.4 |
| RG11 | 400 | 3.2 |
If you’re running a long cable, pick the right type. I once used RG59 for a long run and lost half the signal before it reached the TV.
Troubleshooting Tips And Common Mistakes
Over time, I’ve learned a few tricks—and made some mistakes—while testing coaxial cables:
- Don’t skip the basics. Always check both ends are screwed in tight.
- Label your cables if you have more than one. I once spent an hour testing the wrong cable!
- Don’t bend the cable sharply. It can break inside, even if the outside looks fine.
- Replace old connectors. Rusty or loose connectors ruin the signal.
- Test before buying new devices. I’ve seen people buy new TVs or modems when a $5 cable was the real problem.
One thing beginners miss: splitters can also fail. If you use a splitter (one cable in, two out), test both sides. Sometimes the splitter, not the cable, is the weak point.
When To Replace A Coaxial Cable
If your cable fails any test—no continuity, short circuit, or low signal—it’s time to replace it. I always keep a spare cable handy for quick swaps. Even if a cable looks fine, it can go bad inside. If you see black spots, green corrosion, or melted plastic, toss it.
Also, if the cable is over 10 years old, or has been outside, it’s smart to upgrade. New cables have better shielding and last longer.
How To Test A Coaxial Outlet
Sometimes the problem isn’t the cable, but the wall outlet. Here’s how I check:
- Test the outlet with a known good cable. If the problem stays, it’s the outlet.
- Check the connections inside the wall (if you feel comfortable).
- Test other outlets in the house. If all fail, it may be a bigger wiring issue.
I once found a loose wire inside the wall plate, and tightening it fixed the whole system.
Diy Vs Professional Testing
Most home testing is easy with the steps above. But if you have a big system—like a home theater or security cameras—a pro might have better tools. They use special meters that show exact signal levels and even find hidden faults.
In my experience, though, 90% of home problems can be solved with a visual check and a basic tester.
Safety Tips
Testing coaxial cables is usually safe, but a few safety steps are smart:
- Unplug devices before testing.
- Don’t test live cables connected to power.
- Wear gloves if the cable is old or outside.
- Be careful inside walls—there could be other wires.
I once shocked myself by testing a cable still plugged into a powered splitter. Not fun! Always unplug first.
Real-life Example
A few years ago, my internet kept dropping. I called the service provider, but they said everything was fine on their end. I checked my modem, router, and all the settings—still no luck. Finally, I tested the coaxial cable and found the center pin was loose. Replacing the cable fixed everything in two minutes. That’s when I learned: always test the cable first.
Where To Learn More
If you want to see diagrams or advanced tools, check out the Wikipedia page on coaxial cable. It’s full of details about types of cables, uses, and more.

Frequently Asked Questions
What Is The Most Common Reason For Coaxial Cable Failure?
The most common reason is physical damage—like bends, cuts, or loose connectors. Water and corrosion can also cause problems, especially with outdoor cables.
Can I Use A Regular Multimeter To Test Coaxial Cable?
Yes, you can. Set it to continuity mode and test the center pin and the shield. It’s not as fast as a dedicated tester, but it works.
How Often Should I Check My Coaxial Cables?
I check mine once a year or whenever I notice signal problems. If you live in an old house or have pets, check more often.
Is It Safe To Test Coaxial Cables Myself?
It’s safe as long as devices are unplugged from power. Never test a live cable, and avoid damaged wires.
What Are Signs I Need To Replace My Coaxial Cable?
Replace the cable if you see rust, green spots, melted plastic, or broken ends. Also, replace old cables if you upgrade to faster internet or HD TV.
Testing coaxial cables is easier than you think. With a few tools and these tips, you can solve most problems yourself. And trust me, checking the cable first can save you hours of frustration.
As an Amazon Associate, We earn from qualifying purchases