Sanding wood floors can feel scary the first time. I know it did for me. When I started, I was worried I’d mess up my beautiful floors. But after a lot of research, some trial and error, and a few sore muscles, I figured out how to do it right.
Today, I want to share everything I learned. If you’re thinking about sanding your own wood floors, I hope my experience helps you avoid mistakes and get a result you love.
Why Sand Your Wood Floors?
Sanding isn’t just about making your floors look good. It’s about keeping them healthy. Over time, floors get scratches, stains, and dents. These make your home feel older and less clean. Sanding removes the old finish and smooths out these problems.
After sanding, your floors are ready for a new finish. This protects the wood and makes it shine.
For me, my floors had deep scratches from moving furniture. There were also water stains from plants. No matter how much I cleaned, they still looked tired. Sanding brought life back to my rooms.
What You Need To Sand Wood Floors
Before you start, you’ll need some tools and safety gear. I learned the hard way that missing even one item can slow you down. Here’s what I recommend:
- Drum or belt sander (for main areas)
- Edge sander (for corners and edges)
- Vacuum (preferably a shop vac)
- Sandpaper (various grits: 36, 60, 80, 100, 120)
- Floor scraper (for tough spots)
- Hammer and nail set (to set nails below the surface)
- Safety gear: Dust mask, ear protection, goggles, gloves
- Plastic sheeting and tape (to seal doors and vents)
- Extension cords
It’s tempting to skip safety gear, but don’t. The dust is intense and can harm your lungs and eyes. I wore a mask and still found dust in my nose for days.
Tool Comparison: Drum Sander Vs. Belt Sander
Choosing the right sander makes a big difference. Here’s how I compared the two main types:
| Sander Type | Pros | Cons |
|---|---|---|
| Drum Sander | Removes material fast, good for heavy damage | Can gouge floor if not careful |
| Belt Sander | Easier to control, less risk of gouging | Slower on thick finishes |
I went with a drum sander because my floors were in rough shape. If your floor just needs a light refresh, a belt sander might be enough.
Prepping The Room
Preparation is boring, but it saves hours later. First, I moved every piece of furniture out. I even took off doors that swung into the room. I used a vacuum to get all the dust and dirt from the floor.
Then, I checked for loose boards and nails sticking up. I used a hammer and nail set to drive them below the surface. This step is crucial. If you skip it, a nail can rip your sandpaper or, worse, the sander drum.
I sealed off doorways and vents with plastic sheeting and tape. This kept the dust from spreading to other rooms. I learned the hard way that dust can travel far. Even with doors closed, it found its way into my kitchen the first time.
Sanding: Step-by-step
Let’s get into the real work. Here’s how I sanded my floors, step by step.
1. Start With Coarse Sandpaper
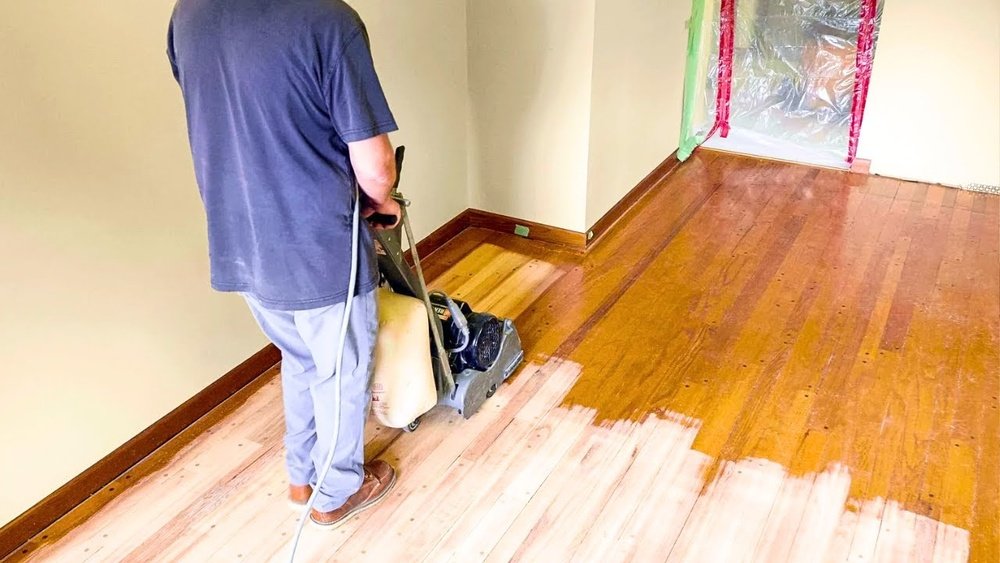
I began with 36-grit sandpaper. This is very rough. It removes old finish and smooths out deep scratches fast. I loaded the drum sander with a fresh sheet, plugged it in, and took a deep breath.
I started the sander while it was off the floor, then gently lowered it onto the wood as I walked forward. Never start or stop the sander while it’s sitting still on the floor. I made that mistake once and left a deep groove in the wood.
You don’t want that.
2. Sand With The Grain
Always sand in the same direction as the wood grain. If you go across the grain, you’ll scratch the surface, and these scratches will show later. I went slowly, letting the sander do the work. If you rush, you’ll miss spots or create uneven patches.
After each pass, I checked the sandpaper. If it looked clogged or worn out, I changed it. Fresh sandpaper works better and saves time.
3. Overlap Each Pass
To avoid stripes, I overlapped each pass by about one-third of the sander’s width. This helps blend the areas together. I learned this after my first floor looked like a zebra. Don’t make my mistake—overlap every time.
4. Use The Edge Sander
The drum sander can’t reach the edges of the room. For these spots, I used an edge sander with the same grit as the main sander. I moved slowly and kept the sander flat. It’s easy to tip it and create a dip along the wall. I did a test patch in a closet first, just to get the feel.
5. Repeat With Finer Grits
After the first pass, my floor looked rough but clean. I vacuumed up all the dust, then switched to 60-grit sandpaper. I repeated the process, overlapping each pass. Then I moved to 80-, 100-, and finally 120-grit. Each time, the floor got smoother.
Here’s a summary of the sanding sequence I followed:
| Step | Sandpaper Grit | Purpose |
|---|---|---|
| 1 | 36 | Remove finish, deep scratches |
| 2 | 60 | Smooth roughness, light scratches |
| 3 | 80 | Refine surface, prep for finish |
| 4 | 100 or 120 | Final smoothing |
6. Clean Up Between Grits
After each sanding round, I vacuumed and wiped the floor with a damp cloth. Even small bits of dust can cause scratches when you move to a finer grit. This step makes your finish look perfect later.
7. Hand-sand Hard-to-reach Spots
Some areas, like corners or under radiators, couldn’t be reached with big machines. For these, I used a floor scraper and hand sandpaper. It took extra time, but even a small missed spot will show once you add finish.
Common Mistakes (and How I Fixed Them)
Even with good instructions, things can go wrong. Here are mistakes I made, and how I solved them:
- Gouges from stopping the sander: Always keep the sander moving when it’s on the floor. If you stop, the drum digs in. I fixed small gouges by sanding gently with a hand sander.
- Uneven color after finishing: This happened when I didn’t sand evenly between grits. The solution is patience. Go slow and don’t skip steps.
- Missed nails tearing sandpaper: I missed a few nails during prep. Always double-check the floor before starting.
- Dust everywhere: My first time, I didn’t seal vents well. Now, I cover every vent and use a shop vac during sanding.
After Sanding: Getting Ready For Finish
Once I finished sanding, my floors looked bare but super smooth. I vacuumed three times, wiped down walls and baseboards, and waited for the dust to settle before wiping with a damp cloth. Patience here means your finish will go on clean and clear.
It’s tempting to rush, but finishing over dust is a recipe for disappointment. I let the floor dry fully before applying stain or finish.

How Long Does It Take?
Sanding isn’t quick, but it’s manageable. Here’s how long it took me for a 300-square-foot room:
- Prep: 1–2 hours
- Sanding (all grits): 4–6 hours
- Edge sanding: 1–2 hours
- Clean-up: 1 hour
If your floor is bigger or has more damage, it’ll take longer. The first time always takes the most time, but you get faster with practice.
Is It Worth Doing Yourself?
For me, sanding my own wood floors saved a lot of money. Professionals quoted me over $2,000. I spent around $200 on rentals and supplies. My arms were sore, but I got a sense of pride every time I walked into the room.
If you’re willing to put in the time, you can do it. But if you have expensive or historic floors, consider hiring a pro for at least the first time.

How To Choose The Right Sandpaper Grit
When I started, I was confused by all the grit numbers. Here’s a simple breakdown:
| Grit Number | Best For |
|---|---|
| 24–36 | Removing paint, thick finish, deep damage |
| 40–60 | Smoothing after rough sanding |
| 80–100 | General smoothing, prep for finish |
| 120+ | Final polish before finishing |
Always start with the lowest grit you need, but don’t go too rough unless your floor really needs it. For my floors, 36 was enough. If your finish is thin, you might start with 60.
Non-obvious Tips I Wish I Knew
Some things are not in most guides, but they made a big difference for me:
- Rent extra sandpaper. Machines can chew through it fast, especially if your floor is sticky or very old. I ran out mid-job and had to rush to the store, which delayed everything.
- Work with the light. Sand when the room is bright. I noticed missed spots only after the sun came out. Move around and look at the floor from different angles.
- Take breaks. It’s hard work, especially on your back and arms. Take breaks to avoid mistakes from being tired.

When To Call A Professional
There are times when I would not recommend doing it yourself:
- If your floors are thin from past sanding (less than 1/4 inch above the tongue)
- If you have parquet or inlaid designs (these need special care)
- If you have valuable antique wood
In these cases, a pro can keep you from making an expensive mistake. Sometimes, peace of mind is worth the cost.
Where I Learned More
I picked up a lot from talking to people at the rental store and watching online videos. One of the best resources I found was the This Old House guide. They break down each step with pictures and clear tips.
Frequently Asked Questions
How Much Dust Does Sanding Wood Floors Make?
A lot. Even with dust bags, fine powder gets everywhere. Seal doors and vents, and wear a dust mask. I vacuumed several times and still found dust days later.
Can I Sand Wood Floors By Hand?
Yes, but only for small areas. Large rooms would take forever and may not be smooth. Use a machine for most of the work and hand sand corners.
How Often Can I Sand My Wood Floors?
Most solid wood floors can be sanded 3–4 times in their life. Each sanding removes some wood. If your floors are thin, be extra careful.
Do I Need To Remove All Furniture Before Sanding?
Absolutely. Sanding creates a lot of dust, and machines need space to move. Empty the room, including rugs and curtains, for best results.
What’s The Best Finish After Sanding?
It depends on your needs. Polyurethane is tough and easy to clean. Oil finishes look natural but need more upkeep. I used water-based polyurethane for a clear, fast-drying finish.
Refinishing wood floors isn’t easy, but it’s rewarding. If you prepare well, take your time, and learn from my mistakes, you can bring new life to your home. Happy sanding!
As an Amazon Associate, We earn from qualifying purchases