Can a Dremel Cut Tile? My Honest Experience (And What I Wish I Knew Before)
If you’re like me, you probably love small power tools. They’re fun, easy to use, and they make tough jobs simple. But sometimes, you wonder if these little tools can handle big tasks. That’s exactly what I thought when I first tried to cut tile with my Dremel. I was nervous, a bit excited, and honestly, not sure what to expect.
So, can a Dremel cut tile? Yes, it can! But there are some important things to know before you start. I learned a lot through trial and error, and I want to share everything with you—what worked, what didn’t, and what I wish I’d known from the start.
Why I Chose A Dremel For Tile Cutting
I started my bathroom renovation project with a tight budget. I didn’t own a big wet saw, and I didn’t want to buy one for just a few cuts. I already had my trusty Dremel in the toolbox. I wondered, “Can this little thing really cut through ceramic tile?
”
After reading a few forums and watching some YouTube videos, I decided to give it a shot. It seemed like the right tool for small jobs, odd-shaped cuts, or fixing mistakes when other saws couldn’t reach.
Types Of Dremel Tools And Accessories For Tile
Not all Dremel tools are the same. For tile, you need the right tool and the right bit. Let me break down what I learned:
Dremel Rotary Tools
Most people have a Dremel rotary tool. These are the classic, hand-held tools that spin bits at high speeds. They’re light and easy to control, which is great for beginners. I used the Dremel 4000, but the 3000 and newer models work just as well.
Tile Cutting Bits
This is where I made my first mistake. I tried a regular cutting wheel first—bad idea. It barely scratched the surface. After some research, I found out you need a diamond wheel or a carbide tile cutting bit for tile. These are made for hard materials.
Here are a few bits I tried:
- Dremel 562 Tile Cutting Bit – Good for curved cuts. It works well for small shapes, but you must go slow.
- Dremel EZ545 Diamond Wheel – Great for straight lines. It’s thin and strong, and it lasts longer than the basic bits.
The difference between the bits is huge. The diamond wheel cuts smoother and faster, while the 562 bit can handle curves but wears down quickly.
Dremel Multi-max (oscillating Tool)
Later, I got my hands on a Dremel Multi-Max. It’s an oscillating tool, not a rotary. With the right blade, it can also cut tile, but it’s slower. I use it for grout removal or making plunge cuts, not for long straight lines.
Comparing Dremel With Other Tile Cutting Tools
I want to be honest: a Dremel is not the best for every tile job. Here’s a quick comparison of Dremel versus other common tile cutters I’ve tried.
| Tool | Best For | Speed | Precision | Mess Level |
|---|---|---|---|---|
| Dremel Rotary Tool | Small, detailed cuts | Slow | High | Low |
| Tile Wet Saw | Large, straight cuts | Fast | Medium | High (water and dust) |
| Manual Tile Cutter | Score and snap | Fast | Low | Very low |
| Angle Grinder | Thick or tough tiles | Medium | Medium | High (dust) |
Key takeaway: Use a Dremel for small jobs or shapes other tools can’t handle. For cutting lots of tiles or thick porcelain, get a wet saw or angle grinder.
What Tiles Can A Dremel Cut?
This was my next big question. I found out that a Dremel can cut most ceramic tiles and some porcelain tiles, as long as they aren’t too thick. Glass mosaic tiles are also possible, but you need a steady hand and the right bit.
Caution: Don’t try to cut thick stone tiles like granite or marble. The Dremel isn’t powerful enough, and you’ll wear out your bits fast.
Quick Reference Table
Here’s a quick guide from my own projects:
| Tile Type | Dremel Effective? | Notes |
|---|---|---|
| Ceramic | Yes | Best results, especially for thin tiles |
| Porcelain | Sometimes | Works with thin tiles only |
| Glass Mosaic | Yes | Good for curves and shapes |
| Stone (Granite/Marble) | No | Not recommended |
How To Cut Tile With A Dremel: My Step-by-step Method
Let me walk you through how I do it. I’ve made mistakes, and I’ve learned what works best.
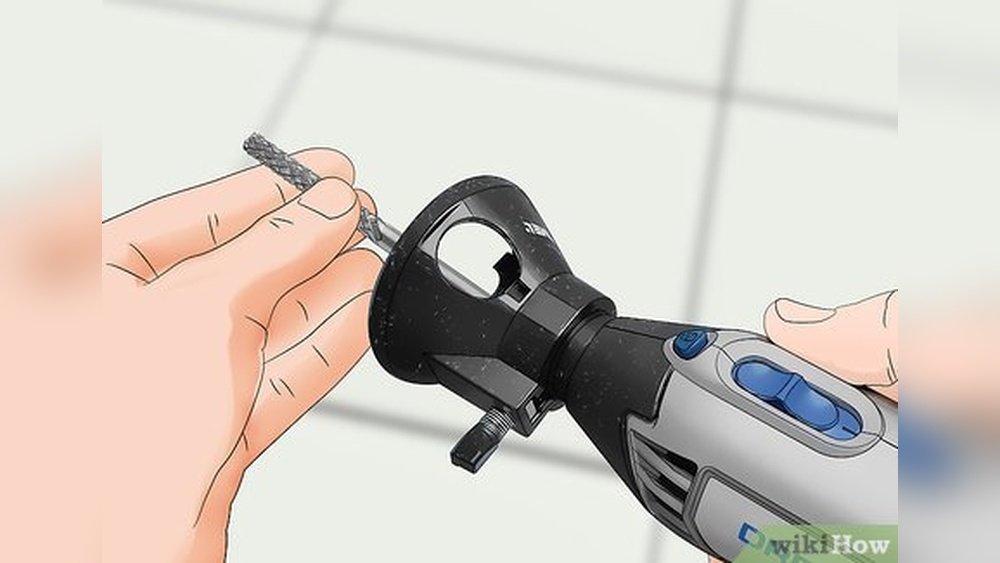
1. Gather Your Tools And Safety Gear
You need:
- Dremel rotary tool (preferably variable speed)
- Diamond wheel or tile cutting bit
- Safety glasses and a dust mask
- Work gloves
- Clamp or vice (to hold the tile)
- Marker or pencil (for marking your line)
- Ruler or straightedge
I can’t stress safety enough. Tiles chip, and bits can break. Always protect your eyes and lungs.
2. Mark Your Cut
Use a pencil or marker to draw your line. For curves, I trace with a template or cup. This simple step saved me from many crooked cuts.
3. Secure The Tile
I learned the hard way—do not try to hold the tile by hand. It slips, vibrates, and you can hurt yourself. Use a clamp or a vice. If you’re cutting a big tile, put a towel under it to prevent scratches.
4. Set Up Your Dremel
Attach your bit. For straight lines, I prefer the EZ545 diamond wheel. For holes or curves, I use the 562 tile bit. Set the speed to medium-high (around 20,000 RPM). Too fast can burn the tile; too slow makes it chip.
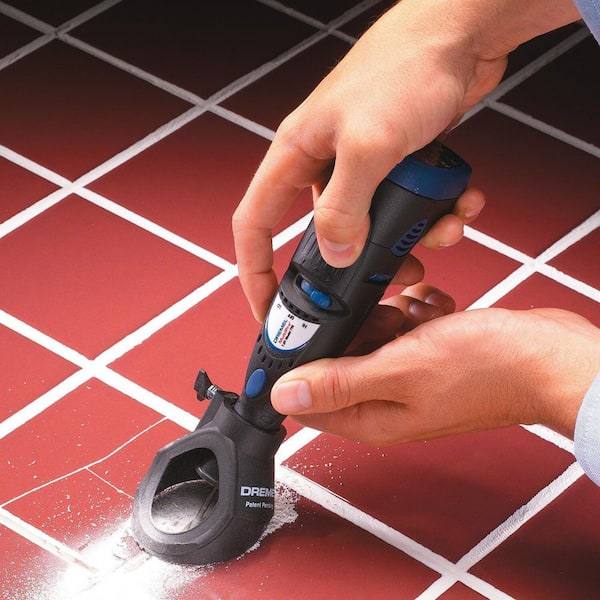
5. Start The Cut
Hold the Dremel like a pencil. Use both hands if you can. Start at the edge of the tile and let the bit do the work. Don’t push hard. If you force it, the tile will crack or the bit will wear out.
For straight cuts, keep the wheel flat against the tile. For curves, move slowly and don’t twist the bit too much.
6. Keep The Bit Cool
This is a trick I wish I’d learned sooner. Cutting tile generates a lot of heat. Stop every 10-20 seconds and dip the bit in water or spray the cut with a little water. This keeps the bit from burning out.
7. Finish And Smooth The Edges
Once you’ve finished the cut, the edges might be rough. I use a sanding drum or a small diamond file to smooth them. This makes the tile look professional and prevents cuts on your fingers.
My Real-world Results (and Surprises)
When I first tried, my cuts were rough. I broke a few tiles. But after some practice, I started getting clean lines, especially on ceramic. The Dremel is not the fastest, but it gives you a lot of control.
One surprise: I was able to make perfect U-shaped cutouts for pipes—something no manual cutter could do. The Dremel really shines for these odd jobs.
But, it’s not perfect. On thick porcelain, the bit struggled and wore out fast. My advice: buy extra bits if you have a lot of cuts. Also, cutting glass tiles is possible, but the edge can chip if you rush.

Common Mistakes I Made (so You Don’t Have To)
- Using the wrong bit. Make sure you use a bit made for tile, not wood or metal.
- Going too fast. Rushing cracks the tile. Slow and steady wins here.
- Forgetting safety gear. Tile dust is sharp. Always wear goggles and a mask.
- Not cooling the bit. Hot bits wear out in minutes. Keep them cool with water.
- Not securing the tile. A loose tile will ruin your cut and might hurt you.
A lot of beginners think you can cut tile in one pass. This isn’t true. I always make several light passes, letting the Dremel do the work.
Cost Of Using A Dremel Vs Other Methods
A big reason I used my Dremel was cost. Here’s a quick look at what I spent compared to renting or buying other tools.
| Tool/Method | Approximate Cost | Reusable? |
|---|---|---|
| Dremel + Tile Bit | $60–$100 (if you own a Dremel) | Yes |
| Manual Tile Cutter | $30–$60 | Yes |
| Wet Saw Rental | $40–$60 per day | No |
| Angle Grinder + Blade | $50–$100 | Yes |
If you already own a Dremel, it’s a cheap way to do small tile jobs. For big projects, renting a wet saw might be cheaper in the long run.

Expert Tips I Learned The Hard Way
- Practice on spare tiles. My first few cuts were bad. Practice makes a big difference.
- Clean up dust right away. Tile dust is fine and gets everywhere. Wipe it up before it spreads.
- Work in a well-ventilated area. The dust can linger in the air.
- Don’t expect miracles. For large cuts or thick tiles, use the right tool for the job.
- Read the Dremel manual. It tells you the right speed for each bit.
One thing that surprised me: Dremel customer support is actually helpful. When I called about a broken bit, they gave me tips and even sent a replacement.
When Not To Use A Dremel For Cutting Tile
Even though I love my Dremel, I admit it’s not always the answer. Don’t use it if:
- You need to cut many tiles (it’s slow).
- The tile is very thick or made of stone.
- You want perfect, factory-straight lines on every tile.
In these cases, use a wet saw or a manual cutter.
Where To Find More Information
If you want to see videos and more guides, I found the official Dremel site helpful. Also, check out this guide on Wikipedia for tool history and more uses.
Frequently Asked Questions
How Long Do Dremel Tile Cutting Bits Last?
From my experience, a diamond wheel lasts for about 8-10 standard ceramic tiles if you use water to cool it. Carbide bits wear out faster, especially on porcelain. Always keep a spare on hand.
Can I Use A Dremel To Cut A Hole In Tile For Pipes?
Yes! This is actually one of the best uses for a Dremel. Use the tile cutting bit and go slow around the circle. It’s much easier than using a manual cutter for holes.
Will A Dremel Crack My Tile?
If you go too fast or push too hard, yes, the tile can crack. Use light pressure, make several passes, and cool the bit often to avoid cracks.
Is A Dremel Safe For Cutting Glass Tiles?
Yes, but you need to be extra gentle. The edge can chip easily, so use slow speed and a diamond wheel. Sand the edge after cutting for a smooth finish.
What Speed Should I Use For Cutting Tile With A Dremel?
I usually set my Dremel to medium-high, about 20,000 RPM. Too slow and the bit will stall; too fast and you risk burning the bit or tile. Always check your bit’s instructions for the best speed.
Cutting tile with a Dremel was a learning curve for me, but now I wouldn’t hesitate for small or tricky jobs. Remember, the right bit, slow speed, and patience are key. Good luck with your project!
As an Amazon Associate, We earn from qualifying purchases