Have you ever tried fixing a leaky faucet under your kitchen sink, only to realize you don’t own a basin wrench? That’s exactly what happened to me last year. I crawled under my sink, flashlight in hand, only to find those tricky nuts holding the faucet were way up in a tight spot. I had heard about basin wrenches, but like many people, I didn’t have one in my toolbox. I started searching for what I could use instead of a basin wrench, and through a lot of trial and error, I found some good workarounds. If you’re in the same situation, let me walk you through what I tried, what worked, and what definitely didn’t.
Prime Day Pick
Limited-time Prime Day price. Check current discount on Amazon.
Why A Basin Wrench Is Handy—but Not Always Available
First, let’s talk about why people use a basin wrench. It’s a special tool designed for those hard-to-reach nuts under sinks, especially when installing or removing faucets. The long handle and pivoting jaw make it easy to grip nuts in tight spaces. The truth is, most of us don’t use it often. That’s why it’s missing from many toolkits, including mine.
But don’t worry. With a little creativity, you can manage without one. Over time, I’ve found a few alternatives that saved my project (and my nerves). Let’s get into the details.
Prime Day Pick
Limited-time Prime Day price. Check current discount on Amazon.
Common Tools You Can Use Instead
I’ve tried several tools when a basin wrench wasn’t available. Some worked surprisingly well, while others just left me frustrated. Here’s what you can use, and what to watch out for.
Prime Day Pick
Limited-time Prime Day price. Check current discount on Amazon.
1. Adjustable Wrench (crescent Wrench)
This was my first idea. An adjustable wrench is a standard tool, and I figured it might do the trick. If you have enough space around the nut, it can work. The jaws open wide and grip well. The problem? Under most sinks, there’s not much room to turn the wrench. I ended up scraping my knuckles more than once. But if you’re lucky and the nut is near the front or there’s a gap, this tool can help.
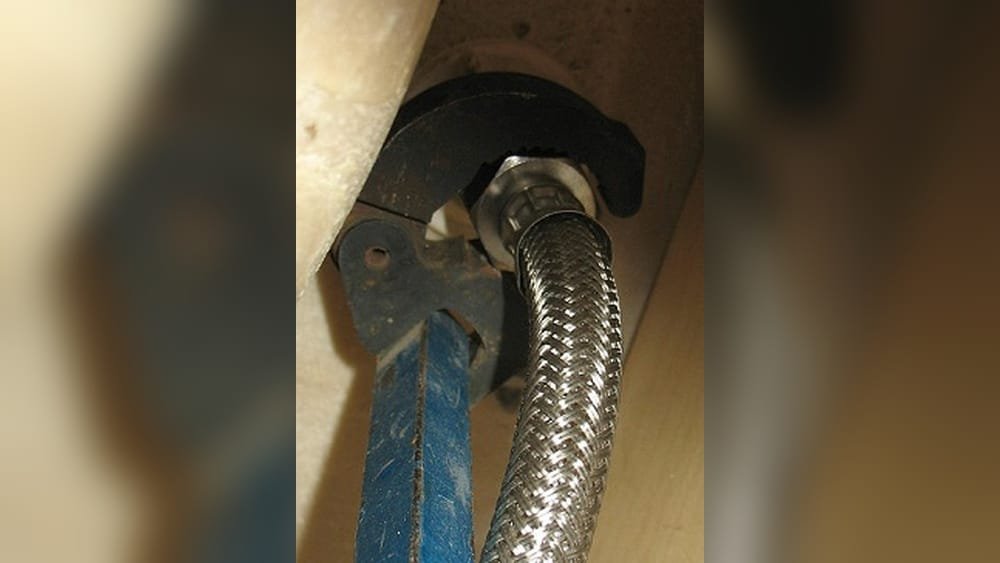
2. Channel Lock Pliers (groove Joint Pliers)
I always keep a pair of channel lock pliers in my toolbox. These are great for gripping and turning larger nuts. The long handles give extra leverage. The downside is similar to the adjustable wrench: tight spaces make it tricky. Sometimes, you can get one jaw on the nut and the other on the outside, and give it a twist. For plastic nuts, be gentle—too much force can break them.
3. Socket Wrench With Deep Socket
One day, I realized my socket set had a deep socket that almost fit over the faucet nut. If you have a socket set, especially with deep sockets, you might get lucky. The round shape is perfect for metal nuts, and you can use an extension to reach up behind the sink. This only works if the nut is a standard size, though. I once tried this on a plastic nut, and it slipped off.
4. Needle Nose Pliers
I tried needle nose pliers once when I had nothing else. They fit into small spaces, but they don’t grip well. Still, if the nut is loose, or you just need to turn it a little, these pliers can help. Don’t expect to loosen a very tight nut with them. They’re more for finishing the job.
5. Open-end Or Box-end Wrench
If you know the exact size of the nut, try an open-end or box-end wrench. These can slide onto the nut, and sometimes you can get enough leverage. The problem is always space. Sinks are cramped, and there’s not much room to move the handle. Still, I’ve used this method successfully when the pipe layout was simple.
6. Locking Pliers (vise-grips)
Locking pliers give you a strong grip, which is great for stubborn nuts. Once clamped, you can focus on turning. But again, space is your enemy. I found these worked best when I could get my hands up behind the sink or if I removed the drain pipe for more room. Also, be careful not to crush plastic nuts.
7. Homemade Strap Wrench
One time, I got creative and made a strap wrench using an old belt and a screwdriver. I wrapped the belt around the nut, slid the screwdriver through the loop, and twisted. This worked for a plastic nut that was stuck. The strap provides grip without damaging the nut. If you don’t have a strap wrench, give this method a try.
8. Pipe Wrench
A pipe wrench is usually too big for under-sink jobs, but it can help if the nut is exposed and you need a lot of force. I used mine once to break loose a corroded metal nut. Make sure you have enough room to move the handle. Otherwise, you’ll just bruise your hands.
9. Faucet & Sink Installer Tool
After a few tough jobs, I bought a faucet & sink installer tool from my local hardware store. It’s not a basin wrench, but it’s designed for under-sink work. This tool is like a plastic tube with slots and notches for different nuts. It made my next faucet install much easier. If you do a lot of plumbing, it’s a good investment.
10. Slip-joint Pliers
Slip-joint pliers are another basic tool you might have. They’re not perfect for faucet nuts, but they can grip in a pinch. I used these once to start loosening a nut, then finished with my fingers. Not ideal, but better than nothing.
When To Use Each Alternative
Not all these tools work for every situation. Here’s a quick guide that helped me decide which tool to try first.
| Tool | Best For | Limitations |
|---|---|---|
| Adjustable Wrench | Accessible nuts, metal fittings | Doesn’t fit tight spaces |
| Channel Lock Pliers | Large nuts, plastic nuts | Limited movement under sink |
| Socket Wrench | Standard-size metal nuts | Doesn’t fit all nuts |
| Needle Nose Pliers | Loose nuts, finishing turns | Poor grip on tight nuts |
| Strap Wrench | Plastic nuts, no damage | Not for tight spaces |
Tricks That Made My Life Easier
Over the years, I picked up a few tricks that made faucet jobs less stressful. Here’s what I learned, usually the hard way.
Use Penetrating Oil First
If the nut is rusty or stuck, spray some penetrating oil and wait ten minutes. This made a huge difference for me. Sometimes, all you need is a little patience.
Remove The Drain Pipe For More Room
The first time I tried to loosen a faucet nut, I didn’t have much space. After I removed the drain pipe (the P-trap), I could fit my tools in much easier. It takes a few extra minutes but makes the job so much simpler.
Use A Headlamp
Holding a flashlight under a sink is hard. I started using a headlamp—it keeps both hands free and you can see what you’re doing.
Take Pictures Before You Start
Before I touch anything, I snap a quick photo with my phone. That way, if I forget how things go back together, I have a reference. Trust me, this saved me more than once.
Don’t Force It
If a nut isn’t moving, don’t just force it. I once cracked a plastic nut and had to buy a new drain assembly. If it feels stuck, double-check your tool choice, try oil, or approach it from a different angle.

Comparing Alternatives: Ease, Cost, And Risk
Not all alternative tools are equal. Here’s how I weigh them based on my own experience.
| Tool | Ease of Use | Risk of Damage | Cost |
|---|---|---|---|
| Adjustable Wrench | Medium | Low (metal nuts) | Low |
| Channel Lock Pliers | Medium | Medium (plastic nuts) | Low |
| Socket Wrench | Easy | Low | Medium |
| Strap Wrench | Easy | Very Low | Low |
| Faucet Installer Tool | Very Easy | Very Low | Medium |
What Not To Do
Here are a few mistakes I made—and hope you can avoid:
- Never use too much force on plastic nuts. They break easily and then you have a bigger problem.
- Don’t use power tools under the sink. It’s tempting, but they can slip and cause damage.
- Avoid using pliers on nuts with soft edges—they can round them off, making removal harder.
- Don’t skip safety. Wear gloves if you can. There are often sharp edges under sinks.

When You Really Need A Basin Wrench
Sometimes, nothing but a basin wrench will do. If the nut is tucked up behind the sink in a narrow gap, and you can’t get any other tool on it, you might have to borrow or buy one. After fighting with alternatives for years, I finally picked up a basin wrench for about $15. It’s saved me time and frustration, but I still use the tricks above when I don’t have it handy.
Extra Tips For Beginners
If this is your first time working under a sink, let me share two insights I wish I knew at the start:
- Take a break if you’re getting frustrated. Sometimes, stepping away for five minutes clears your head, and you’ll see a solution you missed.
- Keep a towel and bucket nearby. Even small leaks make a mess. I learned this the hard way when water dripped all over my kitchen floor.
Also, consider searching for video guides online. Seeing someone else do the job can make things much clearer. For more on plumbing tools, check out this Wikipedia article on wrenches.
:max_bytes(150000):strip_icc()/SPR-how-to-use-a-basin-wrench-2718720-step-03-d6851359278f44cdb435e22c5d4bdfe8.jpg)
Frequently Asked Questions
Can I Use Regular Pliers Instead Of A Basin Wrench?
Yes, you can use regular pliers like channel locks or slip-joint pliers. However, they may not fit in tight spaces, and you need to be careful not to damage plastic nuts.
What If The Nut Is Too Tight And Nothing Works?
If the nut is stuck, apply penetrating oil and let it sit for a few minutes. Try again with a different tool. If it’s still stuck, you may need to carefully cut the nut off with a hacksaw blade.
Is It Worth Buying A Basin Wrench For One Job?
If you only need to do this once, try borrowing a basin wrench from a friend or hardware store. If you plan to do more plumbing, it’s a good investment and not very expensive.
Can I Damage My Sink Using The Wrong Tool?
Yes, using the wrong tool can scratch or break parts under your sink, especially if you use too much force. Always start gently and protect surfaces with a rag if needed.
What If I Drop Something Behind The Sink?
It happens to everyone! Use a magnet on a string or a flexible grabber tool to fish out lost nuts or tools.
If you ever find yourself under the sink without the right tool, remember: patience and creativity go a long way. With a few common tools and a bit of flexibility, you can finish the job and get back to your day—no special wrench required.
As an Amazon Associate, We earn from qualifying purchases