If you’ve ever tried hanging a picture, mounting a TV, or putting up shelves, you know the pain of drilling into a wall only to hit…nothing. Or worse, you hit a wire or a pipe. That’s why I swear by my Franklin Sensors stud finder. I’ve used a lot of different stud finders over the years—some cheap, some fancy—but Franklin Sensors models make the job so much easier and a lot less stressful. Let me walk you through how I use mine, what I’ve learned, and some tips that most people miss.
Why I Switched To Franklin Sensors
Before I found the Franklin Sensors stud finder, I had mixed results with the old magnetic ones. They would sometimes find a nail, sometimes not. I once made six holes in my living room wall before finding a stud. That’s when I knew I needed something better.
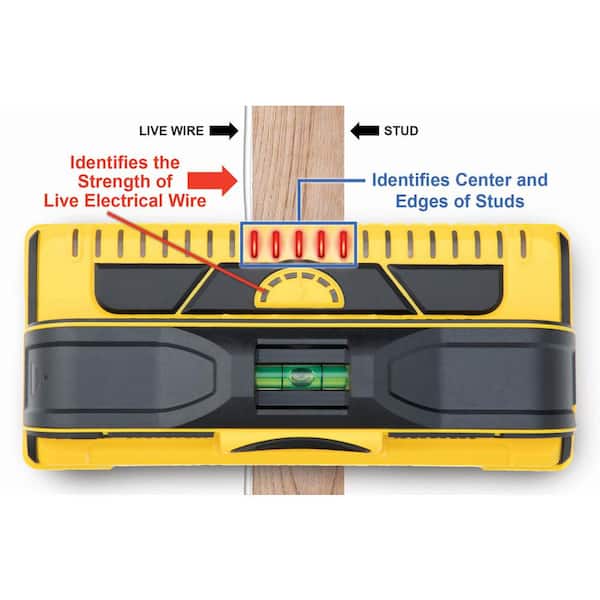
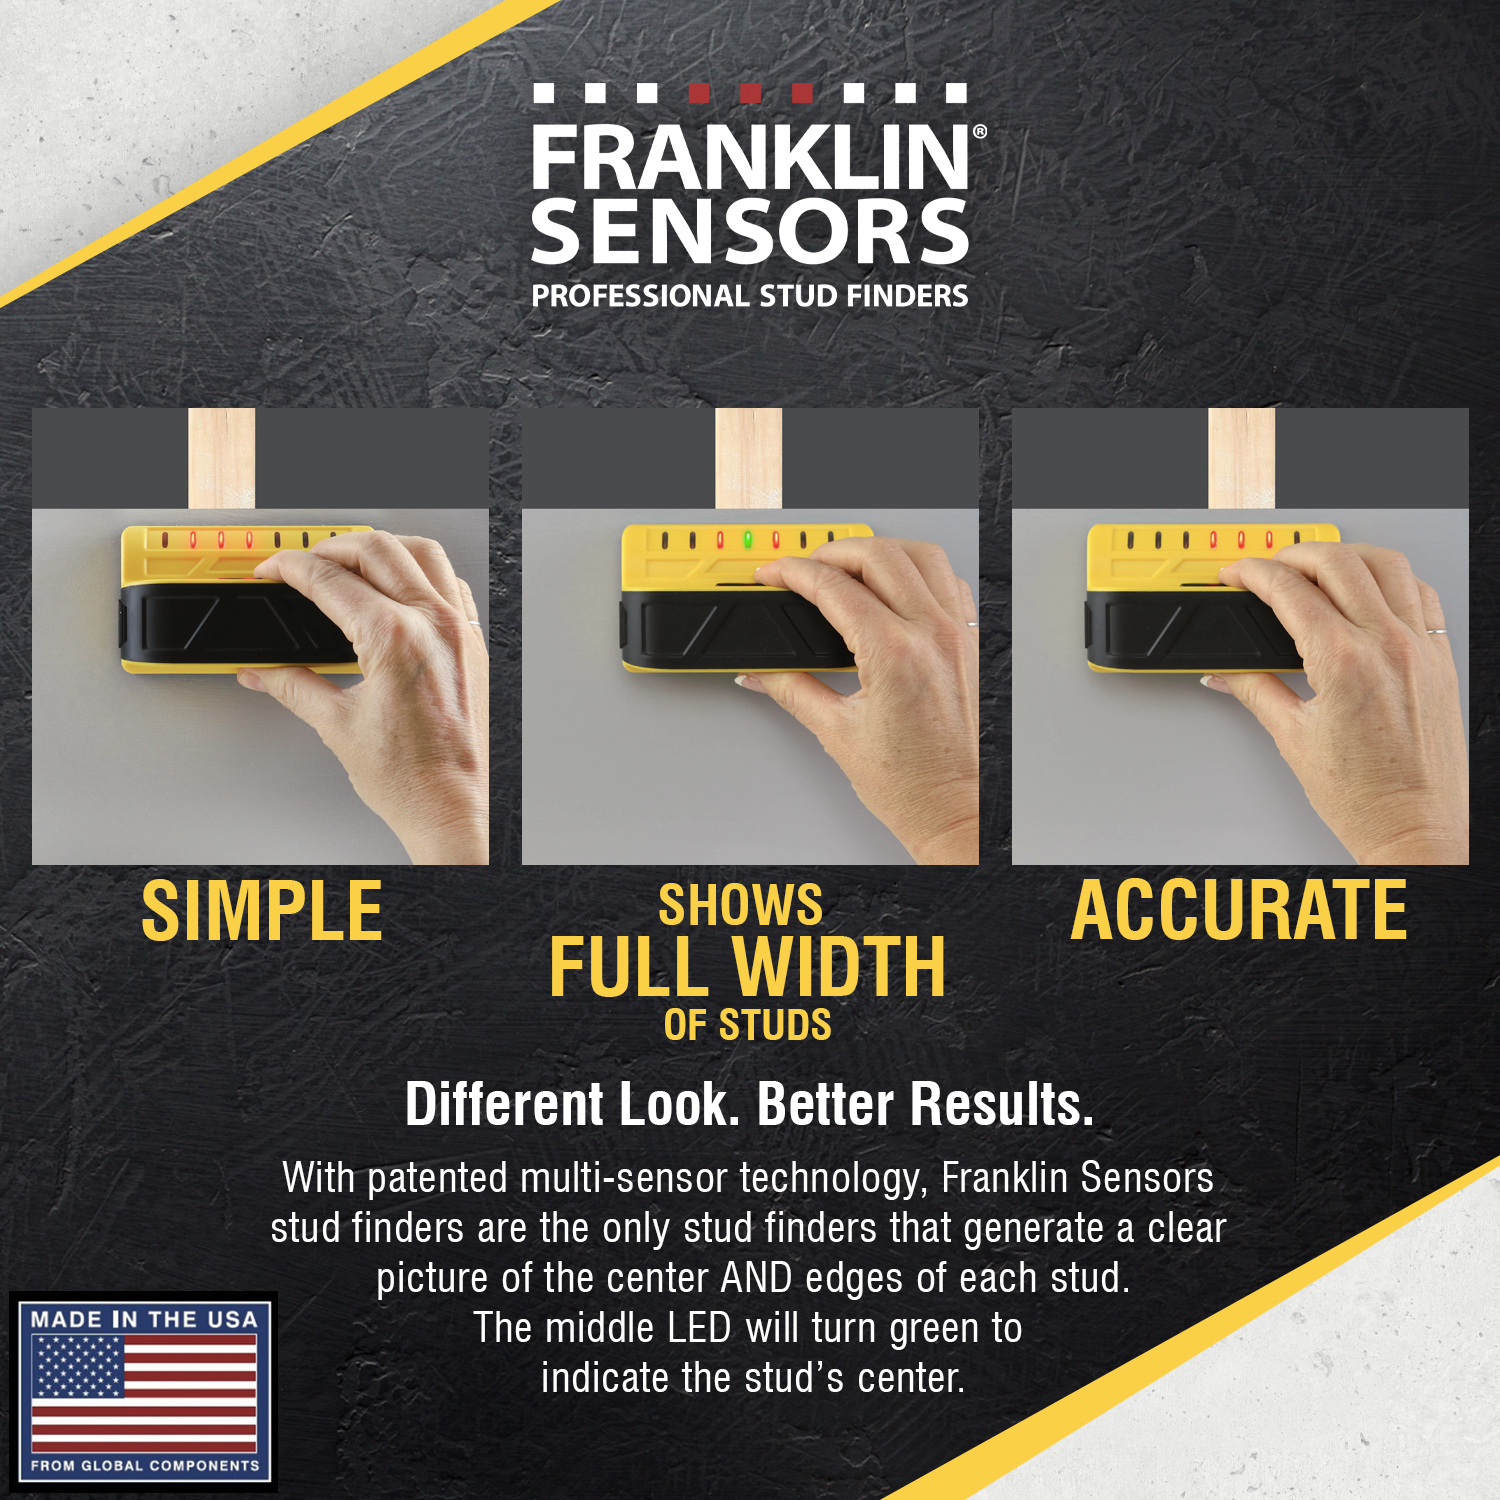
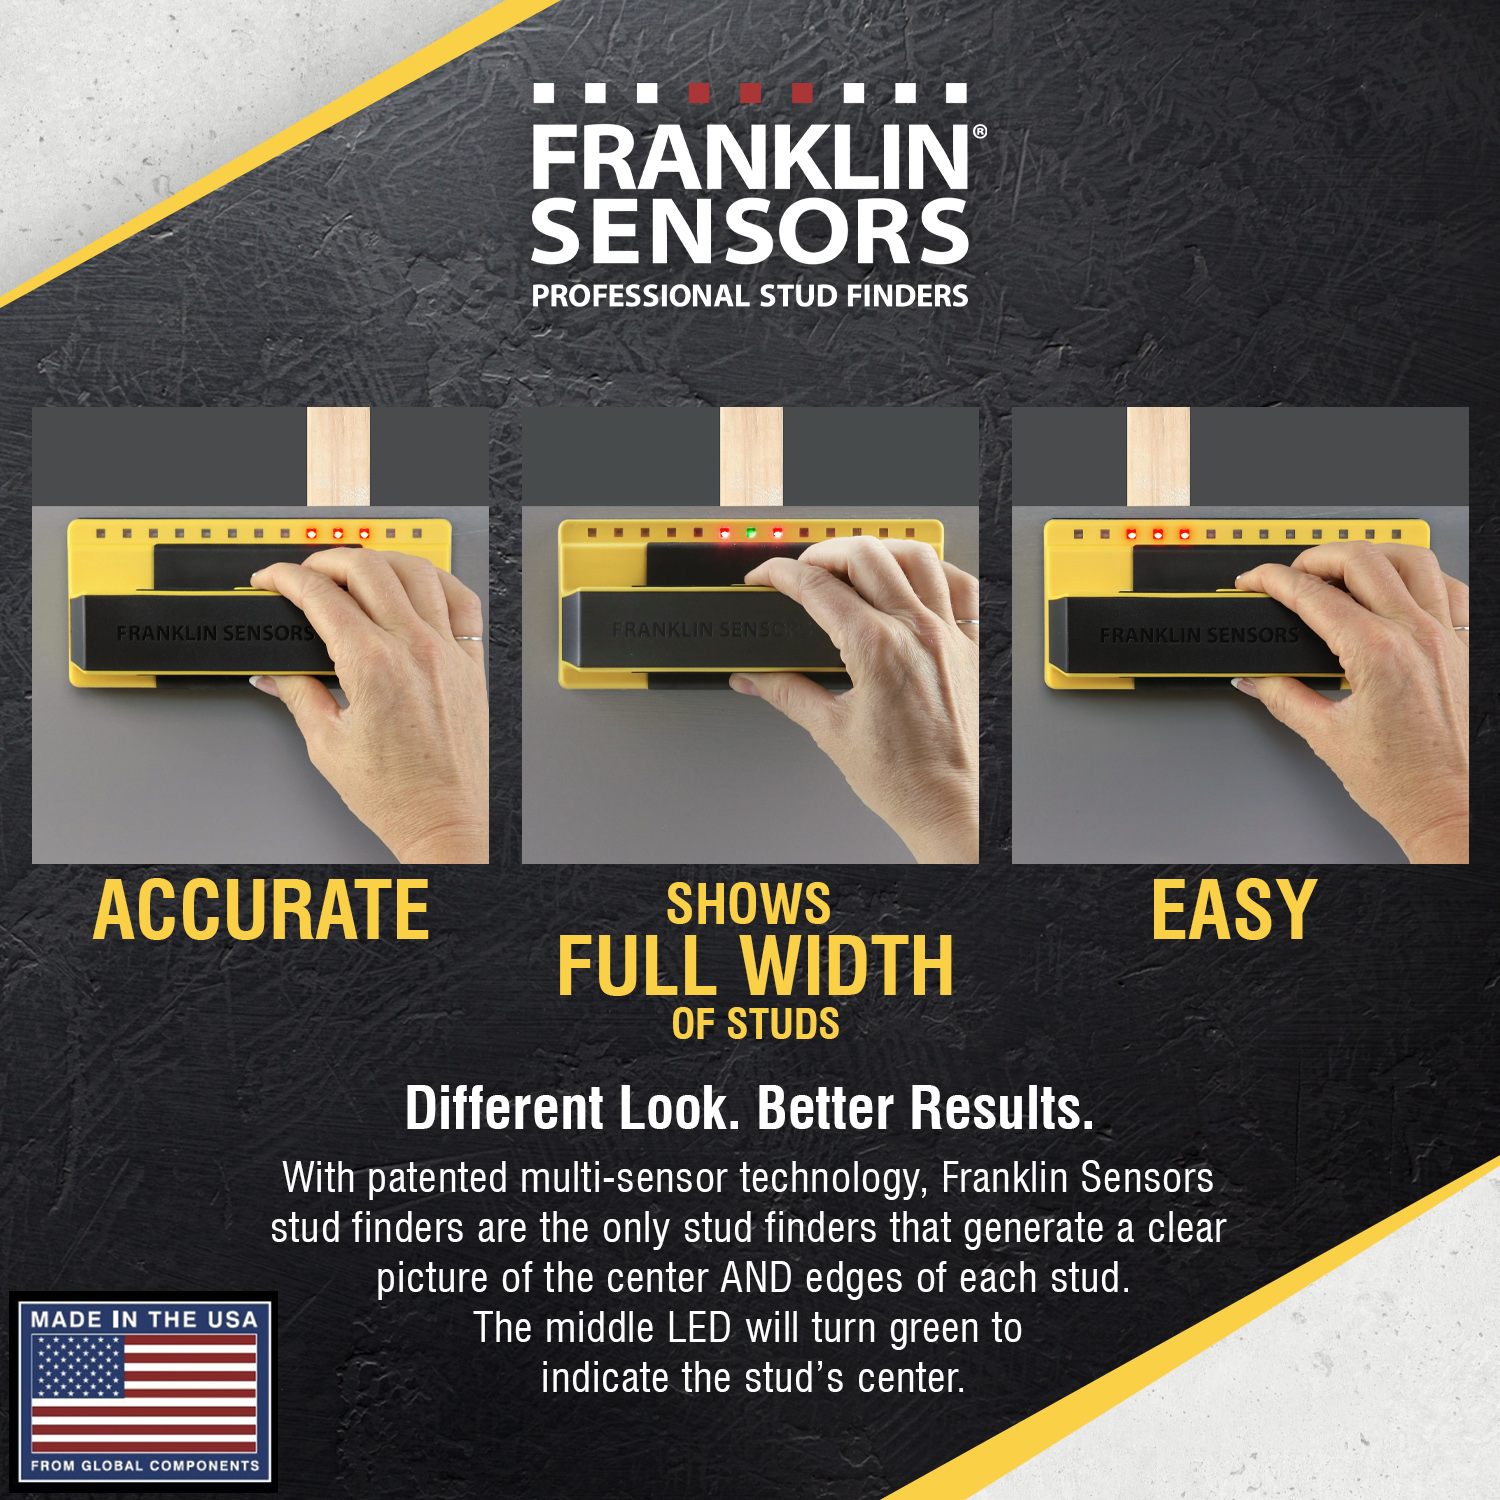
Franklin Sensors uses multiple sensors, not just one. This makes a huge difference. You can see the whole width of the stud, not just a tiny spot. The LED lights on the tool light up exactly where the stud is, so there’s no guessing.
It made my jobs cleaner, faster, and honestly, a lot less frustrating.
What Is A Stud Finder—and Why Does It Matter?
A stud finder helps you locate the wooden or metal studs behind your drywall. Studs are the vertical pieces of wood or metal that hold up your wall. Most things you want to hang—a big mirror, a TV, heavy shelves—need to be anchored to a stud, not just drywall, or they might fall down. Drywall itself is weak and can’t hold much weight.
With a tool like the Franklin Sensors model, you don’t have to guess where the stud is. You avoid making unnecessary holes and prevent damage to wires or pipes that might be hiding behind the wall.
Getting Ready: What You Need Before You Start
Before you grab your stud finder, I always check a few things:
- Make sure the wall is clear of pictures, mirrors, or metal objects. Metal can confuse the sensors.
- Have a pencil handy to mark the spot.
- If you have pets or kids around, keep them away from where you’re working. You don’t want distractions.
- Wipe the wall with a dry cloth. Dust can sometimes make the sensors less accurate.
Having these things ready saves time and helps you get the most accurate reading.
How To Use A Franklin Sensors Stud Finder: Step-by-step
I’ll walk you through exactly how I use mine. I have the ProSensor 710, but most Franklin Sensors models work the same way.
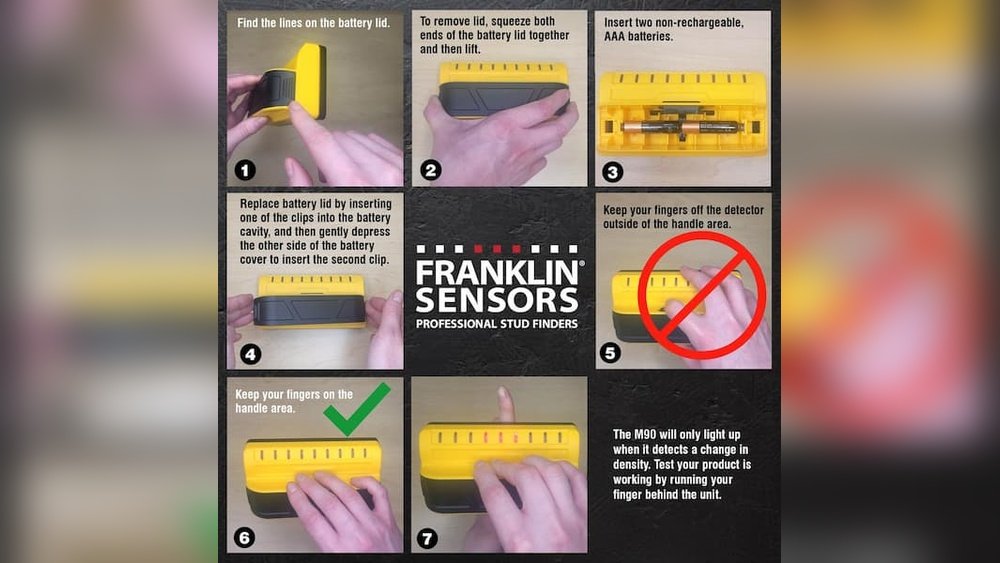
1. Insert The Batteries
First things first: check the batteries. Open the battery compartment on the back and pop in two AA batteries. If the lights seem dim or don’t turn on, swap out the batteries for new ones.
2. Place The Sensor Flat Against The Wall
Hold the stud finder flat against the wall where you want to start searching. Don’t tilt it or press too hard—just a gentle touch is enough.
3. Press And Hold The Button
Most Franklin Sensors models have a button on the handle. When you press it, the device turns on and calibrates itself. There’s no need to wait or move slowly. I love that I don’t have to “pre-calibrate” like some other brands.
4. Slide The Stud Finder Across The Wall
Move the stud finder left or right in a straight line. Keep it flat and steady. As you move, you’ll see a row of LED lights turn on. These lights show you exactly where the stud is. The center of the lit area is the center of the stud.
Here’s a quick example: One time, I moved the stud finder across my kitchen wall. Three lights popped on right where I expected a stud. I marked the center spot with a pencil. That’s where I ended up drilling, and it was solid.
5. Mark Your Stud
Once you see the lights, stop and mark the center of the stud with your pencil. If you want to be extra sure, move the stud finder a few inches higher or lower and try again. The lights should show the stud in the same spot both times.
6. Double-check For Wires Or Pipes
Franklin Sensors stud finders don’t detect wires or pipes. If you’re working in an area with lots of electrical outlets or plumbing, I recommend using a separate wire detector. It’s a small extra step, but it can save you from a costly mistake.
7. Start Your Project
Now that you’ve found the stud and marked it, you’re ready to drill or hammer. Always start with a small pilot hole to check that you really hit wood. If you feel solid resistance, you’re in the right spot.
Extra Features I Like (and How To Use Them)
Some Franklin Sensors models come with extra features. Here’s how I use them in real life.
Multi-spot Sensing
Instead of finding just one point, the multi-spot sensing shows the whole width of the stud. This is great for mounting wider brackets or shelves. You see exactly how wide the stud is—no more guessing.
Deep Scan Mode
If your walls are thick, some models have a deep scan button. Hold it down while scanning, and the sensors reach deeper into the wall. This saved me when I was working in my basement, where the walls are thicker than normal drywall.
Built-in Bubble Level
Some Franklin Sensors have a small bubble level on top. This helps you make sure your marks are straight, which is a life-saver for hanging shelves or pictures in a straight line.
Real-world Example: Hanging A Heavy Mirror
Let me share a quick story. I wanted to hang a heavy mirror in my hallway. I knew drywall alone wouldn’t support it. I grabbed my Franklin Sensors stud finder, cleared the wall, and scanned along where I wanted the mirror to go.
The LED lights lit up in two spots, showing two studs about 16 inches apart. I marked both centers. Then, I used my drill to make small pilot holes. I felt solid wood behind the drywall—no hollow sound. The mirror went up without a problem, and it’s been hanging there for over two years now.
If I hadn’t used the stud finder, I probably would have guessed, made a mess of the wall, and maybe even broken the mirror.
Comparing Franklin Sensors With Other Stud Finders
I’ve used several brands over the years, so here’s how Franklin Sensors stacks up against others.
| Feature | Franklin Sensors | Magnetic Stud Finder | Electronic (Single Sensor) |
|---|---|---|---|
| Accuracy | High (multi-sensor) | Low (finds nails, not studs) | Medium |
| Speed | Very fast | Slow | Medium |
| Ease of Use | Very easy | Basic | Sometimes tricky |
| Cost | Mid to High | Low | Low to Mid |
| Detects Wires/Pipes | No | No | Some models |
From my experience, the extra cost of Franklin Sensors pays off in saved time and fewer mistakes.
Common Mistakes To Avoid
Even with a great tool, I’ve made some mistakes. Here are a few things to watch out for:
- Scanning too fast: If you move the stud finder too quickly, you might miss the lights or get false readings. Go slow and steady.
- Not checking for wires: Franklin Sensors doesn’t warn you about wires. Always use a separate detector in risky spots.
- Forgetting to replace batteries: Low batteries can make the lights dim or the tool less accurate. I always keep extras on hand.
- Ignoring wall texture: Thick paint, wallpaper, or textured walls can affect accuracy. Press gently and try a few spots if you’re unsure.
My Pro Tips For Better Results
I’ve picked up a few tricks along the way that beginners often miss:
- Scan above and below: Studs run vertically. Check in two or three places along the wall to be sure you’re following the same stud.
- Look for outlets: Electrical outlets are almost always attached to a stud. If you start scanning near an outlet, you’ll likely find a stud on one side.
- Use painter’s tape: If you don’t want to mark your wall, put down a small piece of tape and mark on that instead.
- Double-check before drilling: Always test your spot with a small nail or drill bit. If you miss, it’s easier to patch a tiny hole.
Franklin Sensors Models: Which One Should You Choose?
There are a few different Franklin Sensors models. I’ve tried more than one, and here’s a quick comparison:
| Model | Sensors | LEDs | Extra Features | Best For |
|---|---|---|---|---|
| ProSensor 710 | 13 | 13 | Deep scan, wide display | Heavy-duty jobs |
| ProSensor T6 | 6 | 6 | Compact, affordable | Simple tasks |
| ProSensor 5000 | 9 | 9 | Bubble level | General use |
I use the 710 for big projects, but the T6 is perfect for quick jobs around the house. Choose based on how often you plan to use it and your budget.
How Accurate Are Franklin Sensors Stud Finders?
In my experience, Franklin Sensors are about 95% accurate on standard drywall. On thicker or textured walls, accuracy can drop a bit, but it’s still much better than most other brands. For the most reliable results:
- Always scan in more than one spot.
- Don’t rely on a single pass—go back and forth a couple of times.
- If you get inconsistent readings, check the batteries and try again.
According to independent tests and user reviews, Franklin Sensors models are among the top-rated for accuracy and ease of use. You can check out more technical details at the Wikipedia page on stud finders.
When Not To Use A Stud Finder
Sometimes, a stud finder won’t help:
- Brick or concrete walls: These don’t have studs. You’ll need different anchors.
- Old plaster walls: Stud finders can be less reliable here. Knocking and listening for a solid sound sometimes works better.
- Walls with heavy metal mesh: Some old homes have wire lath, which confuses sensors.
In these cases, I usually look for other clues or ask a pro for advice.
Frequently Asked Questions
How Deep Can Franklin Sensors Stud Finders Detect Studs?
Most models can detect studs up to about 1. 5 inches deep. The deep scan mode helps with thicker walls. On standard drywall, you’ll have no problem finding studs.
Can Franklin Sensors Stud Finders Locate Metal Studs?
Yes, they can find both wood and metal studs. The sensors detect density changes, so metal studs show up just like wood ones.
Do I Need To Calibrate The Tool Every Time?
No. One thing I love about Franklin Sensors is the auto-calibration. Just press the button and start scanning—no setup needed.
Will Paint Or Wallpaper Affect Accuracy?
Heavy wallpaper or thick paint can sometimes make readings less clear, but usually the tool works fine. If you have trouble, try scanning in several places or wiping the wall.
Are Franklin Sensors Stud Finders Worth The Price?
In my honest opinion, yes. I’ve wasted more time and made more wall repairs with cheaper tools. Franklin Sensors saves time, reduces stress, and helps you get the job done right the first time.
Finding studs used to be a guessing game for me, but now it’s quick and almost foolproof. Whether you’re a DIY beginner or a seasoned handyman, a Franklin Sensors stud finder is a smart addition to your toolkit. It’s one of those tools that, once you try it, you wonder how you ever lived without it.
As an Amazon Associate, We earn from qualifying purchases