Cutting plastic pipes used to be a headache for me. Every time I tried, I ended up with rough edges or even cracked pipes. I remember the first time I tried to install a new shower in my bathroom. The pipes were stiff, and my old hacksaw made a mess. But then I discovered the plastic pipe cutter. It changed everything. I want to share exactly how I use this handy tool, what I learned, and tips that can save you from the mistakes I made.
Prime Day Pick
Limited-time Prime Day price. Check current discount on Amazon.
What Is A Plastic Pipe Cutter?
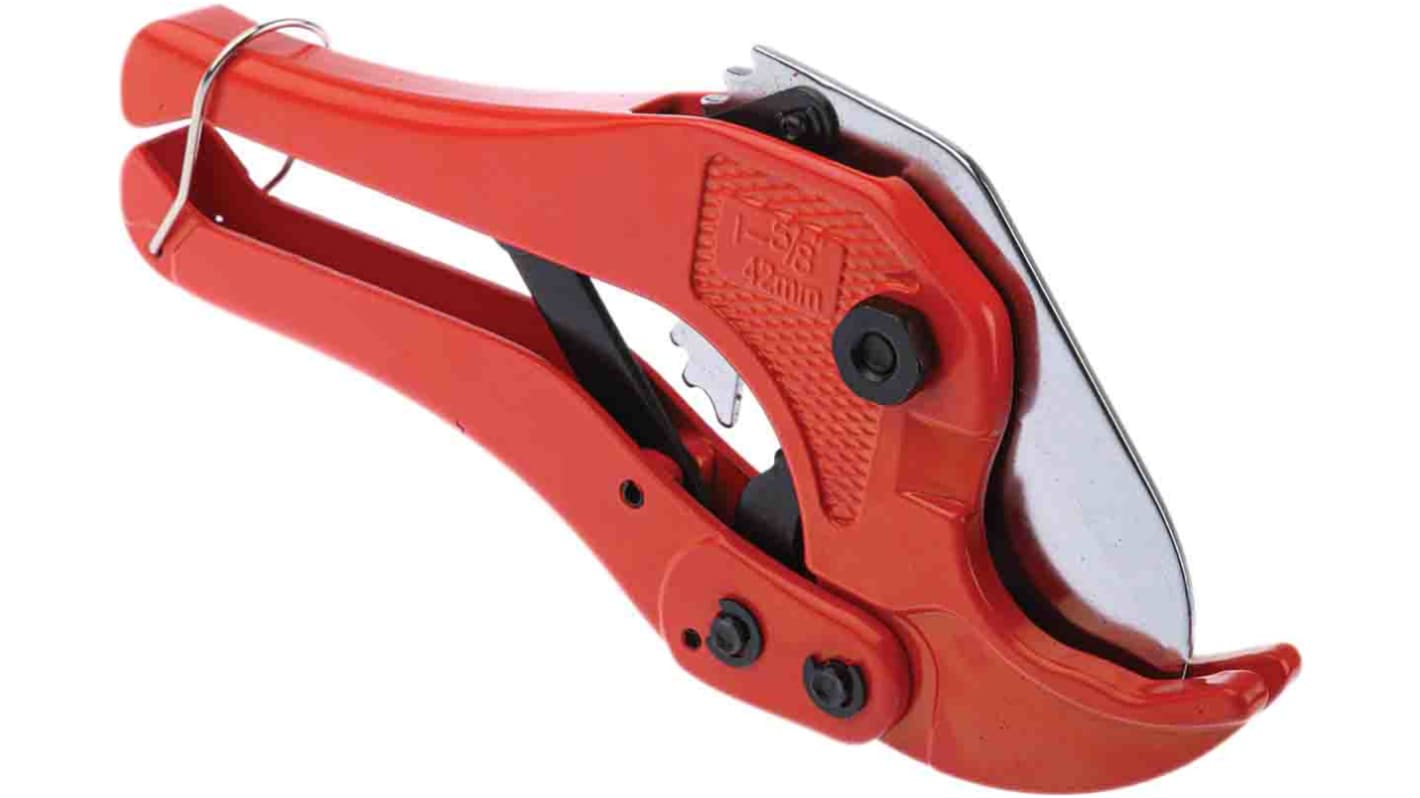
A plastic pipe cutter is a tool designed to cut plastic pipes cleanly and easily. Most are small, hand-held devices. They work much better than a saw for pipes made of PVC, CPVC, or PEX. The cutter looks a bit like a pair of pliers or garden shears, but with a sharp blade. Some even have a ratcheting mechanism to help you cut through thick pipes without much effort.
At first, I was surprised by how simple they are. You squeeze the handles, the blade presses into the pipe, and with a bit of force, it slices straight through. No mess, no fuss.
Prime Day Pick
Limited-time Prime Day price. Check current discount on Amazon.
Why Use A Plastic Pipe Cutter Instead Of A Saw?
When I first started working on DIY plumbing, I used a regular saw. I thought it would be fine. But here’s what happened:
Prime Day Pick
Limited-time Prime Day price. Check current discount on Amazon.
- The cut was never straight.
- The edges were rough and needed sanding.
- Sometimes, the pipe would crack or split.
Using a plastic pipe cutter solved all these problems. The cut was clean and straight. The edges were smooth, so fittings slid on easily. I saved time and avoided extra cleanup. Plus, the tool is small, so I could use it even in tight spaces.
Types Of Plastic Pipe Cutters
I have tried a few different types over the years. Each one has its strengths. Here’s a quick look at the main styles:
| Type | Best For | My Experience |
|---|---|---|
| Scissor-style | Small to medium pipes (up to 1.25 inch) | Great for quick jobs, easy to use, but hands can get tired with thick pipes |
| Ratcheting | Thicker or harder pipes (up to 2 inch) | Less hand strength needed, more control, best for most home jobs |
| Rotary (wheel cutter) | Very large pipes, or precise work | Slower to use, but very accurate; not always needed for home use |
If you’re just starting, a ratcheting plastic pipe cutter is the best choice. It does not require strong hands, and the cuts are always clean.
Tools And Items You Need
Before you get started, make sure you have everything ready. Here’s what I keep on hand:
- Plastic pipe cutter (choose the type that fits your pipe)
- The pipe you plan to cut
- A marker or pencil for marking the pipe
- Measuring tape
- A cloth to clean the pipe
- Sandpaper or deburring tool (optional, for smoothing edges)
Having all these nearby helps the job go faster. I learned this the hard way, running back and forth for missing items.
How To Use A Plastic Pipe Cutter: Step-by-step
Let me walk you through my process. I’ll share the little details that make a big difference.
1. Measure The Pipe
Before you cut, measure carefully. I use a tape measure and mark the pipe with a marker. Double-check your measurement. I once cut a pipe too short and had to buy a new one.
2. Mark The Cutting Point
Draw a clear line where you want to cut. I find that using a permanent marker helps, especially if the pipe is wet or dirty.
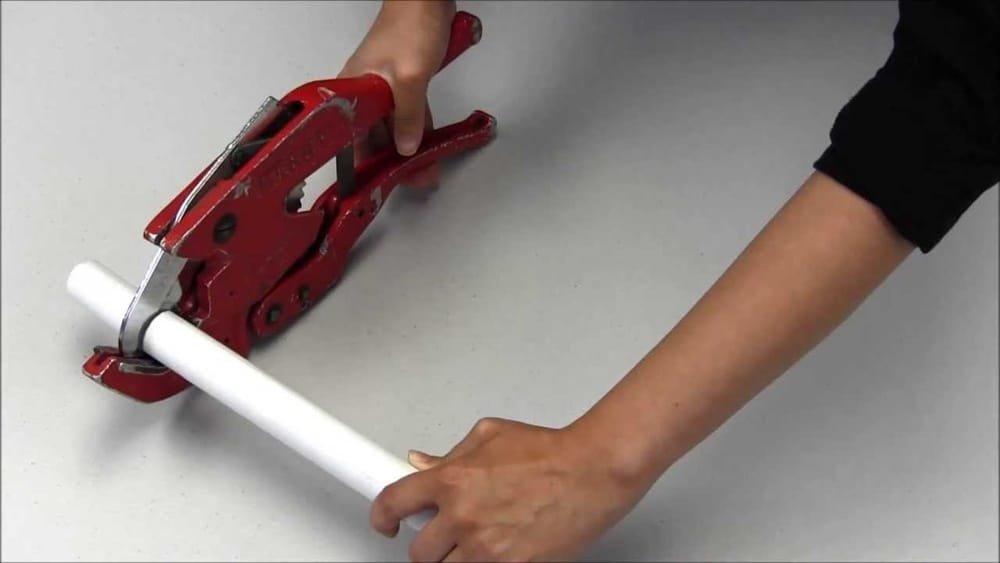
3. Position The Cutter
Open the cutter fully. Place the pipe inside, lining up the blade with your mark. Make sure the pipe sits straight in the tool. If it’s at an angle, the cut will be crooked.
4. Squeeze The Handles
For scissor-style cutters, squeeze the handles together in a slow, steady motion. For ratcheting cutters, squeeze and release. The blade moves forward with each squeeze, making it easy to cut even thick pipes.
5. Complete The Cut
Keep squeezing until the blade slices all the way through. Don’t twist the pipe or force it. Let the tool do the work. If it feels stuck, open the cutter, reposition, and try again.
6. Check The Edge
Look at the cut edge. It should be smooth and even. If you see small burrs or rough spots, use a piece of sandpaper to smooth them out.
7. Clean The Pipe
Wipe away any dust or debris. A clean pipe makes for a better seal when you connect fittings.
Practical Tips For Better Cutting
I’ve made some mistakes along the way. Here are tips that helped me get perfect cuts every time:
- Use slow, steady pressure. Rushing can crack the pipe or cause uneven cuts.
- Keep the blade sharp. A dull blade crushes the pipe instead of slicing it. Most cutters let you replace the blade.
- Cut at room temperature. Cold pipes can crack more easily. If your pipe feels cold, warm it up in your hands first.
- Support both sides of the pipe. This stops the pipe from bending or pinching as you cut.
- Practice on scrap pieces. Before cutting your main pipe, try the tool on leftover pieces. This helps you get a feel for the pressure needed.

Common Mistakes (and How To Avoid Them)
I wish someone had warned me about these problems when I started:
- Cutting too fast. I once squeezed the handles quickly, thinking it would save time. Instead, the pipe cracked.
- Not checking the blade. A dull blade left jagged edges and made joining pipes harder.
- Cutting on a dirty surface. Dirt and grit can dull the blade and scratch the pipe.
- Guessing measurements. Always measure and mark. Eyeballing it rarely works.
- Using the wrong cutter for the pipe size. Small cutters can’t handle big pipes. Trying to force it just damages the tool and the pipe.
How To Choose The Right Plastic Pipe Cutter
Choosing the right tool makes all the difference. Here’s what I look for:
| Feature | Why It Matters | My Advice |
|---|---|---|
| Blade quality | A sharp, hardened blade cuts cleanly | Choose a cutter with a replaceable stainless steel blade |
| Size range | Fits the pipes you use most | Get one that handles your largest pipe size |
| Handle comfort | Makes longer jobs easier on your hands | Look for rubber grips and a ratcheting mechanism |
| Build quality | Lasts longer, less likely to break | Metal bodies are stronger than cheap plastic |
When I bought my first cutter, I went for the cheapest one. It worked, but the handles hurt my hands and the blade dulled quickly. Spending a little more for a quality tool saved me time and frustration.
Safety Tips When Using A Plastic Pipe Cutter
Safety is easy to overlook, but I learned the hard way after a small cut on my finger. Keep these safety tips in mind:
- Wear gloves if you’re new to the tool.
- Keep fingers away from the blade.
- Cut on a stable surface to avoid slips.
- Store the cutter safely when not in use. Many have a lock to keep the blade closed.
- Dispose of pipe scraps carefully to avoid sharp edges.
Cleaning And Maintaining Your Pipe Cutter
A good tool lasts longer if you care for it. Here’s how I keep mine in top shape:
- After each use, wipe the blade clean with a cloth.
- If the blade gets sticky (from pipe glue), use a little rubbing alcohol.
- Store the cutter in a dry place to prevent rust.
- Check the blade for chips or dullness. Replace if needed.
- Oil the moving parts once in a while for smooth action.
I neglected maintenance at first. The cutter got stiff, and my cuts weren’t as clean. A few drops of oil and regular cleaning made a big difference.
When Not To Use A Plastic Pipe Cutter
Sometimes, a plastic pipe cutter isn’t the best tool. Here’s when I use something else:
- For metal pipes (like copper or steel), use a pipe saw or a metal wheel cutter.
- For very large diameter pipes (over 2 inches), a power saw may be better.
- If the pipe is old and brittle, I test on a scrap piece first. Sometimes a saw with a fine blade is safer.
Real-life Examples From My Projects
Let me share a couple of stories from my own work:
Replacing a kitchen sink drain: I needed to cut several sections of PVC under the sink. Space was tight. The ratcheting cutter fit perfectly. Each cut took seconds, and the pieces fit together without leaks.
Fixing a garden irrigation line: The old PEX pipe was buried in the dirt. I used a simple scissor-style cutter. It was quick, and the new fittings snapped right on.
Building a homemade hydroponic system: I had to cut dozens of pipes. Practicing on scraps helped me get each piece just right. Clean cuts meant no leaks, and the project turned out better than expected.

Comparing Plastic Pipe Cutters To Other Tools
If you’re still unsure, here’s a quick comparison from my experience:
| Tool | Speed | Cut Quality | Best Use |
|---|---|---|---|
| Plastic Pipe Cutter | Fast | Very clean | PVC, CPVC, PEX pipes |
| Hacksaw | Slow | Rough, needs sanding | Any pipe, but not ideal for plastic |
| Rotary Wheel Cutter | Medium | Very clean | Large plastic or metal pipes |
Two Insights I Wish I Knew Earlier
- Temperature matters more than you think. If the pipe is cold, it’s much more likely to split. Warming it up with your hands or leaving it in a warm room for a bit can prevent cracks.
- Blade replacement is easy and worth it. Don’t struggle with a dull blade. Most cutters let you swap the blade in minutes. A sharp blade saves you time and headaches.
Frequently Asked Questions
How Do I Know If My Pipe Is Pvc, Cpvc, Or Pex?
Usually, pipes are labeled with their type. PVC is white or gray, CPVC is cream-colored, and PEX is flexible and comes in red, blue, or white. If you’re not sure, ask at your local hardware store or check product guides like Wikipedia: Plastic Pipework.
Can I Use A Plastic Pipe Cutter On Metal Pipes?
No, plastic pipe cutters are for plastic only. For metal pipes, use a hacksaw or a rotary wheel cutter made for metal.
My Cutter Is Stuck On The Pipe. What Should I Do?
Release the handles, open the cutter, and reposition it. Make sure the blade is sharp and the pipe is clean.
Do I Need To Deburr The Pipe After Cutting?
Most cuts are smooth, but if you see rough edges, use sandpaper or a deburring tool. This helps fittings slide on and prevents leaks.
How Often Should I Replace The Blade?
Replace the blade when cuts get harder or the edges look rough. For home use, this is usually after dozens of cuts. Check your tool’s manual for details.
Cutting plastic pipes used to feel stressful for me, but now it’s one of the easiest parts of any plumbing job. The right plastic pipe cutter makes all the difference. Take your time, follow the steps, and you’ll get clean, precise cuts every time. If you’re just starting out, don’t worry—practice on some spare pieces, and soon you’ll feel like a pro. Happy cutting!
As an Amazon Associate, We earn from qualifying purchases