If you’ve ever tried to join two pieces of wood perfectly, you know it’s harder than it looks. Years ago, I struggled with wobbly shelves and lopsided frames. Then I discovered the biscuit joiner. This little power tool changed how I work with wood. Today, I’ll walk you through everything I’ve learned about using a biscuit joiner. I’ll share my best tips, the mistakes I made, and how you can get clean, strong joints—even if you’re just starting out.
What Is A Biscuit Joiner?
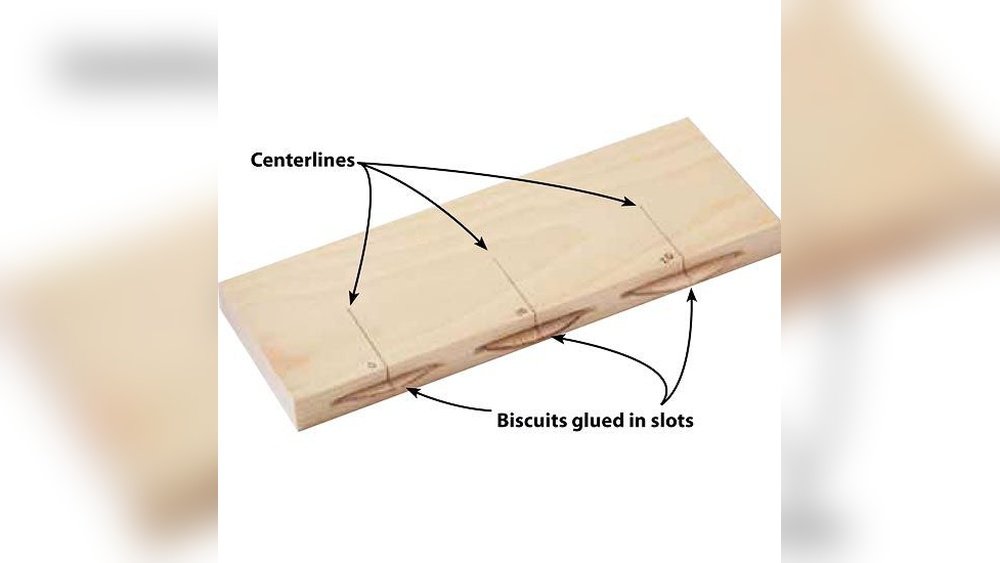
A biscuit joiner (or plate joiner) is a tool that cuts small slots in two pieces of wood. You then glue a thin, oval-shaped piece of wood—called a biscuit—into the slots. As the glue dries, the biscuit swells, locking the pieces together. This method is fast, tidy, and surprisingly strong.
I remember my first time using a biscuit joiner. I was making a bookshelf. Screws left ugly marks, and dowels never lined up. A friend handed me his old biscuit joiner and said, “Try this. ” The difference was night and day.
The shelves were finally straight and flush.
Why Use A Biscuit Joiner?
You might wonder, why not just use screws or nails? Here’s what I’ve found after a lot of trial and error:
- Fast alignment: Biscuits act like guides, helping the wood stay lined up as the glue dries.
- Strong joints: The joint is almost as strong as the wood itself, especially for panels and cabinets.
- No visible hardware: Everything is hidden. No screw holes to fill or cover.
- Works on many projects: Cabinets, tabletops, frames, and more.
I used to dread glue-ups because things shifted or slipped. With biscuits, assembly is less stressful. The pieces snap into place and stay put.
The Main Parts Of A Biscuit Joiner
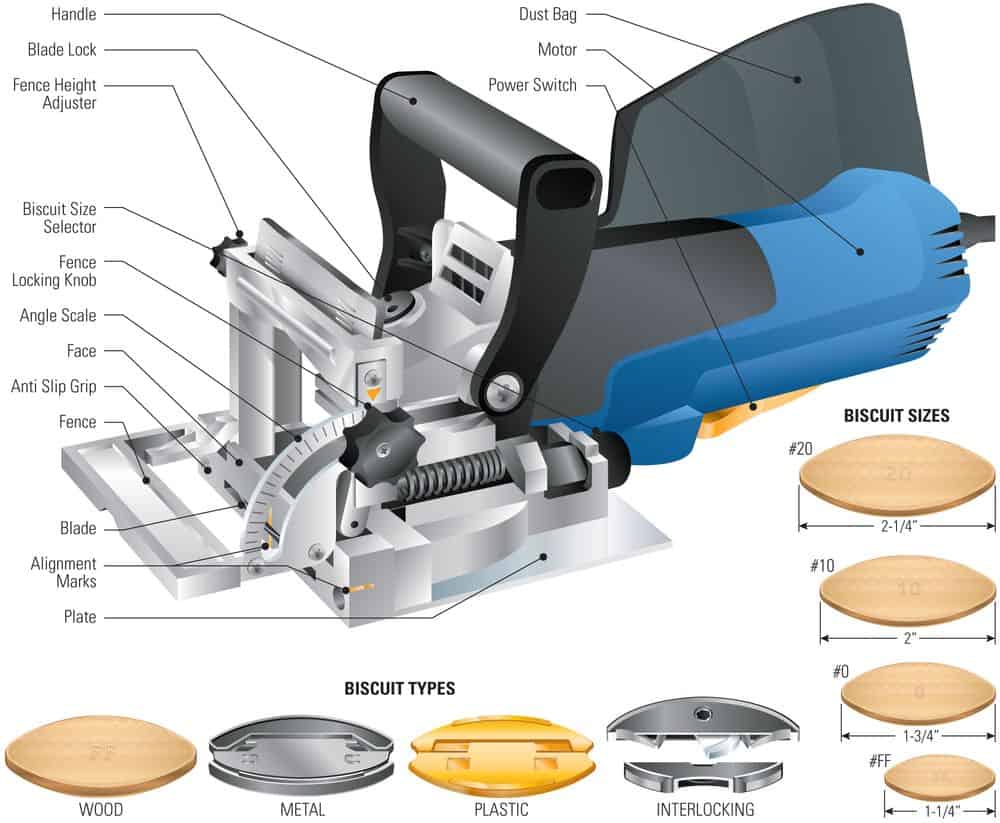
Let me introduce the parts you’ll use the most. Knowing these will help you feel at home with your tool.
| Part | What It Does | My Tip |
|---|---|---|
| Blade | Cuts the slot for the biscuit | Check for sharpness every few projects |
| Fence | Sets the angle and height of the cut | Always lock it before cutting |
| Depth Stop | Controls how deep the blade goes | Match the depth to your biscuit size |
| Handle | For holding and guiding the tool | Use both hands for safety |
At first, I ignored the fence settings and cut crooked slots. Don’t make that mistake. Take a minute to set up your joiner before every project.
Choosing The Right Biscuits
Biscuits come in different sizes. The most common are:
- #0 (small) – 5/8” x 1-3/4”
- #10 (medium) – 3/4” x 2-1/8”
- #20 (large) – 1” x 2-3/8”
Most of the time, I reach for #20 biscuits. They fit well for panels, shelves, and frames. For small trim, I use #0. Always match the biscuit to the thickness of your wood. If the biscuit is too big, you’ll weaken the joint.
Too small, and it won’t hold well.
Step-by-step: How I Use A Biscuit Joiner
I want to walk you through my process, step by step. I’ll also point out the common pitfalls I learned to avoid.
1. Gather Your Tools And Materials
You’ll need:
- Biscuit joiner
- Biscuits (the right size)
- Wood glue
- Clamps
- Pencil and measuring tape
- Safety glasses and dust mask
- Scrap wood for practice
When I first started, I skipped the dust mask. Big mistake! Cutting slots creates a cloud of fine dust. Protect your lungs.
2. Mark Your Joint Locations
Lay out the two boards you want to join. Draw a pencil line across both at each spot you want a biscuit. I put biscuits every 6-10 inches for panels, and near the ends for frames.
Pro tip: Keep the marks light. Heavy lines are hard to erase after gluing.
3. Set The Biscuit Joiner
Adjust the fence height so the slot will be centered in the wood’s edge. Set the depth for your biscuit size. On most joiners, there’s a dial or lever for this. Double-check the settings—this saves you from headaches later.
I learned this the hard way when I set the fence too low. The slot poked out the side of my board. Measure twice, cut once!
4. Cut The Slots
Place the fence flat on your workpiece. Line up the joiner’s center mark with your pencil line. Hold the tool with both hands. Press the joiner forward into the wood until the blade stops, then pull it back out.
Go slow. If you push too fast, the slot will be rough and uneven.
After cutting, blow or vacuum out the dust from each slot. If you leave dust inside, the biscuit won’t fit right, and the glue won’t bond as well.
5. Do A Dry Fit
Before gluing, insert the biscuits and push the pieces together. Check that everything lines up and the joints close tightly.
I skip this step only when I’m feeling overconfident—and I always regret it. Dry fitting catches problems before the glue sets.
6. Apply Glue And Assemble
Squeeze glue into the slots and on the biscuit. I use a small brush to spread it. Insert the biscuits, then push the boards together.
Don’t use too much glue. If you do, it oozes out and makes a mess. Wipe up any squeeze-out with a damp cloth before it dries.
7. Clamp And Wait
Clamp the assembly until the glue dries. I usually leave it clamped for at least 30 minutes, but overnight is safest for big projects.
Don’t skip the clamping. Even if the joint feels tight, clamping ensures a strong bond.
Comparing Biscuit Joints To Other Wood Joints
You might wonder, “Is a biscuit joint really better? ” Here’s what I’ve found, based on my experience and some research.
| Joint Type | Strength | Speed | Visible Hardware? | Best Use |
|---|---|---|---|---|
| Biscuit Joint | High | Fast | No | Panels, shelves, frames |
| Dowels | Very High | Medium | No | Chairs, heavy frames |
| Pocket Screws | Medium | Very Fast | Yes (unless plugged) | Cabinets, face frames |
| Mortise & Tenon | Very High | Slow | No | Doors, tables |
Biscuits are my go-to for big, flat surfaces. For super-strong joints, like chair legs, I switch to dowels or mortise and tenon.

Common Mistakes And How To Avoid Them
I made plenty of mistakes when I started. Here are the biggest ones, and how you can avoid them:
- Cutting slots off-center: Double-check your fence height before every cut.
- Forgetting to dry fit: Always test before gluing. It saves headaches.
- Not enough glue: If the joint is dry, it won’t hold. But too much glue is messy.
- Not cleaning slots: Dust in the slot weakens the bond.
- Misaligned marks: Use a square to mark both boards at once for perfect alignment.
- Skipping clamps: Even if the joint feels tight, clamps make it stronger.
There’s a learning curve. But with a little practice, you’ll get smooth results.
My Favorite Biscuit Joiner Projects
I’ve used biscuit joiners on all sorts of projects. Here are a few that turned out great:
- Bookcases: Shelves stay straight and strong, even with heavy books.
- Tabletops: Joining boards edge-to-edge is a breeze. No more gaps.
- Picture frames: Thin biscuits work great for mitered corners.
- Cabinet doors: Quick assembly, no visible fasteners.
If you’re just starting, try making a small box or shelf. Practice cutting slots and gluing up. You’ll gain confidence fast.
Tips For A Better Biscuit Joint
Over time, I’ve picked up a few tricks that make a big difference:
- Label your boards before cutting. It’s easy to mix up left and right.
- Practice on scrap wood first. Get a feel for the joiner before working on your real project.
- Store biscuits in a sealed container. They absorb moisture and swell if left out.
- Use a sharp blade. A dull blade tears up the wood.
- Don’t rush the glue-up. Take your time for best results.
One insight I learned late: If your boards are bowed or twisted, biscuits won’t fix the problem. Start with straight, flat wood for the best joints.
Another tip: If your wood is thin (under 3/4”), consider using smaller biscuits or switching to another joint method.
Maintenance And Safety
A biscuit joiner is pretty low-maintenance, but a little care goes a long way:
- Clean the tool after every use. Dust buildup can affect accuracy.
- Check the blade for wear. Replace if it’s chipped or dull.
- Tighten all screws before you start.
- Wear safety glasses and a dust mask. The fine dust is no joke.
Safety is key. I once skipped the dust mask and ended up sneezing for hours. Don’t be like me—protect yourself.
Choosing A Biscuit Joiner: What Matters
If you’re shopping for a biscuit joiner, here’s what I look for:
| Feature | Why It Matters | My Experience |
|---|---|---|
| Adjustable fence | Lets you cut at different angles and heights | Essential for versatility |
| Power (amp rating) | Higher power cuts smoother, especially in hardwood | Look for at least 5 amps |
| Dust collection | Keeps your workspace clean | Built-in bag or vacuum port is very helpful |
| Ergonomics | Comfort and control during use | Try holding it before buying |
Some brands are better than others. Read reviews and, if you can, test one out in a store first. For detailed comparisons, you can check resources like Wikipedia.
Frequently Asked Questions
How Strong Are Biscuit Joints?
Biscuit joints are quite strong for most furniture and cabinets. They’re not as strong as dowel or mortise and tenon joints, but for shelves, panels, and frames, they hold up very well. I’ve made heavy bookcases that never sagged.
Can I Use A Biscuit Joiner On Plywood?
Yes, you can. I often use biscuit joints on plywood panels. Just be careful—some cheap plywood can splinter. Go slow and use a sharp blade.
What Glue Should I Use For Biscuit Joints?
Any good wood glue works. I use regular yellow carpenter’s glue. The glue both in the slot and on the biscuit makes the joint strong. Waterproof glue is best if your project will get wet.
Do Biscuits Add Any Strength, Or Are They Just For Alignment?
Biscuits do both. They help line up your boards, but they also add real strength, especially when the glue swells the biscuit inside the slot. For big panels, that extra holding power matters.
How Do I Avoid Cutting Through The Edge Of My Board?
Set your fence height carefully, and always measure before cutting. Practice on scrap wood first. If your slots are too close to the edge, try a smaller biscuit.
Using a biscuit joiner made my woodworking cleaner, faster, and more fun. It’s one of those tools that’s simple to use but gives great results. I hope my stories and tips help you get started with confidence. If you stick with it, you’ll soon be making strong, neat joints that you can be proud of.
Happy building!
As an Amazon Associate, We earn from qualifying purchases