Keeping my hedge trimmer sharp has made my gardening life so much easier. I used to struggle with dull blades. The cuts were messy, and my arms got tired fast. But once I learned how to sharpen my hedge trimmer myself, everything changed.
Prime Day Pick
Limited-time Prime Day price. Check current discount on Amazon.
My hedges looked better, and I finished the job quicker. If you want to do the same, I’m happy to walk you through the whole process step by step. I’ll share what I learned, the mistakes I made, and a few tips that make a big difference.
Why A Sharp Hedge Trimmer Matters
When I first started trimming, I didn’t think much about blade sharpness. I thought all hedge trimmers were a bit slow and hard to use. But after a few months, I noticed my bushes looked ragged, and the branches didn’t cut cleanly.
Prime Day Pick
Limited-time Prime Day price. Check current discount on Amazon.
This made them heal slowly and look unhealthy.
Prime Day Pick
Limited-time Prime Day price. Check current discount on Amazon.
A sharp trimmer makes every cut smooth and quick. It keeps the plant healthy and saves you time. Plus, a dull blade can actually be dangerous. It makes the tool harder to control, and you may need to use more force—never a good idea when working with sharp objects.
Types Of Hedge Trimmers And Their Blades
Let’s talk about the types of trimmers. I’ve used both manual and electric ones, and the sharpening process is a bit different for each.
| Type | Blade Material | Sharpening Difficulty |
|---|---|---|
| Manual Hedge Shears | Steel | Easy |
| Electric Hedge Trimmer | Hardened Steel | Moderate |
| Gas Hedge Trimmer | Hardened Steel | Moderate |
Manual shears usually have two long, scissor-like blades. They’re simple to sharpen. Electric and gas trimmers use a row of teeth that move back and forth. These teeth need a bit more care, but you can still sharpen them at home with some patience.
Signs Your Hedge Trimmer Needs Sharpening
How do you know if your trimmer is dull? Here’s what I noticed:
- Ragged cuts – Instead of clean slices, branches looked torn.
- Extra effort – I had to push harder or go over the same spot again.
- Stuck branches – Sometimes, twigs got caught instead of being cut cleanly.
- Vibration – The trimmer shook more than usual.
- Visible nicks – I saw small dents or rough spots on the blades.
If you see any of these, it’s time to sharpen your blades.
Tools And Materials You Need
I tried a few different tools before finding what worked best. You don’t need anything fancy, but using the right tools saves time and gives better results.
- Flat file (medium size, for electric/gas trimmers)
- Sharpening stone (for manual shears)
- Fine file or diamond file (for detail work)
- Cleaning brush or old toothbrush
- WD-40 or light machine oil
- Rag or cloth
- Protective gloves and safety glasses
- Screwdriver (if you need to remove the blades)
- Clamp or vise (optional, but helpful)
I started with just a file and a brush, but later added gloves and glasses after a few near misses. Safety always comes first.
Preparing Your Hedge Trimmer For Sharpening
Before I touch the blades, I always make sure the tool is safe to work on.
- Unplug or remove the battery if it’s electric.
- Drain the gas if you have a gas trimmer.
- Wear gloves. Even dull blades can cut you.
- Clean the blades. I use a brush and soapy water to remove sap and dirt. For stubborn sap, a bit of WD-40 works wonders.
- Secure the trimmer. If I can, I clamp it to a workbench. This keeps both hands free and avoids accidents.
These steps might seem boring, but they make the sharpening much easier and safer.
How To Sharpen Manual Hedge Shears
Manual shears are the easiest to sharpen. Here’s how I do it:
- Open the shears fully so both blades are visible.
- Hold the shears steady. I usually clamp the handle to a table or ask a friend for help.
- Use a sharpening stone or a flat file. Always follow the angle of the blade.
- File away from you in one direction. This gives a smoother edge and avoids scratches.
- Check your progress every few strokes. Stop when the edge feels sharp but not rough.
- Flip and repeat for the other blade.
- Wipe the blades with a cloth and apply a few drops of oil to prevent rust.
With a bit of practice, I can sharpen my shears in about ten minutes.

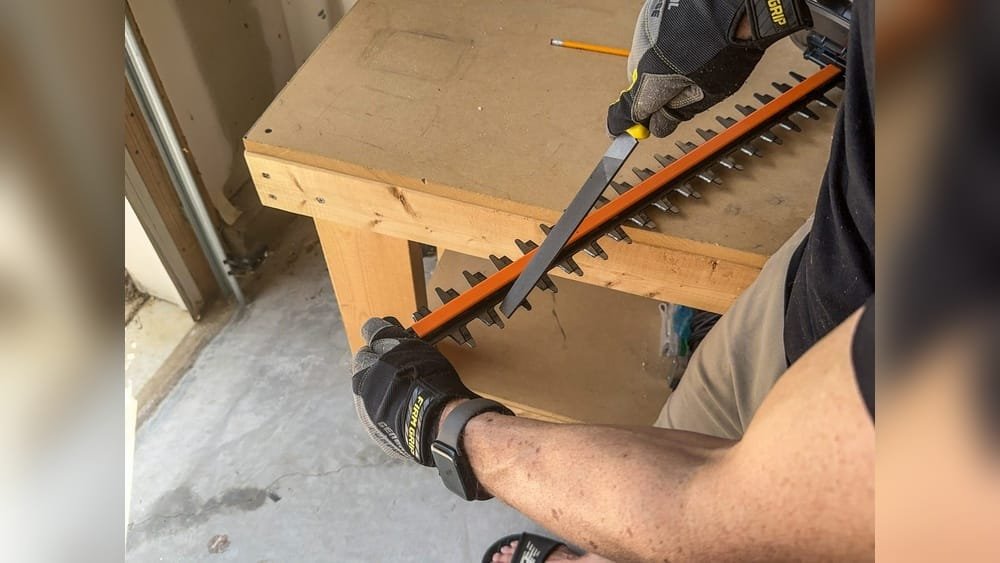
How To Sharpen Electric Or Gas Hedge Trimmers
This part used to make me nervous, but after a few tries, it became routine. The key is patience and small, steady strokes.
- Lay the trimmer flat on a stable surface.
- Inspect the blades. I check each tooth for damage or nicks.
- Use a flat file. Place it at the same angle as the original edge (usually around 45 degrees).
- File each tooth in the same direction, using short strokes. Don’t saw back and forth.
- Count your strokes. I usually do about 5-10 strokes per tooth.
- Work slowly down the blade, tooth by tooth.
- Flip the trimmer over and repeat for the other side if needed.
- Remove burrs. Lightly run a sharpening stone along the back side to smooth out any rough spots.
- Clean and oil the blades when done.
I sometimes use a power rotary tool with a grinding attachment for faster results, but only if I’m confident. It’s easy to take off too much metal with a power tool. Manual files give more control.
Common Mistakes (and How To Avoid Them)
I made several mistakes when I first started sharpening my hedge trimmer. Here are the main ones and how you can avoid them.
- Sharpening at the wrong angle – Always match the original angle of the blade. If you file too flat or too steep, the blade won’t cut well.
- Taking off too much metal – Light, even strokes are enough. Don’t try to make the blade razor-sharp. A slightly dull blade is safer than a thin, weak edge.
- Forgetting to clean – Dirt and sap make sharpening harder. Always clean the blade first.
- Not oiling after sharpening – I once skipped this, and my blades rusted overnight. Oil protects the edge and keeps the trimmer running smoothly.
- Rushing the job – Patience is key. Slow, even strokes give the best results.

How Often Should You Sharpen Your Hedge Trimmer?
I sharpen my trimmer after every 20 hours of use, or at least once a season. If you use your trimmer on thick or woody plants, you might need to sharpen it more often. If the blades hit rocks or metal fences, always check them right away.
Here’s a simple schedule I follow:
| Usage Type | Recommended Sharpening |
|---|---|
| Light (once a month) | Once per season |
| Moderate (weekly) | Every 20 hours |
| Heavy (professional) | Every 10 hours |
I learned the hard way that regular sharpening is easier than trying to fix badly damaged blades later.
Safety Tips I Wish I Knew Earlier
Sharpening is not dangerous if you take your time and follow a few simple rules.
- Always wear gloves and eye protection.
- Keep your workspace tidy so you don’t trip or drop tools.
- Unplug or remove batteries before starting.
- Keep kids and pets away while you work.
- Check the blade for cracks after sharpening. If you see any, replace the blade instead of sharpening it.
Trust me, a few extra minutes for safety are worth it. I once cut my finger because I was in a rush. Now, I double-check everything.

Aftercare: Keeping Blades Sharp For Longer
Once your trimmer is sharp, a little care goes a long way. Here’s what I do after every use:
- Clean the blades with a brush and wipe with a damp cloth.
- Spray with oil to prevent rust.
- Store in a dry place. I hang mine on the wall to keep it off the ground.
- Check for loose screws. Tighten them if needed.
If you do these things, your trimmer will stay sharp much longer, and you’ll save time in the long run.
When To Replace The Blades
Sometimes sharpening isn’t enough. If the blades are chipped, bent, or cracked, it’s time to replace them. I used to try sharpening even damaged blades, but they never worked well and were unsafe. Most brands sell replacement blades, and changing them is usually simple.
If you’re not sure, compare your blade’s shape and thickness to a new one. If yours is much thinner or uneven, replacement is the best choice.
Should You Sharpen Blades Yourself Or Use A Pro?
I used to take my trimmer to a shop, but now I do it myself. It saves money and time. If you’re nervous, start with manual shears to build confidence. Electric and gas trimmers take more care, but you can learn with practice.
Professional sharpening costs about $20 to $40 per trimmer. Doing it at home is nearly free after buying a file and oil. Just go slow and don’t rush—there’s no harm in asking for help if you get stuck.
If you want more detailed info, you can check out the Wikipedia page on hedge trimmers.
Frequently Asked Questions
How Long Does It Take To Sharpen A Hedge Trimmer?
Usually, it takes me 20 to 30 minutes for a full sharpening. Manual shears are faster—about 10 minutes. Electric and gas trimmers take longer because each tooth needs attention.
Can I Use A Grinder To Sharpen The Blades?
You can, but I recommend using a hand file unless you have experience. A grinder works fast but removes a lot of metal quickly. It’s easy to ruin the blade if you’re not careful.
What Oil Should I Use After Sharpening?
I use light machine oil or WD-40. The goal is to prevent rust and keep the blades moving smoothly. Avoid heavy oils, which attract dirt.
How Do I Know If I’ve Sharpened Enough?
I gently touch the edge with a gloved finger. If it feels smooth and sharper than before, I stop. If the blade still feels dull or has nicks, I do a few more strokes.
Is It Safe To Sharpen The Blades Without Removing Them?
Yes, I usually sharpen the blades while they’re still attached. But if the blades are very dull or damaged, removing them makes the job easier and safer.
Taking care of your hedge trimmer is worth the effort. With a sharp blade, you’ll work faster, stay safer, and your garden will look its best. I hope my experiences help you avoid the mistakes I made and give you confidence to do it yourself.
Happy trimming!
As an Amazon Associate, We earn from qualifying purchases