Sanding rounded edges used to scare me. I would look at a sharp corner on a table or a shelf and wonder, “How do people make that look so smooth? ” Over time, I learned that sanding rounded edges is not as hard as it seems—once you know what works and what doesn’t.
Today, I want to share everything I’ve learned, step by step, so you can get great results too. If you’ve ever felt nervous about sanding curves or worried you’d ruin your project, you’re in the right place.
Why Sanding Rounded Edges Is Different
When I first started woodworking, I thought sanding was just sanding. I’d take a block, wrap it with sandpaper, and go at it. But I quickly found out that rounded edges are a different story. Flat edges let you press down and keep everything even, but with curves, it’s easy to get uneven shapes or ugly flat spots.
Rounded edges look and feel better, especially on things you touch often—like tabletops, chair arms, or cabinet handles. They’re also safer, especially if you have kids at home. But to get a smooth, even curve, you need a different approach than just using a sanding block.
Tools And Materials You’ll Need
Let’s start with the basics. Here’s what I’ve found works best for sanding rounded edges:
- Sandpaper sheets – Get several grits: 80, 120, 180, and 220.
- Flexible sanding sponge – These bend easily around curves.
- Sanding block – For bigger curves, not tight ones.
- Rubber or foam pad – Good for wrapping sandpaper.
- Wood rasp or file (optional) – For rough shaping.
- Power sander (optional) – Random orbit sanders can help, but be careful.
- Dust mask – Don’t skip this.
- Vacuum or brush – To keep the dust under control.
I also keep a pencil and a damp rag nearby. The pencil helps mark high spots, and the damp rag picks up dust and shows the final surface.

Preparing The Surface
Before you start, check the wood for nails, staples, or glue spots. These can tear your sandpaper or scratch the curve. I learned this the hard way after ruining a piece with a hidden staple.
If you’re shaping a new edge, use a router with a round-over bit to get the basic curve. If you don’t have a router, you can hand-sand, but it takes longer. Sometimes, for small projects, I start with a wood file or rasp to get the rough shape, then move to sandpaper.
How To Sand Rounded Edges: Step By Step
Let me walk you through the process I use every time.
1. Start With Coarse Grit For Shaping
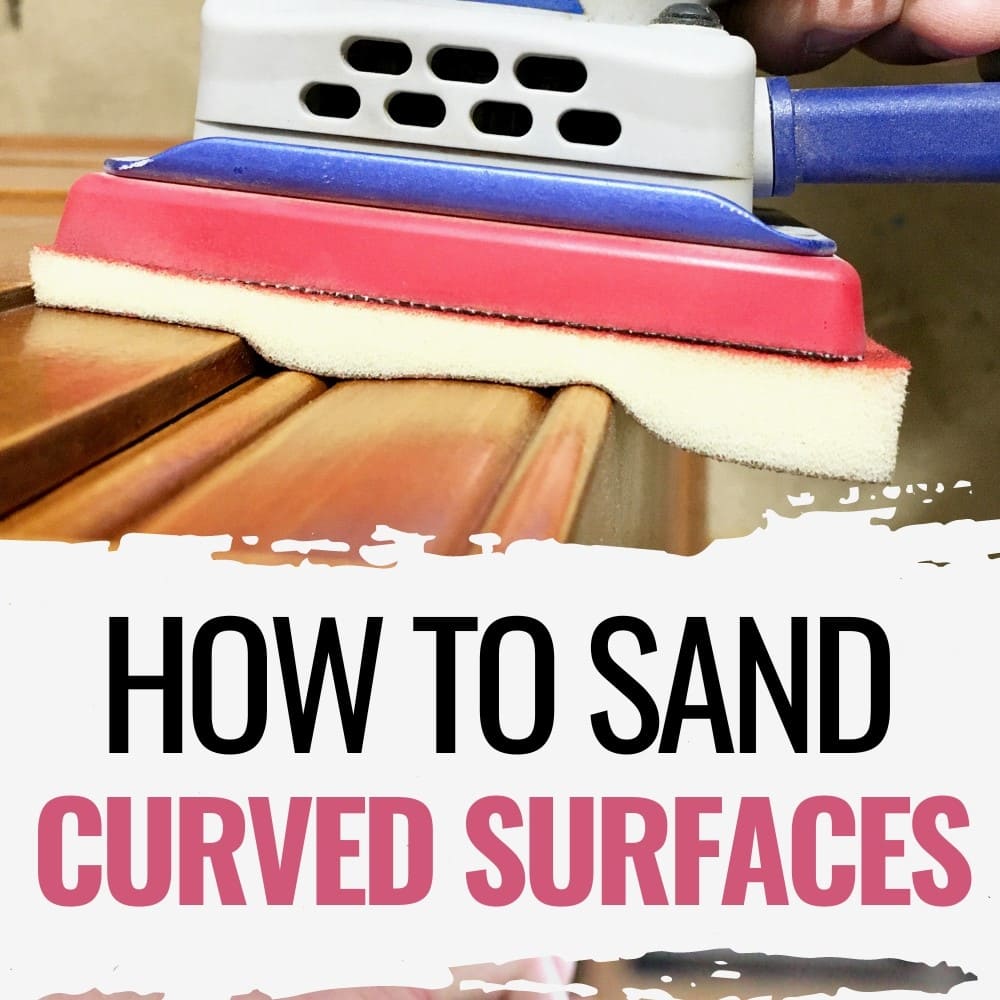
I always begin with 80-grit sandpaper if the edge is very sharp. This grit removes wood fast, but it can leave scratches. I wrap the paper around a foam pad or just use my hand for tight curves. For bigger, gentle curves, I use a sanding block with the paper wrapped around it.
If you’re working on a small, tight radius, I suggest folding the sandpaper and using your fingers. Just don’t press too hard—your fingers can make grooves if you’re not careful.
Tip: For perfect symmetry, sand both sides of the edge the same way. I once sanded one side of a table leg more than the other and ended up with a lopsided look.
2. Move To Medium Grit For Smoothing
Once the sharp edge is gone, I switch to 120-grit. This step is where the edge really starts to feel smooth. The goal here is to remove the deep scratches from the coarse grit. I often use a sanding sponge at this point. Sponges flex around the curve and help keep the rounded shape.
Non-obvious insight: When you switch grits, always sand a little longer than you think you need. The scratches from rougher grits can hide in the curve. Hold the wood up to the light and look for shiny spots—these are usually scratches you missed.
3. Fine Grits For A Silky Touch
Now, I move to 180-grit, and finally 220-grit. This is where patience pays off. I use light pressure and long, even strokes. At this stage, you should feel the edge get almost soft to the touch.
Sometimes I switch to a damp cloth to wipe away dust before checking my progress. This helps see if the edge is truly smooth or if there are still rough spots.
Tip: Don’t skip grits. If you jump from 80 to 220, you’ll see scratches no matter how long you sand.
4. Dealing With Tight Curves And Complex Shapes
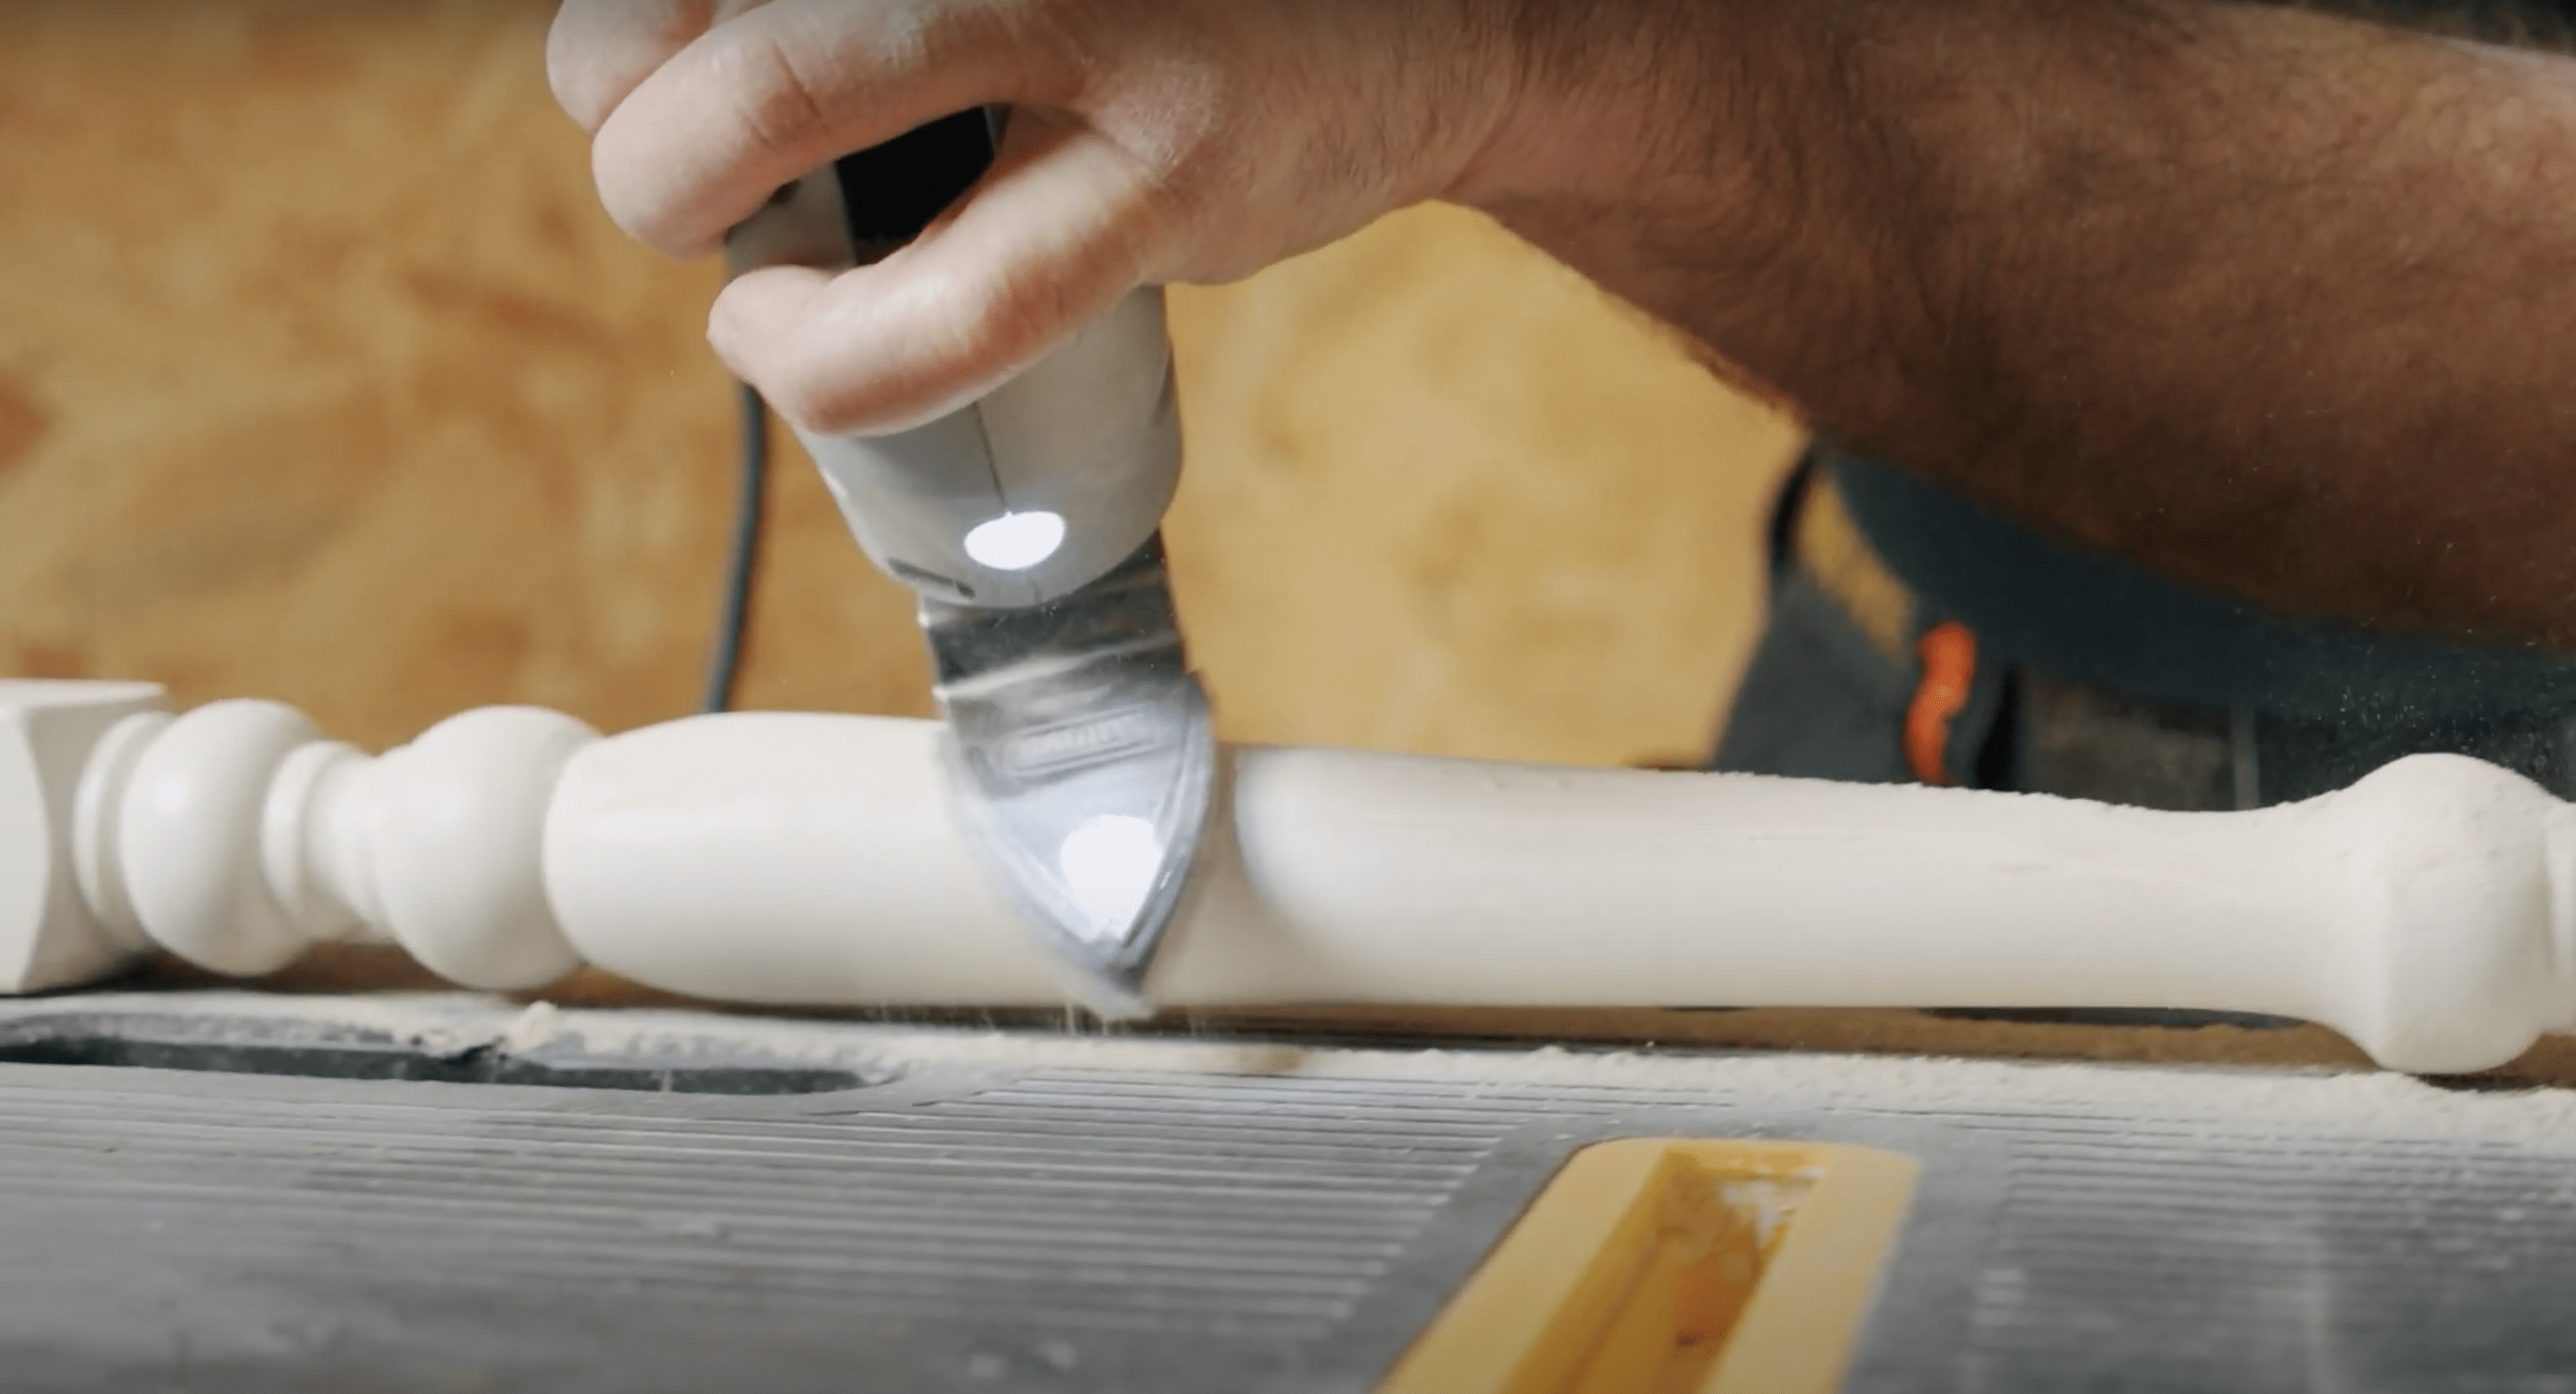
Curves inside handles or small cutouts are tricky. I learned to make my own sanding tools by wrapping sandpaper around a pencil, dowel, or even a piece of rubber hose. This lets me get into tight spots without flattening the curve.
For really small details, I sometimes tear the sandpaper into strips and use a shoeshine motion—pulling the strip back and forth like shining a shoe. It’s slow, but it works.
5. Checking Your Work
When I think I’m done, I always run my fingers along the edge with my eyes closed. My hands feel things my eyes miss. If I feel any bumps or flat spots, I go back to a finer grit and smooth them out.
I also use a pencil to lightly mark the edge before my final sanding. If any pencil marks remain after a few passes, I know I need to sand more in that spot.
Sanding By Hand Vs. Power Tools
You might wonder, “Should I use a power sander?” Here’s what I’ve learned:
- Hand sanding gives more control. You feel the wood and can follow the curve better.
- Random orbit sanders are fast, but they can flatten curves if you’re not careful. I use them only on big, gentle curves.
- Detail sanders are helpful for small spaces, but they can still make flat spots.
Here’s a quick comparison based on my experience:
| Method | Best For | Common Problem | My Rating (1-5) |
|---|---|---|---|
| Hand sanding | All curved edges | Slow on big projects | 5 |
| Random orbit sander | Large, gentle curves | Flattens edges if not careful | 3 |
| Detail sander | Tight spots | Hard to control | 3 |
For most projects, I start with hand sanding, even if it takes more time. The control is worth it.
Grit Progression: Why Order Matters
Many beginners ask me, “Can I skip grits to save time? ” I tried this once. The finish looked great until I stained the wood. Then, all the missed scratches showed up like a road map.
Here’s the grit order I always follow:
- 80-grit: For shaping, removing sharp corners
- 120-grit: Smoothing, removing deep scratches
- 180-grit: Further refining the edge
- 220-grit: Preparing for finish
Skipping a step often means you’ll spend more time fixing mistakes later. Each grit removes the scratches from the one before it.
Sanding Rounded Edges On Different Materials
Not all wood is the same. Here’s what I’ve noticed:
- Softwoods (like pine): Sand very quickly, but scratch easily. Use light pressure.
- Hardwoods (like oak or maple): Take more effort, but give a cleaner finish.
- Plywood: The edges can splinter. Always sand with the grain, and don’t use very coarse grits.
For painted projects, I sometimes stop at 180-grit. For stained or clear finishes, I always go to 220-grit or even 320-grit for a glassy feel.
Here’s a summary table for reference:
| Material | Key Point | Grit to Finish | Extra Tip |
|---|---|---|---|
| Pine (softwood) | Scratches easily | 220 | Light pressure only |
| Oak (hardwood) | Tough to sand | 220+ | Go slow on edges |
| Plywood | Edges splinter | 180 | Sand with the grain |
| MDF | Dusty, smooths fast | 220 | Wear mask, vacuum often |
Common Mistakes (and How To Avoid Them)
I’ve made plenty of mistakes while learning. Here are a few I wish I knew about sooner:
- Pressing too hard: This can flatten the curve or gouge the wood.
- Skipping grits: Leaves deep scratches that show up later.
- Using old sandpaper: Worn paper polishes, but doesn’t sand well.
- Not cleaning dust: Dust hides flaws. Wipe often with a damp rag.
- Not checking with your fingers: Your eyes miss what your hands can feel.
One mistake beginners make is trying to finish too fast. Sanding is slow, but the results are worth it.
My Favorite Tricks For Perfect Rounded Edges
Let me share two insights that made a huge difference for me:
- Use a pencil guide: Lightly draw a line on the edge before final sanding. Sand until the line is gone. This shows if you’re removing wood evenly.
- Make custom sanding blocks: For tight curves, wrap sandpaper around a dowel, pencil, or even an old marker. This keeps the shape true and helps avoid flat spots.
These tricks helped me get professional-looking results, even as a beginner.
When To Stop Sanding
Many people ask, “How do I know when I’m done? ” For me, it’s when the edge feels as smooth as glass, with no bumps or rough spots. I run a damp rag over the edge to check for any raised grain.
If it feels rough after drying, I do a final pass with 220-grit.
If I’m staining, I do a test spot in a hidden area. If the stain goes on evenly, I know I’ve sanded enough.
Finishing Touches
After sanding, always remove all the dust before painting or staining. I use a vacuum and a tack cloth. If you leave dust, the finish won’t stick well.
Sometimes, I round the edge a tiny bit more with 220-grit after the first coat of finish. This knocks down any raised fibers and gives a silky feel.
For more sanding tips and techniques, you can check out resources like Popular Woodworking. They have great guides for both beginners and pros.
Frequently Asked Questions
How Can I Sand A Rounded Edge Without Special Tools?
You can use regular sandpaper by folding it and using your fingers. For tighter curves, wrap the sandpaper around a pencil or dowel. Hand sanding gives the most control and is all you need for most projects.
What Grit Sandpaper Should I Finish With For Rounded Edges?
For most wood projects, finish with 220-grit sandpaper. If you want a super-smooth feel, you can go up to 320-grit. For painted surfaces, 180-grit is usually enough.
Why Does My Rounded Edge Look Flat After Sanding?
This happens when you press too hard or use a sanding block on a tight curve. Try using a flexible sponge or your fingers with gentle pressure. Always move sandpaper in the direction of the curve.
How Do I Sand Inside Tight Corners Or Cutouts?
Wrap sandpaper around a small object like a pencil or dowel. Use a back-and-forth motion, like shining a shoe. For very small spots, use narrow strips of sandpaper.
Is It Okay To Use A Power Sander On Rounded Edges?
Yes, but with care. Power sanders are best for big, gentle curves. They can flatten tight curves if you’re not careful. For detailed work, hand sanding is safer and gives better results.
Sanding rounded edges changed the way my projects look and feel. It takes a bit of time, but the smooth, clean result is always worth it. With patience and the right technique, you’ll never look at sharp corners the same way again.
As an Amazon Associate, We earn from qualifying purchases