Sanding glass edges seemed scary to me at first. I remember holding a sharp piece of glass, wondering how I could ever make it safe to touch. But after trying different methods and learning from mistakes, I found it’s not as hard as it seems.
If you want to smooth those sharp edges on glass, I’m here to share what I learned—step by step, with the little tips that make things easier and safer.
Why Sand Glass Edges?
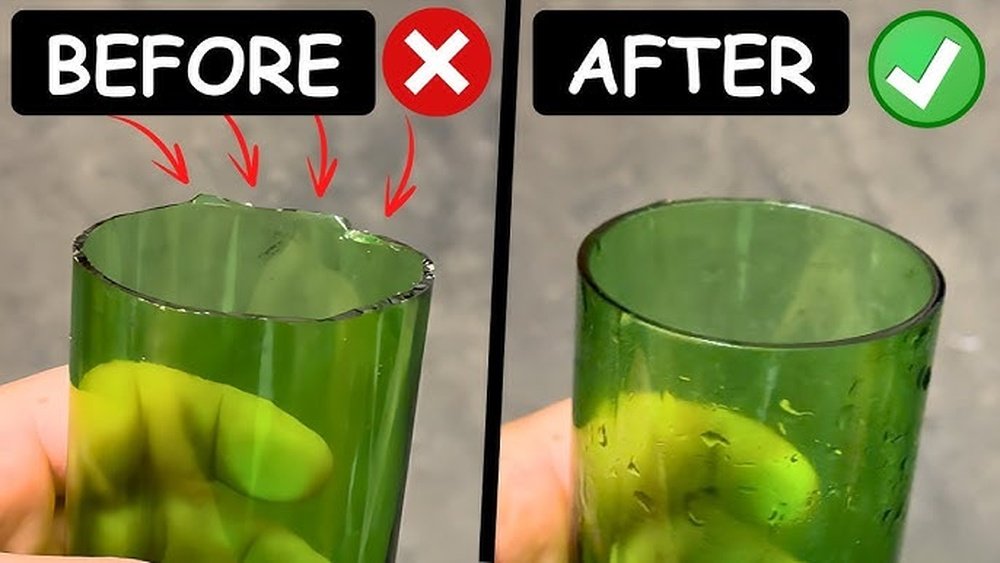
When I started working with glass, I cut myself more than once. The edges are like tiny knives, especially if you break or cut glass at home. Smoothing or sanding the edges is important for two reasons. First, it makes the glass safe to handle.
Second, it gives a finished look, whether you’re making a picture frame, a window, or a craft project.
Safety First: Protect Yourself
Before I tell you about sanding, I want to stress the importance of safety gear. I once skipped gloves because I thought I’d be careful. Big mistake! Now, I always wear:
- Thick gloves (cut-resistant if you have them)
- Safety glasses (even sunglasses are better than nothing)
- A dust mask (glass dust is dangerous to breathe in)
- A long-sleeve shirt to protect your arms
Even if you think you’ll be quick, don’t skip these. Glass pieces are unpredictable.
Tools And Materials: What You Need
You don’t need fancy tools, but using the right ones makes a big difference. Here’s what I use and recommend:
| Tool | Purpose | Best For |
|---|---|---|
| Sandpaper (Silicon Carbide, Wet/Dry) | Smoothing edges | Manual control, small projects |
| Diamond hand pad | Fast, even sanding | Thicker glass, faster results |
| Glass file | Precision work | Tiny chips, detailed work |
| Dremel/rotary tool with diamond bit | Power sanding | Large projects, rounded edges |
| Water spray bottle | Dust control | All sanding methods |
I started with sandpaper and a spray bottle. Over time, I tried diamond pads and a rotary tool. Each method has its pros and cons. I’ll explain those as we go.
Preparing The Glass
I learned early on that you can’t just grab the glass and start sanding. Preparation is key.
- Clean the glass: Wash with soap and water. Dry it well. Dirt can scratch the surface while you sand.
- Lay down a towel or rubber mat: This keeps the glass from sliding and cushions against breaking.
- Mark the edge (if you need): Sometimes I use a marker to highlight the edge I want to sand. It helps me stay on track.
If the piece is small, I sometimes tape the sides with painter’s tape. This protects the glass from accidental scratches.
Choosing The Right Sandpaper Grit
When I first started, I didn’t know which grit to use. I grabbed whatever was in the toolbox. Don’t do that! For glass, use silicon carbide or “wet/dry” sandpaper.
| Grit | Result | When to Use |
|---|---|---|
| 60-120 (coarse) | Fast shaping, removes chips | Rough, chipped, or sharp edges |
| 220-400 (medium) | Smoothing, less scratching | After coarse, or for light smoothing |
| 600-1500 (fine) | Polished, soft finish | Final step, shiny edges |
I usually start with 120 or 220 grit, then finish with 400 or 600. If you want a super shiny edge, go up to 1000 or 1500.
Method 1: Sanding Glass By Hand
This is the most basic way, and it’s how I started. It’s slow, but you have full control.
- Wet the sandpaper: Always sand glass wet. I dip the sandpaper in water, or spray water often. This stops dust and keeps the glass cool.
- Wrap the sandpaper around a small block or use your fingers. For curved edges, I use my finger. For straight edges, a block gives better pressure.
- Rub the sandpaper along the edge: Move in small circles or back and forth. Go slow and check your progress often.
- Rinse the edge every few minutes. Glass powder builds up and can scratch the surface.
- Switch to finer grit as the edge gets smoother. I move from 220 to 400, then 600.
- Check the edge with your finger: If it feels smooth and safe, you’re done.
Don’t rush. If you push too hard, the glass can crack. Gentle pressure works best.

Method 2: Using A Diamond Hand Pad
After getting tired of slow sanding, I bought a diamond hand pad. These are made for glass and ceramics. They cost more, but last a long time.
- Wet the pad before starting.
- Hold the glass steady and rub the pad along the edge.
- Use even, light pressure. The pad cuts faster than sandpaper.
- Rinse often. Diamond grit works best when clean.
- Finish with a fine pad for a smooth edge.
I like diamond pads for thicker glass, like shelves. They cut down the time a lot.
Method 3: Power Tools (rotary Tool/dremel)
If you have a Dremel or rotary tool, sanding is much faster. I use a diamond bit or sanding drum.
- Clamp the glass: Power tools can slip. I always use clamps and a towel to hold the glass.
- Wear extra protection: The tool throws glass dust everywhere. Wear a mask and goggles.
- Set to low speed: High speed can chip the glass.
- Gently touch the edge with the spinning bit. Move slowly along the edge.
- Cool with water: A spray bottle helps keep things cool and dust down.
- Finish by hand: Power tools can leave tiny scratches, so I use fine sandpaper after.
Power tools are great for large projects or thick glass, but they take practice. My first try left some uneven spots. Now, I always finish by hand for the best look.
Method 4: Glass Files
Glass files are small, metal tools with a rough surface. They are great for tiny chips or tight corners. I use mine for detailed work, like smoothing the corners of stained glass.
- Hold the file at an angle to the edge.
- Use short, gentle strokes.
- Check often, and don’t press too hard.
Files are slow, but they give you a lot of control.
Wet Vs. Dry Sanding: Which Is Better?
I tried both, but wet sanding wins every time. Here’s why:
- Less dust: Glass dust is harmful. Wet sanding keeps it down.
- Smoother finish: Water helps sand evenly.
- Cooler glass: No heat cracks.
I only sand dry if I’m outside and wearing a mask, but honestly, wet sanding is safer and easier.
Common Mistakes And How To Avoid Them
I’ve made almost every mistake possible. Here are a few to watch out for:
- Sanding too dry: My lungs were sore for days once. Always use water.
- Using the wrong grit: Coarse sandpaper scratches the glass. Start fine if you’re unsure.
- Pressing too hard: Glass chips easily. Let the tool do the work.
- Skipping safety gear: Even “dull” glass can cut deep.
- Not checking progress: It’s easy to over-sand one spot. Stop often and look closely.
If you avoid these, you’ll save yourself trouble.
How To Polish Glass Edges (optional)
Sometimes, I want the edge to look shiny and clear, like store-bought glass. Polishing is an extra step.
- Use very fine sandpaper (1000-3000 grit) or a special cerium oxide polish.
- Rub gently with a cloth or felt wheel.
- Wipe away the polish and check the shine.
This takes extra time, but the result is beautiful. It’s worth it for gifts or display pieces.
When To Stop Sanding
It’s tempting to keep sanding for a perfect look. But I’ve learned to stop when:
- The edge feels smooth to touch (test with your finger, gently).
- There are no big chips or sharp spots.
- The edge looks even and safe.
Over-sanding can make the glass thin or cause cracks. If in doubt, stop and check.
Cleaning Up
After sanding, I always clean up carefully.
- Wipe the glass with a damp cloth to remove dust.
- Wash your hands and face. Glass powder is hard to see but can irritate skin.
- Clean your work area. Wet paper towels work best.
Never sweep glass dust dry—it goes into the air. Always use water or a vacuum with a HEPA filter.

Comparing Methods: What Works Best?
I’ve tried all these methods. Here’s a quick comparison:
| Method | Speed | Finish | Best For |
|---|---|---|---|
| Hand Sanding | Slow | Very smooth | Small pieces, beginners |
| Diamond Pad | Medium | Smooth | Medium/large pieces |
| Rotary Tool | Fast | Needs finishing | Large, thick glass |
| Glass File | Very slow | Precise | Details, corners |
If you’re just starting, hand sanding is the easiest. For bigger jobs, try a diamond pad or a rotary tool.
Non-obvious Tips I Learned
There are a few things I wish I knew from the start:
- Check with a flashlight: Shine a light along the edge. Tiny chips and cracks show up better.
- Use dish soap in water: A drop of soap in your water makes sanding smoother and cleaner.
- Edge color changes: Sanded glass edges turn frosty or white. If you want them clear, you’ll need to polish extra.
When To Get Help
Most small glass projects are safe to do at home. But if you have very thick, tempered, or valuable glass, it’s worth asking a professional. I once tried to sand a thick aquarium panel—big mistake. The edge cracked, and I had to replace the whole thing.
Some jobs are best left to the pros.
Useful Resources
If you want to read more about glass safety and working with glass, I found this guide from the Wikipedia Glass Cutter page very helpful. It covers more about tools and safety for all types of glass work.

Frequently Asked Questions
What Grit Sandpaper Is Best For Sanding Glass Edges?
I recommend starting with 220 grit if the edge is very sharp or rough. Move up to 400 or 600 grit for a smooth finish. For a polished look, finish with 1000 or 1500 grit.
Can I Sand Glass Edges Without Water?
You can, but I don’t suggest it. Sanding dry creates a lot of dust that’s dangerous to breathe. Wet sanding keeps dust down and gives a better finish.
How Do I Avoid Chipping The Glass While Sanding?
Always use gentle pressure and keep the edge wet. Let the sandpaper or tool do the work. If you push too hard, the glass can chip or crack.
Is It Possible To Make The Edge Look Clear And Shiny?
Yes! After sanding, use very fine sandpaper (1000-3000 grit) or a glass polish like cerium oxide. Buff with a cloth until it shines.
Do I Need Special Sandpaper For Glass?
Yes, use silicon carbide or “wet/dry” sandpaper. Regular wood sandpaper doesn’t work well and can scratch the glass.
Sanding glass edges can be relaxing once you get the hang of it. I hope my tips and stories help you avoid cuts and get great results. Take your time, stay safe, and enjoy your project!
As an Amazon Associate, We earn from qualifying purchases