Sanding hardwood floors was something I always thought was best left to the pros. The idea of using big machines and making a mess was scary. But when my living room floor started looking dull and scratched, I decided to give it a try myself.
I want to share my full experience with you—everything from getting ready, to the actual sanding, to cleaning up. If you’re thinking about doing this yourself, I hope my story helps you avoid stress and get great results.
Why I Decided To Sand My Own Floors
My hardwood floors had seen better days. Years of family, pets, and moving furniture left deep scratches and faded spots. Hiring a professional was expensive—quotes ranged from $1,500 to $3,000 for my 400 square foot living room. I knew DIY would cost less, but I worried about making mistakes.
Still, I was ready to put in the effort to save money and learn a new skill.
Gathering The Right Tools And Materials
Before starting, I researched and made a checklist. Here’s what I found essential:
- Drum sander (rented from a local hardware store)
- Edge sander for corners and edges
- Shop vacuum with a HEPA filter
- Various sandpaper grits: 36, 60, 80, and 120
- Dust masks and ear protection
- Plastic sheeting to block off rooms
- Wood filler for deep gaps or holes
- Knee pads (trust me, your knees will thank you)
- Rags and tack cloths
I spent about $100 renting the sanders for a weekend. Add another $75 for sandpaper, dust masks, and wood filler. This was much cheaper than hiring out. My biggest tip: don’t skimp on safety gear. Sanding makes a LOT of dust.

Prepping The Room: The Most Important Step
Preparation was a lot more work than I expected. But it paid off. I started by moving all furniture out. I took off baseboards and covered vents with plastic. Next, I used plastic sheeting and painter’s tape to seal doorways.
Dust gets everywhere, and I wanted to keep it out of the rest of the house.
I also removed any nails or staples sticking up from the floor. I filled deeper gouges with wood filler and let it dry overnight. Finally, I vacuumed the whole floor twice. Skipping this step can ruin your sandpaper and even your sander.
Choosing The Right Sandpaper Grit
Picking the right sandpaper grit was tricky at first. I read that most floors need three to four passes, each with a finer grit. Here’s what worked for me:
- 36-grit: Removes old finish and deep scratches.
- 60-grit: Smooths rough spots from the first pass.
- 80-grit: Prepares the surface for finishing.
- 120-grit: Final smoothing.
If your floors aren’t too bad, you might start with 60-grit. But for mine, the 36-grit was a lifesaver.
Here’s a quick comparison of sandpaper grits and their uses:
| Grit | Use | Results |
|---|---|---|
| 36 | First pass, removes finish | Very rough |
| 60 | Second pass, smooths surface | Less rough |
| 80 | Pre-finishing | Smooth |
| 120 | Final pass | Very smooth |
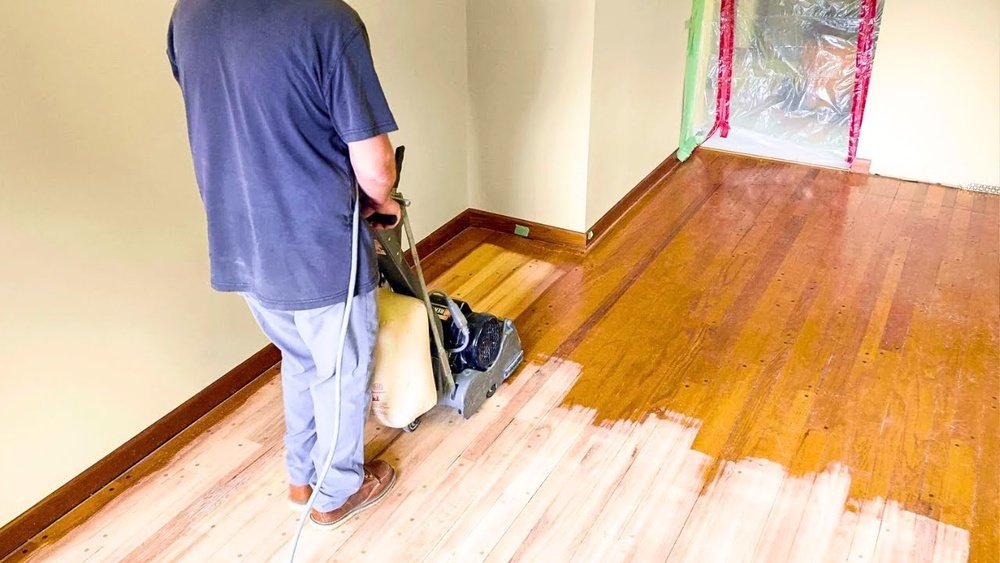
Handling The Drum Sander: My First Time
The drum sander looked big and loud, and I was nervous. The rental guy showed me how to turn it on and off. He warned me never to stop moving while the drum was down. If you do, you’ll gouge the floor.
That actually happened to me once near a wall—so keep moving!
I started in a corner and moved with the grain of the wood. I overlapped each row by a few inches. When I reached the wall, I lifted the drum before turning around. My advice: practice in a closet or hidden area first. After a few runs, I felt more confident.
Edges And Corners: The Tricky Parts
The drum sander can’t reach every spot. For edges and corners, I used an edge sander. It was lighter, but still powerful. I found it easier to control, but it made a lot of dust. I wore a dust mask and opened windows.
For tight corners, I sanded by hand with 80-grit sandpaper. It took time, but made a difference. Don’t skip these spots—unfinished edges are easy to see after staining.
/refinish-hardwood-flooring-1314864-hero-8c687ea6601148a2af507a47c0e57491.jpg)
Dealing With Floor Problems
Not all floors are the same. Mine had some cupping (boards curved up at the edges) and a few old stains. Cupping needed more passes with coarse grit. Old water stains were hard to remove—some never fully came out.
If your floor is too thin (less than 3/4 inch), be careful. Too much sanding can ruin it. Check for nails or staples often. I hit a hidden nail once and it tore the sandpaper.
Cleaning Up After Sanding
After sanding, my room was covered in fine dust. I vacuumed three times—using a shop vac, then a regular vacuum, then a tack cloth. Any dust left behind will mess up your finish.
I also wiped the walls and windowsills. Dust floats everywhere. The cleaner your room, the better your stain or finish will look.
Staining And Finishing: The Rewarding Part
I chose a light oak stain to brighten the room. I used a lambswool applicator and worked in small sections. Stain dries fast, so don’t stop in the middle of a row. After staining, I let it dry overnight.
For the finish, I picked a water-based polyurethane. It dries faster, has less smell, and is safer for pets and kids. I applied three thin coats, sanding lightly with 220-grit between coats. I waited at least two hours between coats.
My floors dried in about 24 hours, but I waited three days before moving furniture back.
Here’s a breakdown of common finishes:
| Finish Type | Dry Time | Durability | Smell |
|---|---|---|---|
| Oil-based polyurethane | 8-24 hours | Very high | Strong |
| Water-based polyurethane | 2-4 hours | High | Low |
| Wax | 1-2 hours | Low | Mild |
Common Mistakes I Made (so You Don’t Have To)
Looking back, I made a few mistakes that I hope you can avoid:
- Stopping the sander in one place: This left a groove. Always keep moving.
- Not changing sandpaper soon enough: Dull sandpaper doesn’t remove finish well.
- Rushing the prep: Dust and debris caused rough spots in my finish.
- Skipping grits: I tried to save time by skipping 80-grit. The finish looked uneven.
- Not wearing ear protection: The noise was much louder than I expected.
One thing I learned: patience pays off. Rushing only means you’ll spend more time fixing problems later.

The End Result And How I Felt
After all the work, my floor looked brand new. The scratches were gone, the color was even, and the surface was smooth. Family and friends couldn’t believe I did it myself. The best part? I saved over $1,000 and gained confidence to tackle other home projects.
Sanding floors is not easy, but it’s very doable if you prepare well and take your time. If I could do it, you can too.
What I Wish I Knew Before Starting
There were a few things I wish someone had told me:
- It’s a full-body workout. You’ll be sore afterward.
- Dust is relentless. No matter how much you seal off a room, it sneaks into other areas.
- Renting quality equipment matters. My friend tried a cheap sander and got bad results.
- Not all floors can be sanded. Some engineered wood has a thin top layer—check before you start.
- Neighbors may complain about noise. Schedule during the day and give them a heads up.
Is Diy Floor Sanding Right For You?
If you like hands-on work and want to save money, I recommend trying it. Just start small—maybe with a bedroom before tackling a big living room. If you’re short on time, have health issues, or your floor is very old, hiring a pro might be best.
Here’s a quick look at when to go DIY vs. hire a pro:
| Situation | DIY | Hire a Pro |
|---|---|---|
| Saving money is a priority | ✔️ | |
| Large or complex rooms | ✔️ | |
| Experience with power tools | ✔️ | |
| Very old or thin floors | ✔️ | |
| Short on time | ✔️ |
If you want more tips and detailed guides, I found the This Old House website very helpful.
Frequently Asked Questions
How Long Does It Take To Sand A Hardwood Floor?
For a standard living room (about 400 square feet), it took me two full days—one for prep and sanding, another for staining and finishing. Drying time for the finish adds another day or two before moving furniture back.
Can I Sand Hardwood Floors By Hand?
You can, but it’s very slow and hard work. Hand sanding works for small areas or corners, but for a whole room, a drum sander is much better.
How Do I Know If My Floor Is Too Thin To Sand?
Most solid hardwood can be sanded 3-5 times. If you see nail heads or the boards are less than 3/4 inch thick, be careful. Engineered wood often has a thin top layer—check with the manufacturer.
What’s The Best Finish For High-traffic Areas?
Water-based polyurethane is my top pick. It dries fast, has little odor, and resists scratches well. Oil-based is even tougher but smells strong and dries slowly.
How Can I Reduce Dust When Sanding?
Seal off doors and vents with plastic, use a sander with a dust bag, and vacuum often. Still, expect some dust to escape—plan on cleaning after.
If you’re considering sanding your own hardwood floors, I hope my experience gives you the confidence to try. It’s hard work, but seeing your floor shine again is worth every bit of effort.
As an Amazon Associate, We earn from qualifying purchases