Replacing the string on my Greenworks 40V trimmer seemed a bit scary at first. I remember standing in my yard, looking at the empty spool, and feeling stuck. If you’re here, maybe you’ve felt the same way—wishing someone would just walk you through it, step by step, in plain language. Good news: I’ve done this many times, messed up a few, and finally got it right. So, let’s walk through it together. I’ll break everything down, share what worked for me, and point out the things you won’t see in most guides. By the end, you’ll feel confident about swapping out that trimmer line, even if you’ve never done it before.
Prime Day Pick
Limited-time Prime Day price. Check current discount on Amazon.
Why You Need To Replace The String
You might wonder why you can’t just keep using your trimmer until the string is all gone. The truth is, a fresh string makes a huge difference. When the line gets short or worn, it can’t cut grass or weeds very well. You end up working harder, and sometimes the trimmer even starts to shake or sound rough. I noticed my trimmer would leave patches of grass behind and even burn out the motor faster. Replacing the string keeps your Greenworks trimmer working like new and protects your investment.
What You’ll Need Before Starting
Before you open up your trimmer, gather everything you need. This saves time and prevents frustration later.
Prime Day Pick
Limited-time Prime Day price. Check current discount on Amazon.
- Replacement trimmer line – For most Greenworks 40V trimmers, you need 0.065-inch or 0.080-inch diameter line. Always check your model’s manual.
- Scissors or wire cutters – To cut the new line.
- A clean towel – Wipe away grass or dirt from the head.
- Safety gloves (optional) – I like using gloves because the old string can be sharp.
A quick tip: Buy quality trimmer line. I tried a cheap line once, and it kept breaking. Spending a little more saves you time and effort.
Prime Day Pick
Limited-time Prime Day price. Check current discount on Amazon.
Understanding Your Greenworks 40v Trimmer Head
The first time I opened the head, I was a bit lost. There are two main types of heads:
- Bump feed: You tap the head on the ground to advance the string.
- Automatic feed: The string advances on its own.
Most Greenworks 40V models use a bump feed head. If your trimmer is different, the steps may vary a bit, but the basics are similar.
Here’s a simple chart comparing the two types:
| Head Type | How String Advances | Common Models |
|---|---|---|
| Bump Feed | Tap on ground | 2101602, 21362 |
| Auto Feed | Automatic release | 2100202, 2100302 |
Knowing your head type helps you avoid mistakes later.
Safety First
Never skip safety. I always remove the battery before working on my trimmer. It sounds obvious, but I once forgot and nearly started the motor by accident. Also, wear eye protection—bits of dirt or grass can fly out when opening the head.
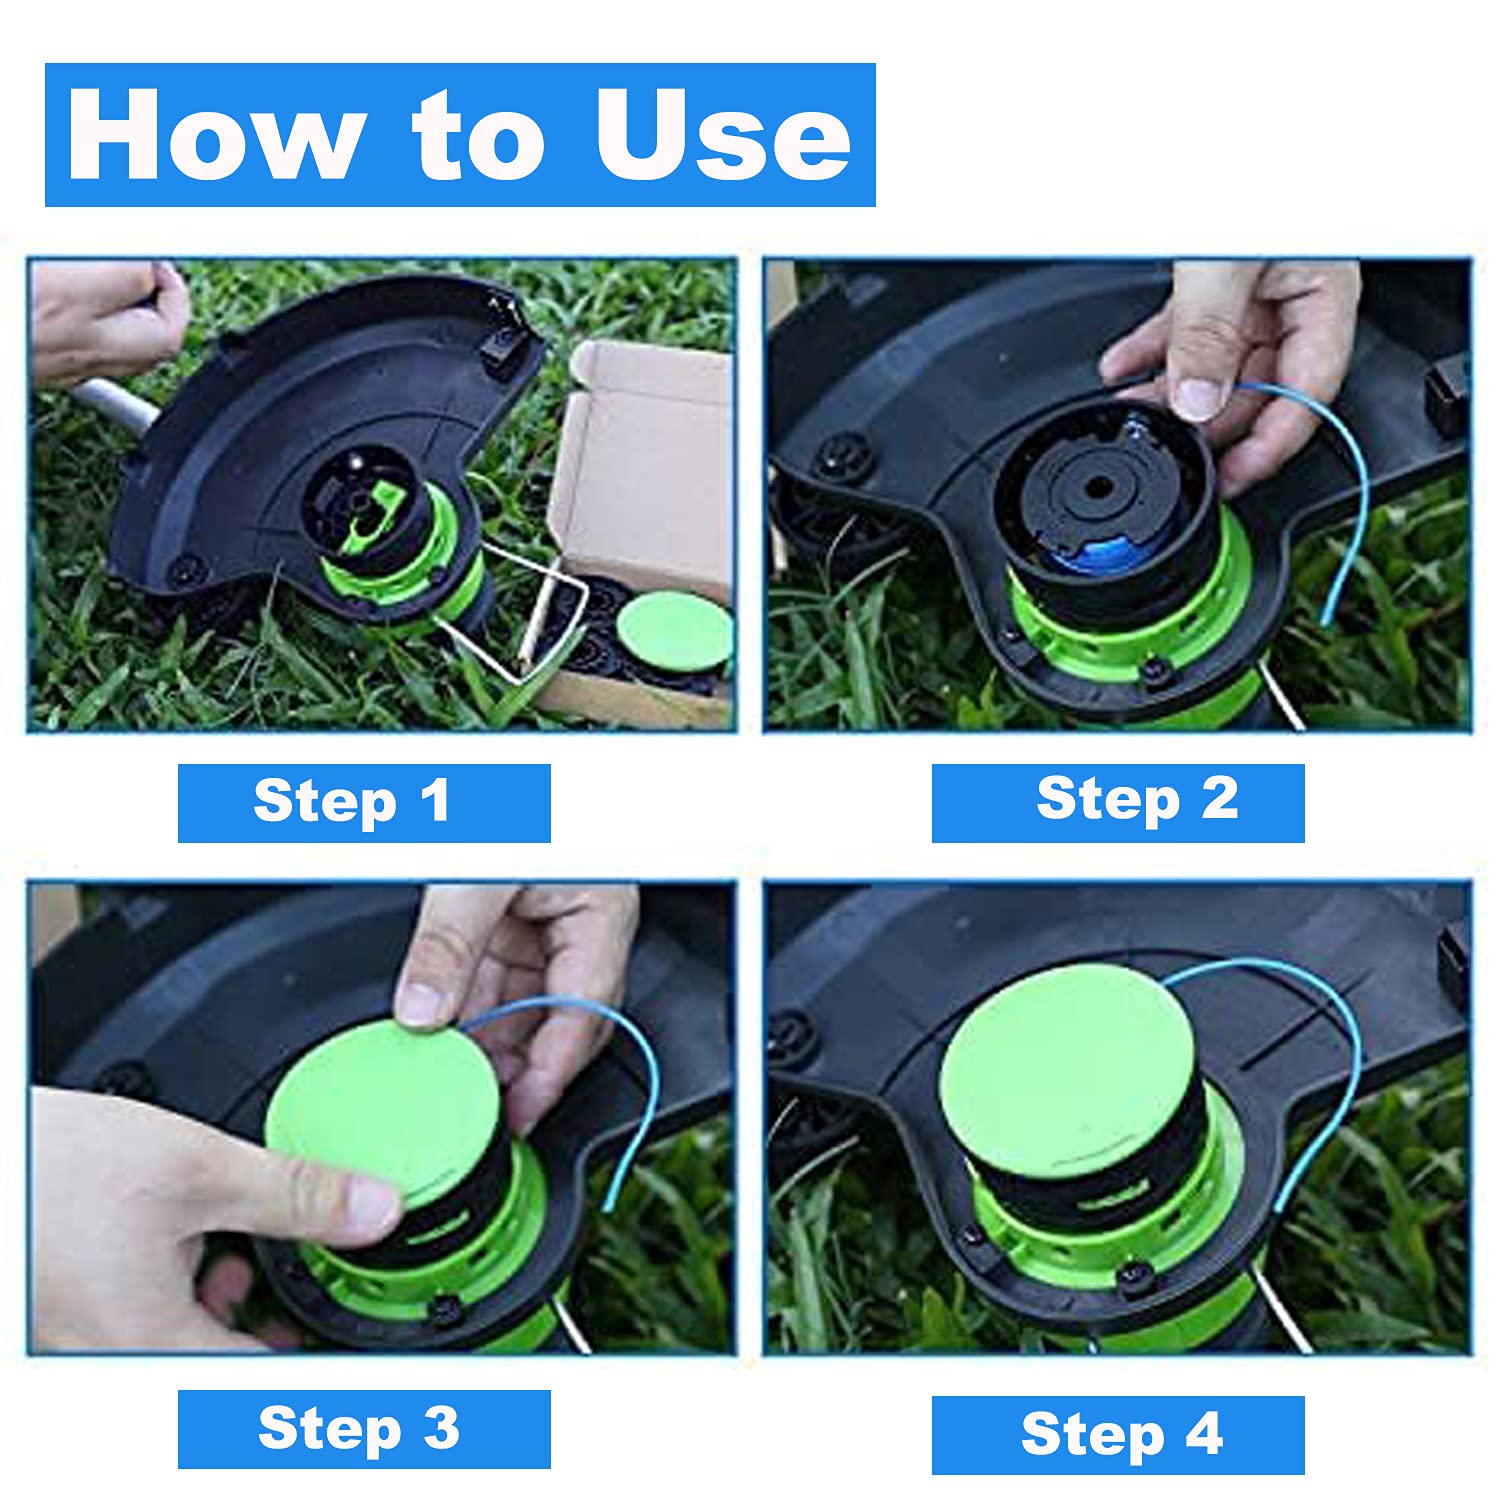
Step-by-step Guide: Replacing The String
Let’s dive into the actual process. I’ll break down each step, so you won’t feel rushed or lost.
1. Remove The Battery
Slide the battery out of the trimmer. This step is critical. The trimmer cannot start by accident if the battery is out.
2. Lay The Trimmer On A Flat Surface
Put the trimmer on a table or on the ground. Make sure the head faces up. This keeps things stable and prevents rolling.
3. Open The Trimmer Head
Most Greenworks heads have two tabs on the side. Push both tabs in at the same time. The cover should pop off. If it feels stuck, wiggle it gently. Don’t force it or use tools, or you might break the plastic.
Tip: Take a photo before removing anything. This helped me when I forgot how things fit back together.
4. Remove The Empty Spool
Pull the spool out from the head. Sometimes grass or dirt gets stuck inside. Clean the area with your towel.
5. Cut The New Trimmer Line
Measure about 10 to 15 feet of line. For a dual-line spool, cut two pieces of equal length. If you use too much, the line will jam. Too little, and you’ll run out quickly.
6. Wind The Line On The Spool
This is where most people get tripped up (I did too). Each spool has arrows showing the winding direction. Thread the line into the anchor hole or slot. Then, wrap the line neatly and tightly following the arrow. Avoid crossing lines—they’ll tangle later.
If your model uses a dual-line spool, wind both lines in their own channels.
Here’s a quick comparison of single and dual-line heads:
| Spool Type | Number of Lines | Winding Method |
|---|---|---|
| Single Line | 1 | Wrap in one groove |
| Dual Line | 2 | Wrap each line separately |
Pro Tip: If you’re struggling to keep the line tight, pinch the spool between your knees while winding. This freed my hands and kept things from unspooling.
7. Secure The Line
Once you finish winding, leave about 6 inches of line hanging. Lock the ends into the notches on the spool. This keeps them from springing loose.
8. Place The Spool Back
Insert the spool into the head. Thread the ends of the line through the eyelets on the head. Make sure the spool sits flat and the lines don’t cross.
9. Snap The Cover Back On
Align the cover with the slots and press until it clicks. Tug gently on the lines to check they move freely.
10. Reinsert The Battery And Test
Put the battery back in. Hold the trimmer away from your body and tap the head on the ground (for bump feed). The string should advance. If not, double-check your winding or the installation.
What Most Guides Don’t Tell You
Many tutorials skip the little things that matter. Here are two insights I learned the hard way:
- Don’t Overfill the Spool: I used to pack in as much string as possible. Bad idea! It jams the head and stops the line from feeding. Leave a little space at the edge for the string to move.
- Don’t Mix Old and New String: If you see leftover old string, pull it all out. Mixing old and new can cause tangles or breakage. I wasted a full afternoon trying to save a few inches of old line. Not worth it.
Choosing The Right Trimmer Line
The type of string you pick really matters. Here’s what I found after trying a few:
- 0.065-inch line: Best for lighter jobs and smaller yards.
- 0.080-inch line: Handles tougher weeds and thicker grass, but may slow down the motor if overloaded.
Some lines are twisted or star-shaped for extra cutting power. I like twisted line for its durability.
Here’s a quick data table comparing line types:
| Line Type | Diameter | Best For | Durability |
|---|---|---|---|
| Round | 0.065″ | Grass | Good |
| Twisted | 0.080″ | Weeds | Excellent |
| Star | 0.080″ | Thick brush | Very Good |
Always check your manual for the maximum line size your trimmer can use. Using a thicker line than allowed can damage the motor.
My Most Common Mistakes (and How To Avoid Them)
I’ve made nearly every mistake possible. Here’s what to watch out for:
- Winding the line backwards: Always follow the arrow on the spool.
- Forgetting to thread the line through the eyelets: The trimmer won’t work if the line isn’t in the guides.
- Snapping the cover too hard: Press gently; forcing can crack the plastic.
- Ignoring the battery: I once forgot to remove it and got a good scare. Always take it out first.
Learning from these mistakes will save you time and hassle.
Maintenance Tips For Longer Lasting String
Getting the string in is one thing. Keeping it working well is another. Here’s what I do:
- Clean the head after every use. Grass builds up and can block the line.
- Store line indoors. Sun and heat make it brittle.
- Check for cracks in the cover. Replace any damaged parts right away.
- Don’t cut against hard objects. Hitting rocks or fences snaps the string fast.
With these habits, my trimmer runs smoother and the string lasts longer.
When To Replace The Spool Instead Of The String
Sometimes, the whole spool wears out. If the notches or eyelets are broken, or the spool doesn’t spin freely, replace it. I learned this after fighting with a stuck spool for half an hour. Replacement spools are easy to find and cost less than a new trimmer.

Where To Find More Help
If you get stuck, check the official Greenworks website or your owner’s manual. They have model-specific guides. You can also find helpful videos on YouTube. For more details, I found the Greenworks Support page helpful.
Frequently Asked Questions
How Often Should I Replace The String On My Greenworks 40v Trimmer?
It depends on how often you use it. For small yards, once a season may be enough. For heavy use, you might need to change it every few weeks.
Can I Use Any Trimmer Line Brand?
Yes, as long as the diameter matches your model. I’ve used both Greenworks and other brands with no problems.
What If My Trimmer Line Keeps Breaking?
You might be hitting hard surfaces or using old, brittle line. Try a fresh, quality line and avoid hitting rocks or fences.
Can I Use A Thicker Line For Tougher Weeds?
Check your manual first. If your trimmer can handle it, thicker line (like 0. 080-inch) works well. Don’t exceed the recommended size or it may strain the motor.
Is It Better To Buy Pre-wound Spools?
Pre-wound spools are easier for beginners but cost more. Winding your own is cheaper and lets you pick your favorite line type.
—
Replacing the string on a Greenworks 40V trimmer isn’t as tough as it seems, once you know the steps. I used to dread it, but now I can do it in minutes. With a little practice and these tips, you’ll get the hang of it too.
Keep your trimmer in good shape, and your yard will always look sharp. If you ever feel stuck, remember—you’re not alone, and there’s always a simple fix. Happy trimming!

As an Amazon Associate, We earn from qualifying purchases