If you’ve ever tried hanging a shelf or mounting a TV, you know the stress of finding a wall stud. I remember the first time I tried to hang a heavy mirror in my living room. I knocked on the wall, listened for a dull thud, and hoped I’d hit a stud. I was wrong. The mirror pulled a chunk of drywall out. That’s when I bought my first stud finder. It felt like a magic tool at first, but soon I wanted to know: how does a stud finder actually work? And how could I use it like a pro? Let me walk you through everything I learned from my own ups and downs, so you can avoid holes in your wall and wasted time.
What Is A Stud Finder?
A stud finder is a small handheld device. Its job is to help you find the wooden or metal framing—the studs—hidden behind your walls. Most homes have studs spaced about 16 or 24 inches apart. Drywall is attached to these, so if you want to hang something heavy, you need to anchor it to a stud. Otherwise, you risk pulling the wall apart, just like I did with my mirror.
There are two main types of stud finders:
- Magnetic stud finders
- Electronic stud finders
Each works in a different way. I’ve used both, and each has its strengths and quirks.
How Magnetic Stud Finders Work
I started with a basic magnetic stud finder. It’s simple, cheap, and doesn’t need batteries. Here’s what I learned.
A magnetic stud finder contains a strong magnet, usually a neodymium magnet. When you move it across the wall, it reacts to metal. In most homes, drywall is nailed or screwed into studs. The magnet will “stick” or pull slightly when it finds a nail or screw in the wall.
That’s your clue—there’s a stud right there.
I found this method works best if you move the magnet slowly and patiently. Sometimes, you’ll feel it tug near a screw head. Other times, it takes a few passes. Once, I spent five minutes waving the magnet back and forth, only to realize I was finding old nails from a previous renovation!
Here’s a quick summary of how magnetic stud finders compare with electronic ones:
| Feature | Magnetic Stud Finder | Electronic Stud Finder |
|---|---|---|
| Power Source | No batteries needed | Batteries required |
| Price | Low | Medium to high |
| Accuracy | Good if nails/screws are present | Better for finding actual studs |
| Works on Plaster Walls | Rarely | Sometimes (depends on model) |
My Experience Using Magnetic Stud Finders
In my old apartment, with thin drywall and standard studs, the magnetic finder worked well. I learned to slide it in small, slow circles. When the magnet “caught,” I’d mark the spot with a pencil. But if the wall was thick, or there were metal pipes or wiring, things got confusing.
One day, I tried it on a plaster wall. The magnet didn’t respond at all. Later, I found out there were no screws—plaster walls are held differently. That’s when I realized that magnetic finders are not perfect for every wall type.
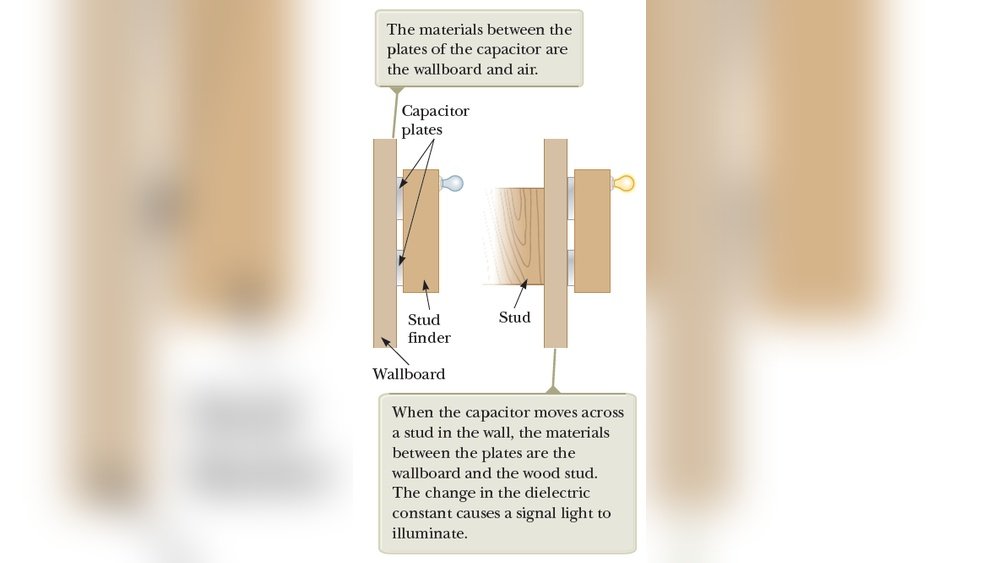
How Electronic Stud Finders Work
After some trial and error, I moved up to an electronic stud finder. This tool uses sensors to detect changes in density behind the wall. It sounds fancy, but it’s not hard to use.
Here’s what happens: you turn the device on, place it flat against the wall, and slowly slide it sideways. The finder measures the wall’s density using a small sensor. When it senses a change—a stud, a pipe, or even wires—it lights up or beeps.
Most electronic stud finders have lights or a screen. Some even show the center or edges of the stud. I found this super helpful, especially when hanging cabinets or shelves that need to be perfectly centered.
Here’s a simple breakdown of how electronic stud finders work:
- Calibration: Place the device on the wall (not over a stud) and press a button. This “zeros” the sensor.
- Scanning: Slide the finder slowly across the wall. If it senses denser material, it signals you.
- Marking: Use a pencil to mark the edges or center as shown on the device.
Types Of Electronic Stud Finders
Over the years, I’ve tried several models. They fall into a few categories:
- Edge Finders: These show where the edge of a stud is.
- Center Finders: These point to the middle of the stud.
- Multi-sensor Finders: These use multiple sensors for better accuracy.
Some also detect live wires or pipes. That’s a life-saver, because you don’t want to drill into electrical wiring by mistake. Once, I almost did—my stud finder beeped and showed a lightning bolt icon. I stopped, checked behind the wall, and found a live wire.
That warning saved me a big headache.
Common Features Of Electronic Stud Finders
Electronic models have become smarter over the years. Here are some features I’ve seen:
- LCD screens for clear readings
- Wire and pipe detection to avoid accidents
- Deep scan modes for thick walls
- Audio alerts for easy marking
Here’s a quick look at different types and what they can do:
| Type | What It Detects | Best For |
|---|---|---|
| Edge Finder | Stud edges | Basic projects |
| Center Finder | Stud center | Hanging large items |
| Multi-Sensor | Multiple stud locations | Precision work |
| Wire/Pipe Detection | Wires, pipes, studs | Older homes, safety |
How To Use A Stud Finder (step-by-step)
Let me walk you through the steps I follow whenever I use a stud finder. It doesn’t matter if you’re a beginner or have used one before—these steps will help you avoid mistakes.
1. Choose The Right Stud Finder
If your walls are standard drywall, both magnetic and electronic finders work. For plaster, textured, or thick walls, electronic is better.
2. Prepare The Wall
Remove any art, hooks, or shelves. Wipe the wall with a dry cloth. Dust or residue can affect some electronic finders.
3. Calibrate (for Electronic Finders)
Place the finder flat against the wall, away from light switches or outlets. Press and hold the power or calibrate button until it’s ready.
4. Start Scanning
Move the finder slowly—don’t rush. If you go too fast, you might miss the stud. I usually scan in both directions to double-check.
5. Mark The Spot
When the finder beeps or lights up, mark the location with a pencil. For heavy items, I mark both edges and the center.
6. Double-check
Scan the area again to confirm. This helps avoid false positives, like pipes or wires.
Here’s a simple workflow I follow:
| Step | Action | Tip |
|---|---|---|
| 1 | Pick stud finder | Choose based on wall type |
| 2 | Clean wall | Remove dust for accuracy |
| 3 | Calibrate | Do this away from studs |
| 4 | Scan slowly | Go both directions |
| 5 | Mark spots | Use pencil for easy erasing |
| 6 | Check again | Confirms true stud location |

Common Problems And How To Avoid Them
I’ve made plenty of mistakes with stud finders. Here are a few common problems, and what I do now to avoid them:
- False positives: Sometimes, a stud finder beeps for a pipe or wire. Solution: Check if there’s an outlet, switch, or water line nearby.
- Finder doesn’t beep anywhere: Old homes may have odd stud spacing. Try a different wall or use a tape measure for a rough guess.
- Error signals: Low batteries or thick paint can cause errors. Change the batteries or clean the wall.
A non-obvious tip I learned: if you can’t find any studs, measure 16 inches from a corner. Most studs start there. Also, look for clues like light switches or outlets—they’re usually mounted on the side of a stud.
Advanced Tips For Accurate Stud Finding
If you want to get perfect results, here’s what I do that most beginners miss:
- Scan in two directions. Sometimes, the finder gives a better reading if you go up and down, not just sideways.
- Mark both edges. When you find both edges, the center is easy to locate. This is a must for mounting TVs or shelves.
- Use blue painter’s tape. I stick tape on the wall, then mark the spots. It’s easy to remove and doesn’t damage paint.
- Check for wires. If your finder can detect wires, always use this mode before drilling.
- Use a small nail to test. If you’re unsure, tap a tiny nail where you marked. If it meets resistance, it’s a stud.

When A Stud Finder Doesn’t Work
Some walls make stud finders useless. In my old rental, the walls were thick plaster on lath. My electronic finder gave random results, and the magnetic one stuck everywhere. In these cases, you can:
- Look for patterns of nails at the baseboard.
- Tap gently and listen for a solid sound.
- Use a tiny drill bit to test (in an out-of-sight spot).
If you’re still stuck, ask a pro or check with a builder. Some walls are just tricky.
When To Use A Stud Finder
Here’s when I always use one:
- Hanging anything heavy (TVs, shelves, mirrors)
- Installing grab bars in the bathroom
- Mounting curtain rods (especially for blackout curtains)
- Securing baby gates
For small items, drywall anchors sometimes work. But for safety, I trust my stud finder.

Are Stud Finders Worth It?
After years of home projects, I can say yes. The first time I drilled into a stud and my shelf didn’t fall, I felt relief. For less than $20, you can avoid big repairs. Even the basic magnetic kind is better than guessing.
If you want more science on how electronic stud finders work, check this Wikipedia page.
Frequently Asked Questions
How Accurate Are Stud Finders?
Most modern stud finders are quite accurate, especially electronic ones. Magnetic types depend on finding metal fasteners, so they’re less precise. For the best results, scan twice and mark carefully.
Can Stud Finders Detect Wires Or Pipes?
Some advanced electronic stud finders can spot live wires and metal pipes. Always check your model’s manual. If you see a wire icon or hear a warning beep, stop drilling and investigate.
What If My Wall Is Plaster Or Textured?
Stud finders often struggle with plaster, lath, or thick textured walls. Use visual clues, tap for solid sounds, or try a small test nail. Sometimes, professional help is needed for tricky walls.
Do I Need To Use A Stud Finder For Every Wall Hanging?
Not for every case. For light objects, drywall anchors may work. For anything heavy, or anything that needs to be safe (like a TV or grab bar), always use a stud finder to locate a stud.
Why Does My Stud Finder Give Different Results Each Time?
This can happen if you scan too fast, don’t calibrate, or your batteries are low. Make sure to calibrate on a clear part of the wall, move slowly, and scan in both directions for the most accurate results.
Finding studs can be tricky, but with a little practice—and the right tool—you’ll get the hang of it. I’ve made all the mistakes, so you don’t have to. Good luck with your next project, and may your shelves always stay up!
As an Amazon Associate, We earn from qualifying purchases