Testing Ethernet cables is a skill I picked up after moving into a new apartment. My internet was slow, sometimes dropping off during video calls. I thought, “Is it my cable?” That question started my deep dive into Ethernet cable testing. Over the past few years, I’ve learned a lot—some lessons the hard way. I want to share what actually works, what tools make life easier, and how you can avoid common mistakes. If you’re setting up your home network or fixing office connections, these tips will help.
Why Test Ethernet Cables?
When my streaming kept buffering, I blamed my internet provider. But a friend told me, “Check your Ethernet cable first.” I learned that a damaged or low-quality cable can make even the fastest internet crawl. Testing helps you find problems like:
- Slow speeds that don’t match your plan
- Dropped connections during calls or downloads
- Unstable gaming with lag or disconnections
Testing is not just for IT experts. Anyone can do it with a little guidance. Over time, I’ve saved hours by finding and fixing cable issues instead of calling tech support.
What Tools Do You Need?
Before testing, you need the right tools. Some people use advanced equipment, but you can start simple. Here’s what I use and recommend:
| Tool | Purpose | Price Range |
|---|---|---|
| Basic Cable Tester | Checks wiring and continuity | $10 – $30 |
| Multimeter | Measures resistance and shorts | $15 – $50 |
| Advanced Tester | Measures speed and quality (signal loss, crosstalk) | $100+ |
| Computer + Network Adapter | Real-world speed tests | Already available |
When I first started, a basic tester was enough. Later, I bought a multimeter for more detailed checks. If you run many cables, consider an advanced tester.
Types Of Ethernet Cables
Not all Ethernet cables are the same. I once used an old Cat 5 cable for my new gigabit router and wondered why speeds were low. Here’s a quick overview:
| Category | Max Speed | Max Distance | Best Use |
|---|---|---|---|
| Cat 5 | 100 Mbps | 100 meters | Old devices |
| Cat 5e | 1 Gbps | 100 meters | Home/office |
| Cat 6 | 10 Gbps | 55 meters | High-speed networks |
| Cat 6a | 10 Gbps | 100 meters | Future-proofing |
If you want the fastest speeds, pick Cat 6 or higher. Testing helps you spot if your cable matches what you expect.
How To Visually Inspect Ethernet Cables
The first thing I always do is a simple visual check. I once found a cable with a cat bite—yes, my own cat!—and that explained my connection problems.
Here’s what to look for:
- Check for cuts or kinks: Move your hand along the cable. Feel for sharp bends or breaks.
- Inspect the connectors: Are the plastic tabs on the RJ45 ends broken? If they are, the cable won’t stay in the port.
- Look for loose pins: Inside the connectors, make sure the gold pins are straight and not pushed in.
If you find visible damage, replace the cable. It’s faster and often cheaper than trying to repair it.
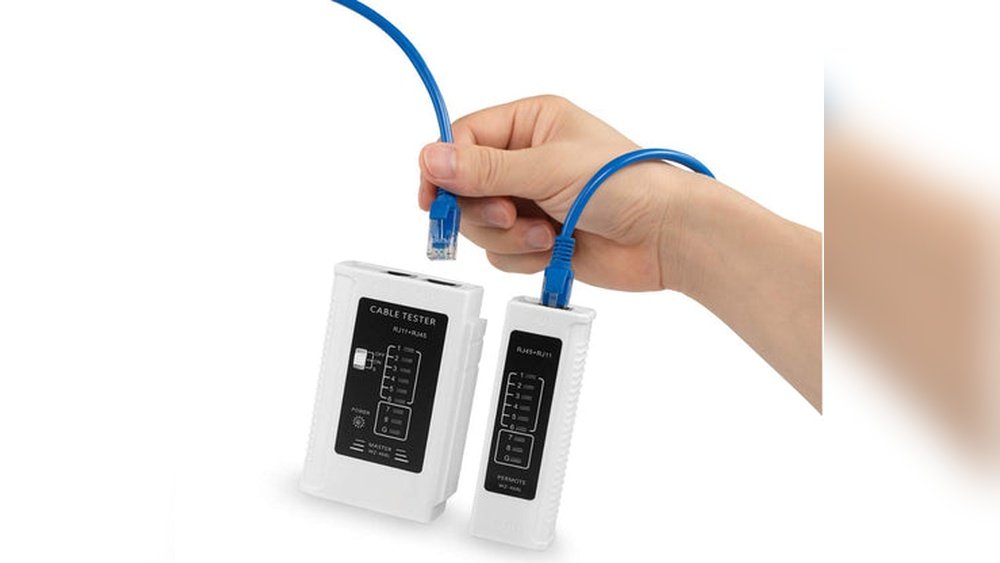
Using A Basic Ethernet Cable Tester
The first tool I bought was a simple cable tester. It cost about $15 and saved me hours. Here’s how I use it:
- Plug one end of the cable into the tester’s main unit.
- Plug the other end into the remote unit.
- Turn on the tester.
Most testers have lights that move in sequence. Each light shows a working wire inside the cable. If a light does not come on, that wire is broken. If the lights blink out of order, the wiring is wrong (miswiring).
A common mistake: testing with the cable still plugged into devices. Always unplug both ends before testing.
Testing With A Multimeter
When I wanted to dig deeper, I tried using a multimeter. This tool measures continuity and can help find hidden breaks.
Here’s my method:
- Set your multimeter to continuity mode (it usually has a sound wave symbol).
- Touch one probe to a pin on one end of the cable.
- Touch the other probe to the matching pin on the other end.
- Listen for a beep. If you hear it, the wire is good.
Repeat for all eight pins. It’s a bit slow, but you’ll know exactly which wire is broken. I once found only pin 8 was faulty—enough to slow my connection.

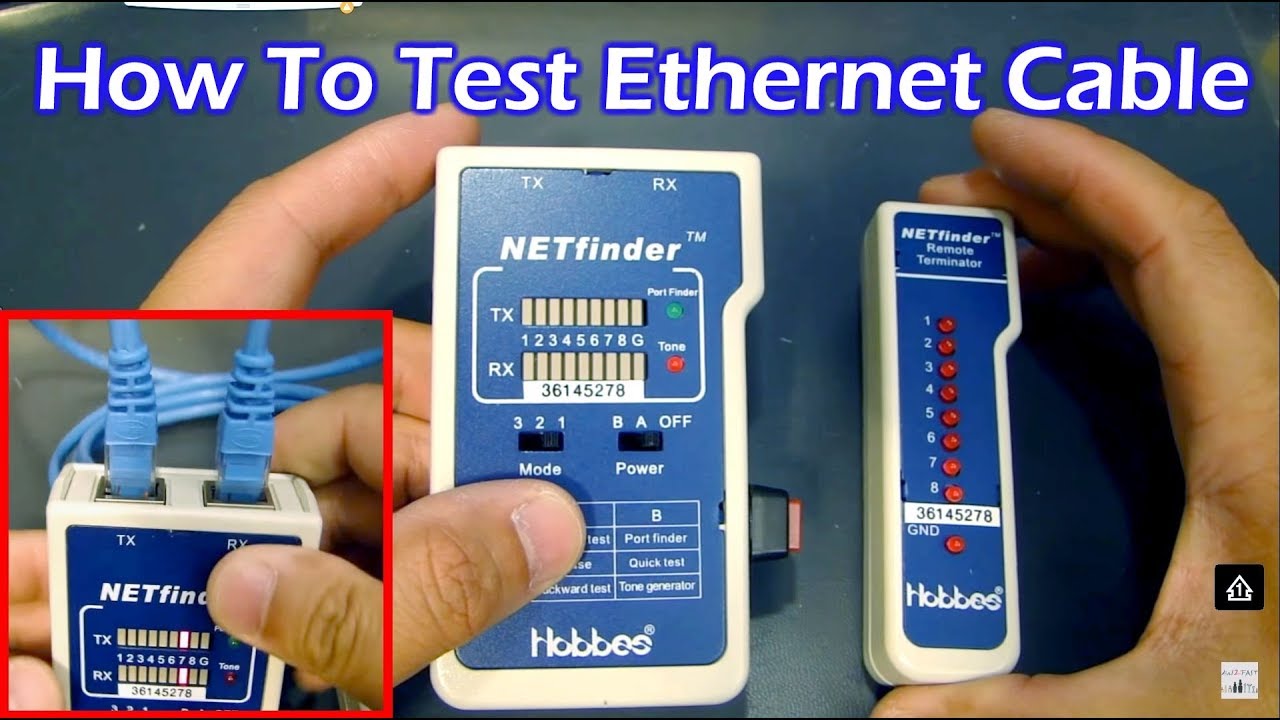
Advanced Cable Testers
Last year, I borrowed an advanced tester from a friend who works in IT. It showed not just wiring, but also signal quality. This matters if you have long cables or need top speed.
Features I found useful:
- Wiremap: Checks if each wire is connected in the right place.
- Length measurement: Tells you the cable’s exact length.
- Signal loss: Shows if the signal is weakening over long distances.
- Crosstalk detection: Finds out if wires are interfering with each other.
These testers cost more, but for offices or smart homes, they’re worth it. I discovered one cable lost 40% of its signal, even though it looked fine.
Testing Ethernet Speed With Your Computer
Sometimes, the best test is real-world use. I often plug the cable into my laptop and run a speed test.
- Connect your computer directly to the router with the cable.
- Go to a speed test site (like Speedtest.net).
- Run the test.
Compare your results to your internet plan. If you pay for 500 Mbps but get only 80 Mbps, the cable may be the problem.
Windows Built-in Diagnostics
Windows has a network troubleshooter. Right-click your network icon, select Troubleshoot problems, and follow the steps. Sometimes, it tells you if the Ethernet connection is faulty.
Mac Network Utility
On a Mac, open Network Utility and check the link speed. If it says 100 Mbps but your router supports 1 Gbps, your cable might be limiting you.
Common Problems And How To Fix Them
Through trial and error, I found several issues that pop up often:
1. Loose Connections
Sometimes cables wiggle loose, especially if you move devices often. Make sure the RJ45 connectors click securely into the port.
2. Bent Or Crushed Cables
Heavy furniture crushed one of my cables. This caused random disconnects. Avoid running cables under carpets or furniture.
3. Bad Wiring
If you make your own cables, double-check the wiring order. Use the T568B or T568A standard. Mismatched wires create slow or dead connections.
4. Cable Length
Cables over 100 meters (328 feet) can lose speed and reliability. For home use, stay under 50 meters if you want the best performance.
5. Poor Quality Or Old Cables
Cheap or old cables can’t handle high speeds. Upgrade to Cat 6 or better for modern networks.
How To Make Your Own Ethernet Cable (and Test It)
I once made my own cables to save money. The process is simple but needs care.
- Cut the cable to length.
- Strip about 2 cm (0.8 inches) of the outer jacket.
- Untwist and arrange wires by color (use a wiring guide).
- Trim wires evenly.
- Insert into RJ45 connector.
- Crimp with a crimping tool.
- Test with a cable tester.
Always test new cables before use. I once crimped a connector with two wires swapped—nothing worked until I re-did it.

Real-life Example: Fixing My Home Office
When I started working from home, my video calls were choppy. I tested the cable—no obvious damage. But the cable tester showed pins 1 and 2 were not lighting up. I replaced the cable with a new Cat 6, and my calls were smooth again. Sometimes, even if a cable “looks” fine, testing reveals hidden faults.
What Most Beginners Miss
Many people skip testing both ends of the cable. I made this mistake. A cable can be fine on one end but have a loose connection on the other.
Another common oversight is not considering interference. Placing Ethernet cables next to power cords can cause signal problems. After I separated them, my connection improved.
When To Replace Vs. Repair
If a cable has a broken connector or is short, I replace it. Trying to repair is rarely worth the time unless the cable is long or expensive. For critical connections, I always keep a spare tested cable on hand.
Comparing Testing Methods
Here’s a quick look at testing methods I’ve used, and when I choose each:
| Method | Tools Needed | Best For | Accuracy |
|---|---|---|---|
| Visual Inspection | None | Quick checks | Low |
| Basic Tester | Cable tester | Wiring faults | Medium |
| Multimeter | Multimeter | Broken wires | High |
| Advanced Tester | Pro tester | Signal quality | Very High |
| Computer Speed Test | PC + Internet | Real use | Medium |
For most home users, a basic tester plus a speed test is enough. For offices, advanced testing tools give extra peace of mind.
A Few Final Tips
- Always label both ends of your cables. It saves confusion later.
- Keep cables away from power cords and fluorescent lights.
- Store spare cables in a cool, dry place.
- Don’t bend cables sharply—this weakens the wires inside.
If you want more technical details, the Wikipedia page on Ethernet cables is a good resource.
Testing Ethernet cables is not hard. Over time, I’ve made it a habit—just like checking batteries in a remote. It keeps my network fast and reliable, with less stress.
Frequently Asked Questions
How Do I Know If My Ethernet Cable Is Faulty?
Look for slow speeds, dropped connections, or lights on your cable tester that don’t light up in order. If you see damage, or your speed test is much lower than expected, your cable may be faulty.
Can A Bad Ethernet Cable Affect Internet Speed?
Yes. A broken or low-quality cable can limit your speed. For example, a damaged Cat 5 cable can drop your gigabit connection down to 100 Mbps or less.
How Often Should I Test My Ethernet Cables?
I check my cables every few months or whenever I notice connection issues. If you move furniture or upgrade equipment, it’s a good time to test.
What’s The Best Tester For Home Use?
For most people, a basic cable tester (about $10-$30) is enough. If you want to see signal quality, invest in an advanced tester.
Can I Repair A Damaged Ethernet Cable?
You can cut and re-crimp the ends if the damage is near the connector. For deep cuts or crushed cables, it’s safer and faster to replace them.
Testing Ethernet cables doesn’t have to be scary or hard. With simple tools and a little patience, you can keep your network running smoothly—just like I do at home.
As an Amazon Associate, We earn from qualifying purchases