Testing fiber optic cable used to feel like a big mystery to me. I remember the first time I saw those tiny glass strands and wondered, “How on earth do people know if these things are working? ” I’ve learned a lot since then.
Now, I want to share everything I know about how to test fiber optic cable. If you’re new to this, don’t worry—I’ll keep it simple and use my own stories and mistakes to help you avoid common problems. Let’s dive in together.
Why Testing Fiber Optic Cable Matters
Fiber optic cables are everywhere now—offices, homes, and even in street corners. They carry internet, phone calls, and more. But they’re sensitive. A tiny bend, a bit of dust, or even a small crack can ruin their speed. I learned the hard way when an entire office lost internet because of a single dirty connector.
That’s why testing these cables is so important. If you skip it, you might end up with slow internet, dropped calls, or even a total blackout.
Main Types Of Fiber Optic Tests
Over the years, I’ve used a few main tests to check fiber optic cables. Each one tells you something different. Here’s what I’ve learned about the most common methods.
1. Visual Inspection
This might sound basic, but it’s the first thing I always do. I grab a flashlight and a magnifying glass and look at the cable ends. I check for scratches, dirt, or cracks. Even a tiny speck of dust can cause problems.
Once, I spent hours trying to fix a connection, only to find a fingerprint on the end. Cleaning it solved everything.
2. Continuity Test
This test checks if the light can travel from one end to the other. I use a visual fault locator (VFL), which is basically a pen that shines a red laser through the fiber. If I see the red light at the far end, the cable isn’t broken. If not, there’s a big problem somewhere. It’s simple but powerful. I’ve caught many broken cables this way.
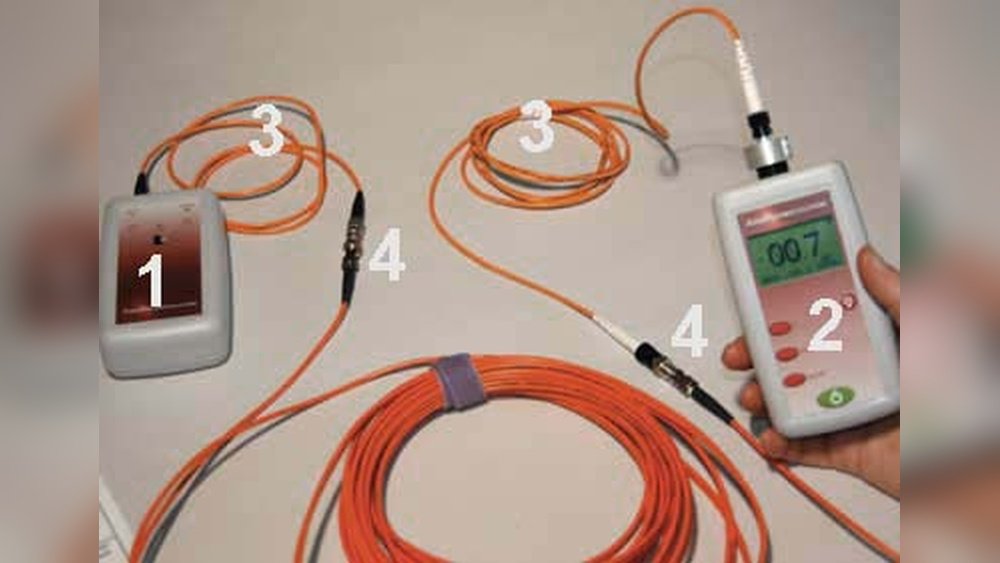
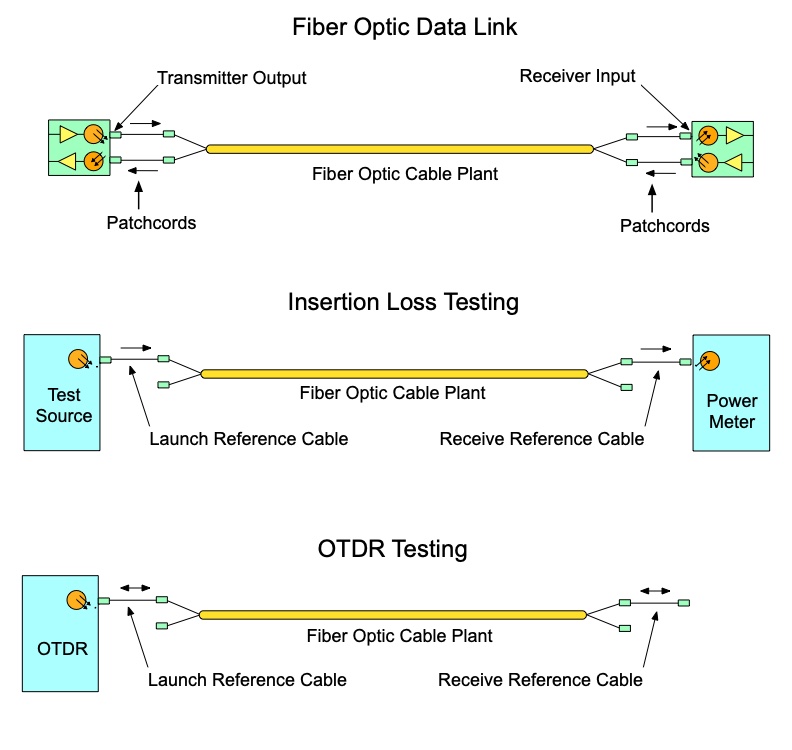
3. Insertion Loss Test
This test tells me how much light is lost as it travels through the cable. Too much loss means the signal gets weak. I use a light source and a power meter. I connect them to each end of the cable. The power meter shows the strength of the light at the end. If the number is too low, the cable or connectors might be dirty or damaged.
4. Otdr (optical Time Domain Reflectometer) Test
This is the advanced test. An OTDR sends pulses of light down the cable and measures the reflections. It shows me a graph of the cable, with bumps where there are faults, bends, or breaks. The first time I used an OTDR, the graph looked like a mountain range. But after some practice, I learned to spot the trouble spots quickly.
Tools I Use For Testing Fiber Optic Cable
Here’s a quick look at the main tools I’ve used and what they do. I wish I’d known about all these when I started.
| Tool | What It Does | My Tip |
|---|---|---|
| Visual Inspection Tools | Helps see dirt or damage on cable ends | Always clean before and after testing |
| Visual Fault Locator (VFL) | Finds breaks or bends using a red laser | Great for short cables |
| Optical Power Meter | Measures light loss in the cable | Use with a stable light source |
| OTDR | Shows detailed map of the fiber | Best for long cables or tough problems |
Step-by-step Guide: How I Test Fiber Optic Cable
Let me walk you through my usual process. I’ve made mistakes before, but this step-by-step method helps me avoid trouble.
Step 1: Prepare And Inspect
I start by turning off all network equipment. Safety first. Then I gently clean the cable ends using special wipes or alcohol pads. Once, I skipped this step and spent hours troubleshooting what turned out to be a smudge.
Next, I use my flashlight and magnifying glass. If I see any chips, cracks, or heavy dirt, I clean or replace the connector.
Step 2: Run A Continuity Test
I connect the VFL to one end of the cable. If the red light shows up at the other end, I know there are no big breaks. If the light is weak or missing, I check for tight bends or pinch points along the cable.
Step 3: Check Insertion Loss
I connect the light source to one end and the power meter to the other. I write down the reading. For most single-mode cables, a loss under 0. 5 dB per connector is good. If it’s more, I clean the connectors and try again.
Sometimes, I swap out patch cords to see if the problem follows the cord or stays with the cable.
Step 4: Use The Otdr For Tough Cases
If there’s still a problem, I use the OTDR. This tool has saved me many times. I connect it and run a scan. The OTDR graph shows where the loss or reflection is happening. Once, I found a sharp spike just 20 meters into a cable.
It turned out someone had stapled the cable by mistake!
Step 5: Document Everything
I always write down my results. I note which cables passed, which failed, and what I did to fix them. It helps if I need to check again later. Good records have saved me from repeating work many times.

Understanding Test Results
At first, the numbers and graphs can be confusing. Here’s how I make sense of them.
Power Meter Readings
The power meter shows the light loss in decibels (dB). Lower loss is better. Too much loss means you’ll have slow or dropped connections. For example, if I see more than 0.5 dB loss per connector, I know something’s wrong.
Otdr Traces
An OTDR trace looks like a line that sometimes jumps up or down. Big drops mean big problems. Small bumps can be normal, like connectors or splices. But a sudden sharp drop is usually a break or a bad connector.
I always look for big changes close to the start of the cable—they’re often easier to fix.
Common Problems And How I Fix Them
I’ve run into a lot of problems over the years. Here are some of the most common, and what I do about them.
| Problem | What Causes It | How I Fix It |
|---|---|---|
| High Insertion Loss | Dirt, bad splices, or broken connectors | Clean connectors, re-terminate if needed |
| No Continuity | Broken fiber or connector | Find break with VFL, replace cable or connector |
| Reflections in OTDR | Bent fiber, poor connectors | Check for tight bends, fix connectors |
| Intermittent Signal | Loose connections, microbends | Tighten connectors, re-route cable |
Key Mistakes I Made (so You Can Avoid Them)
I’ve learned a lot from doing things wrong. Here are two mistakes that caught me by surprise.
- Ignoring cleanliness. I thought a little dust couldn’t hurt. I was wrong! Even a tiny bit of dirt can ruin a connection.
- Not labeling cables. Early on, I tested the wrong cable by accident. Now I always label both ends before I start.
Tips That Made My Life Easier
Here are some things I wish someone had told me sooner:
- Always carry extra cleaning wipes. You’ll use more than you expect.
- Don’t trust just your eyes—a quick test with a VFL can save hours.
- Write down your readings. Memory fades, but notes last.
- Try not to bend the cable too sharply. If you need to coil it, make the loop as big as a dinner plate.
- If you’re stuck, walk away for a minute. Fresh eyes spot what tired eyes miss.

Single-mode Vs Multi-mode Cable: What’s Different?
Testing is similar for both, but there are small differences. Single-mode cables are used for long distances and have tighter loss budgets. Multi-mode is for short, fast connections in offices. I’ve found single-mode cables are less forgiving if you don’t keep them clean.
Here’s a quick comparison:
| Type | Distance | Common Use | Loss Limit (per connector) |
|---|---|---|---|
| Single-Mode | Up to 40 km | Long-haul, outside plant | 0.3–0.5 dB |
| Multi-Mode | Up to 2 km | Inside buildings | 0.5–1.0 dB |
When Should You Test Fiber Optic Cables?
From my experience, you should test:
- When you first install the cables
- After any repair or move
- If you notice slow speeds or dropped connections
- As part of regular maintenance (I check mine every 6–12 months)
Skipping these can lead to bigger headaches later.
What I Wish I Knew Before I Started
If I could talk to my past self, I’d say: Don’t be afraid of testing! The tools may look scary, but they’re just there to help. Every mistake you catch early saves hours of pain later. Take your time, label everything, and keep those connectors clean.
If you want more technical details, I found the Wikipedia Fiber Optic Communication page really helpful when I first started.
Testing fiber optic cable doesn’t have to be scary. With a little patience and the right steps, anyone can do it. I hope my experience helps you test with more confidence—and maybe even enjoy the process a bit.
Frequently Asked Questions
What Is The Most Common Cause Of Fiber Optic Cable Problems?
Most problems come from dirty or damaged connectors. Even a bit of dust can block the light signal and cause big issues.
How Often Should I Test My Fiber Optic Cables?
I recommend testing after installation, any time you move or repair cables, and at least every 6–12 months for maintenance.
Can I Use Regular Cleaning Wipes For Fiber Connectors?
No, always use special fiber cleaning wipes or alcohol pads. Regular wipes can leave lint or chemicals behind.
What’s The Best Tool For Finding A Fiber Break?
A visual fault locator (VFL) is great for short cables. For long cables or hidden breaks, use an OTDR.
Is It Safe To Look Into The End Of A Fiber Optic Cable?
Never look directly into the end of a fiber optic cable. The light is invisible and can damage your eyes. Always use the right tools to test.
If you’re just starting out, don’t worry. I’ve made every mistake in the book, and I’m still learning. Take your time, follow these steps, and you’ll do just fine. Good luck!
As an Amazon Associate, We earn from qualifying purchases