Can You Sand Engineered Wood Flooring? My Hands-on Experience
When I bought my first home, I fell in love with the rich look of engineered wood flooring. It added warmth and style to every room. But after a few years, scratches and dull spots started to show up, especially where the kids and our old dog played. I wondered, “Can I sand engineered wood flooring like real hardwood?” I did a lot of research, talked to flooring experts, and finally tried it myself. In this article, I’ll share everything I learned, what worked, and what didn’t—so you don’t make the same mistakes.
What Is Engineered Wood Flooring?
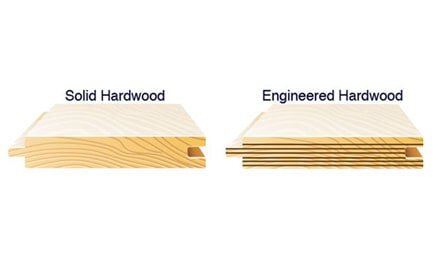
Before I started, I needed to understand what I was working with. Engineered wood flooring is not the same as solid hardwood. It’s made of several layers. The top layer is real wood—called the wear layer—glued over layers of plywood or high-density fiberboard. This makes it more stable than solid wood. It doesn’t expand or shrink as much with changes in temperature or humidity.
I found out that most engineered floors have a wear layer between 1.5 mm and 6 mm thick. That top layer is all you can sand. If you go deeper, you’ll hit the plywood, and the floor is ruined. This was a big eye-opener for me.
Can You Sand Engineered Wood Flooring? The Short Answer
Yes, you can sand engineered wood flooring—but only under certain conditions. The key factor is the thickness of the wear layer. If it’s thick enough, you can sand it one or two times in its lifetime. If it’s thin, sanding is risky.
When I checked my own floor, I measured the wear layer at 3 mm. That meant I could sand it once, but I had to be very careful.
How To Check If Your Floor Can Be Sanded
Here’s what I did to check if my floor was safe to sand:
- Look for documentation – I found the original box and paperwork. It listed the wear layer thickness.
- Remove a floor vent – I gently pulled up a vent cover near the wall and looked at the exposed edge of the plank. I could see the top layer and measure it with a ruler.
- Ask the manufacturer – When in doubt, I called the company. They gave me the exact specs.
A good rule of thumb: If the wear layer is less than 2 mm, do not sand. If it’s 2 mm to 4 mm, you can sand once. If it’s over 4 mm, you can sand two or maybe three times if you’re gentle.
Why People Want To Sand Engineered Wood
I wanted to sand my floor because it had:
- Deep scratches from moving furniture
- Faded patches under windows
- A few stubborn stains from spilled drinks
Sanding can remove surface damage and let you refinish the floor with a new color or look. It’s much cheaper than replacing the entire floor.
But I learned that light scratches, scuffs, or dull finish can often be fixed without sanding. Sometimes a good clean and a new coat of finish is enough.
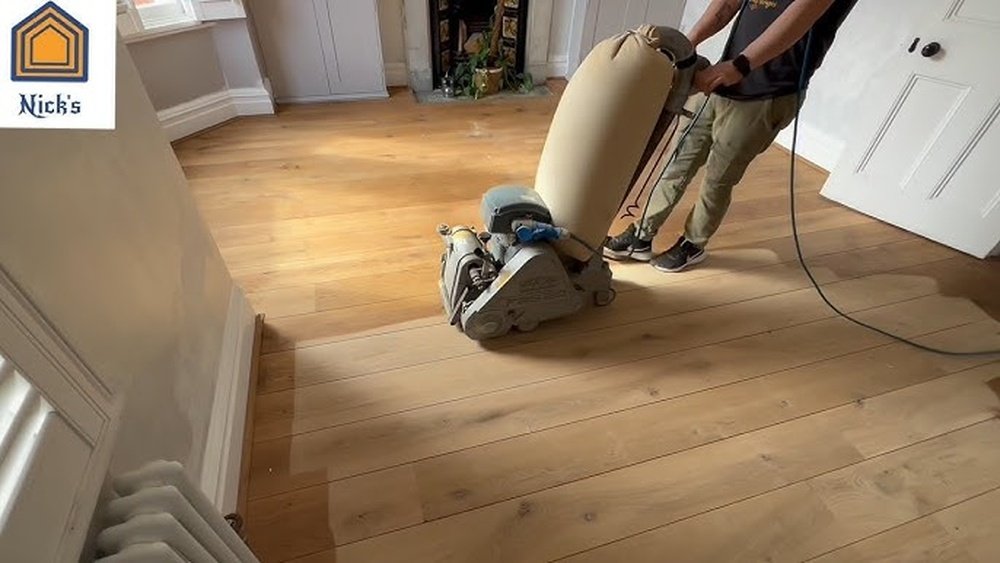
The Sanding Process: My Step-by-step Experience
I was nervous about sanding, but I decided to do it myself to save money. Here’s how I tackled the project.
1. Gather Tools And Materials
I rented a drum sander for the main areas and a handheld edge sander for corners. I bought sandpaper in three grits: coarse (36), medium (60), and fine (100). I also got safety glasses, a dust mask, and ear protection.
2. Prep The Room
I moved all the furniture out, took off baseboards, and vacuumed the floor. I covered vents and doorways with plastic to keep dust from spreading.
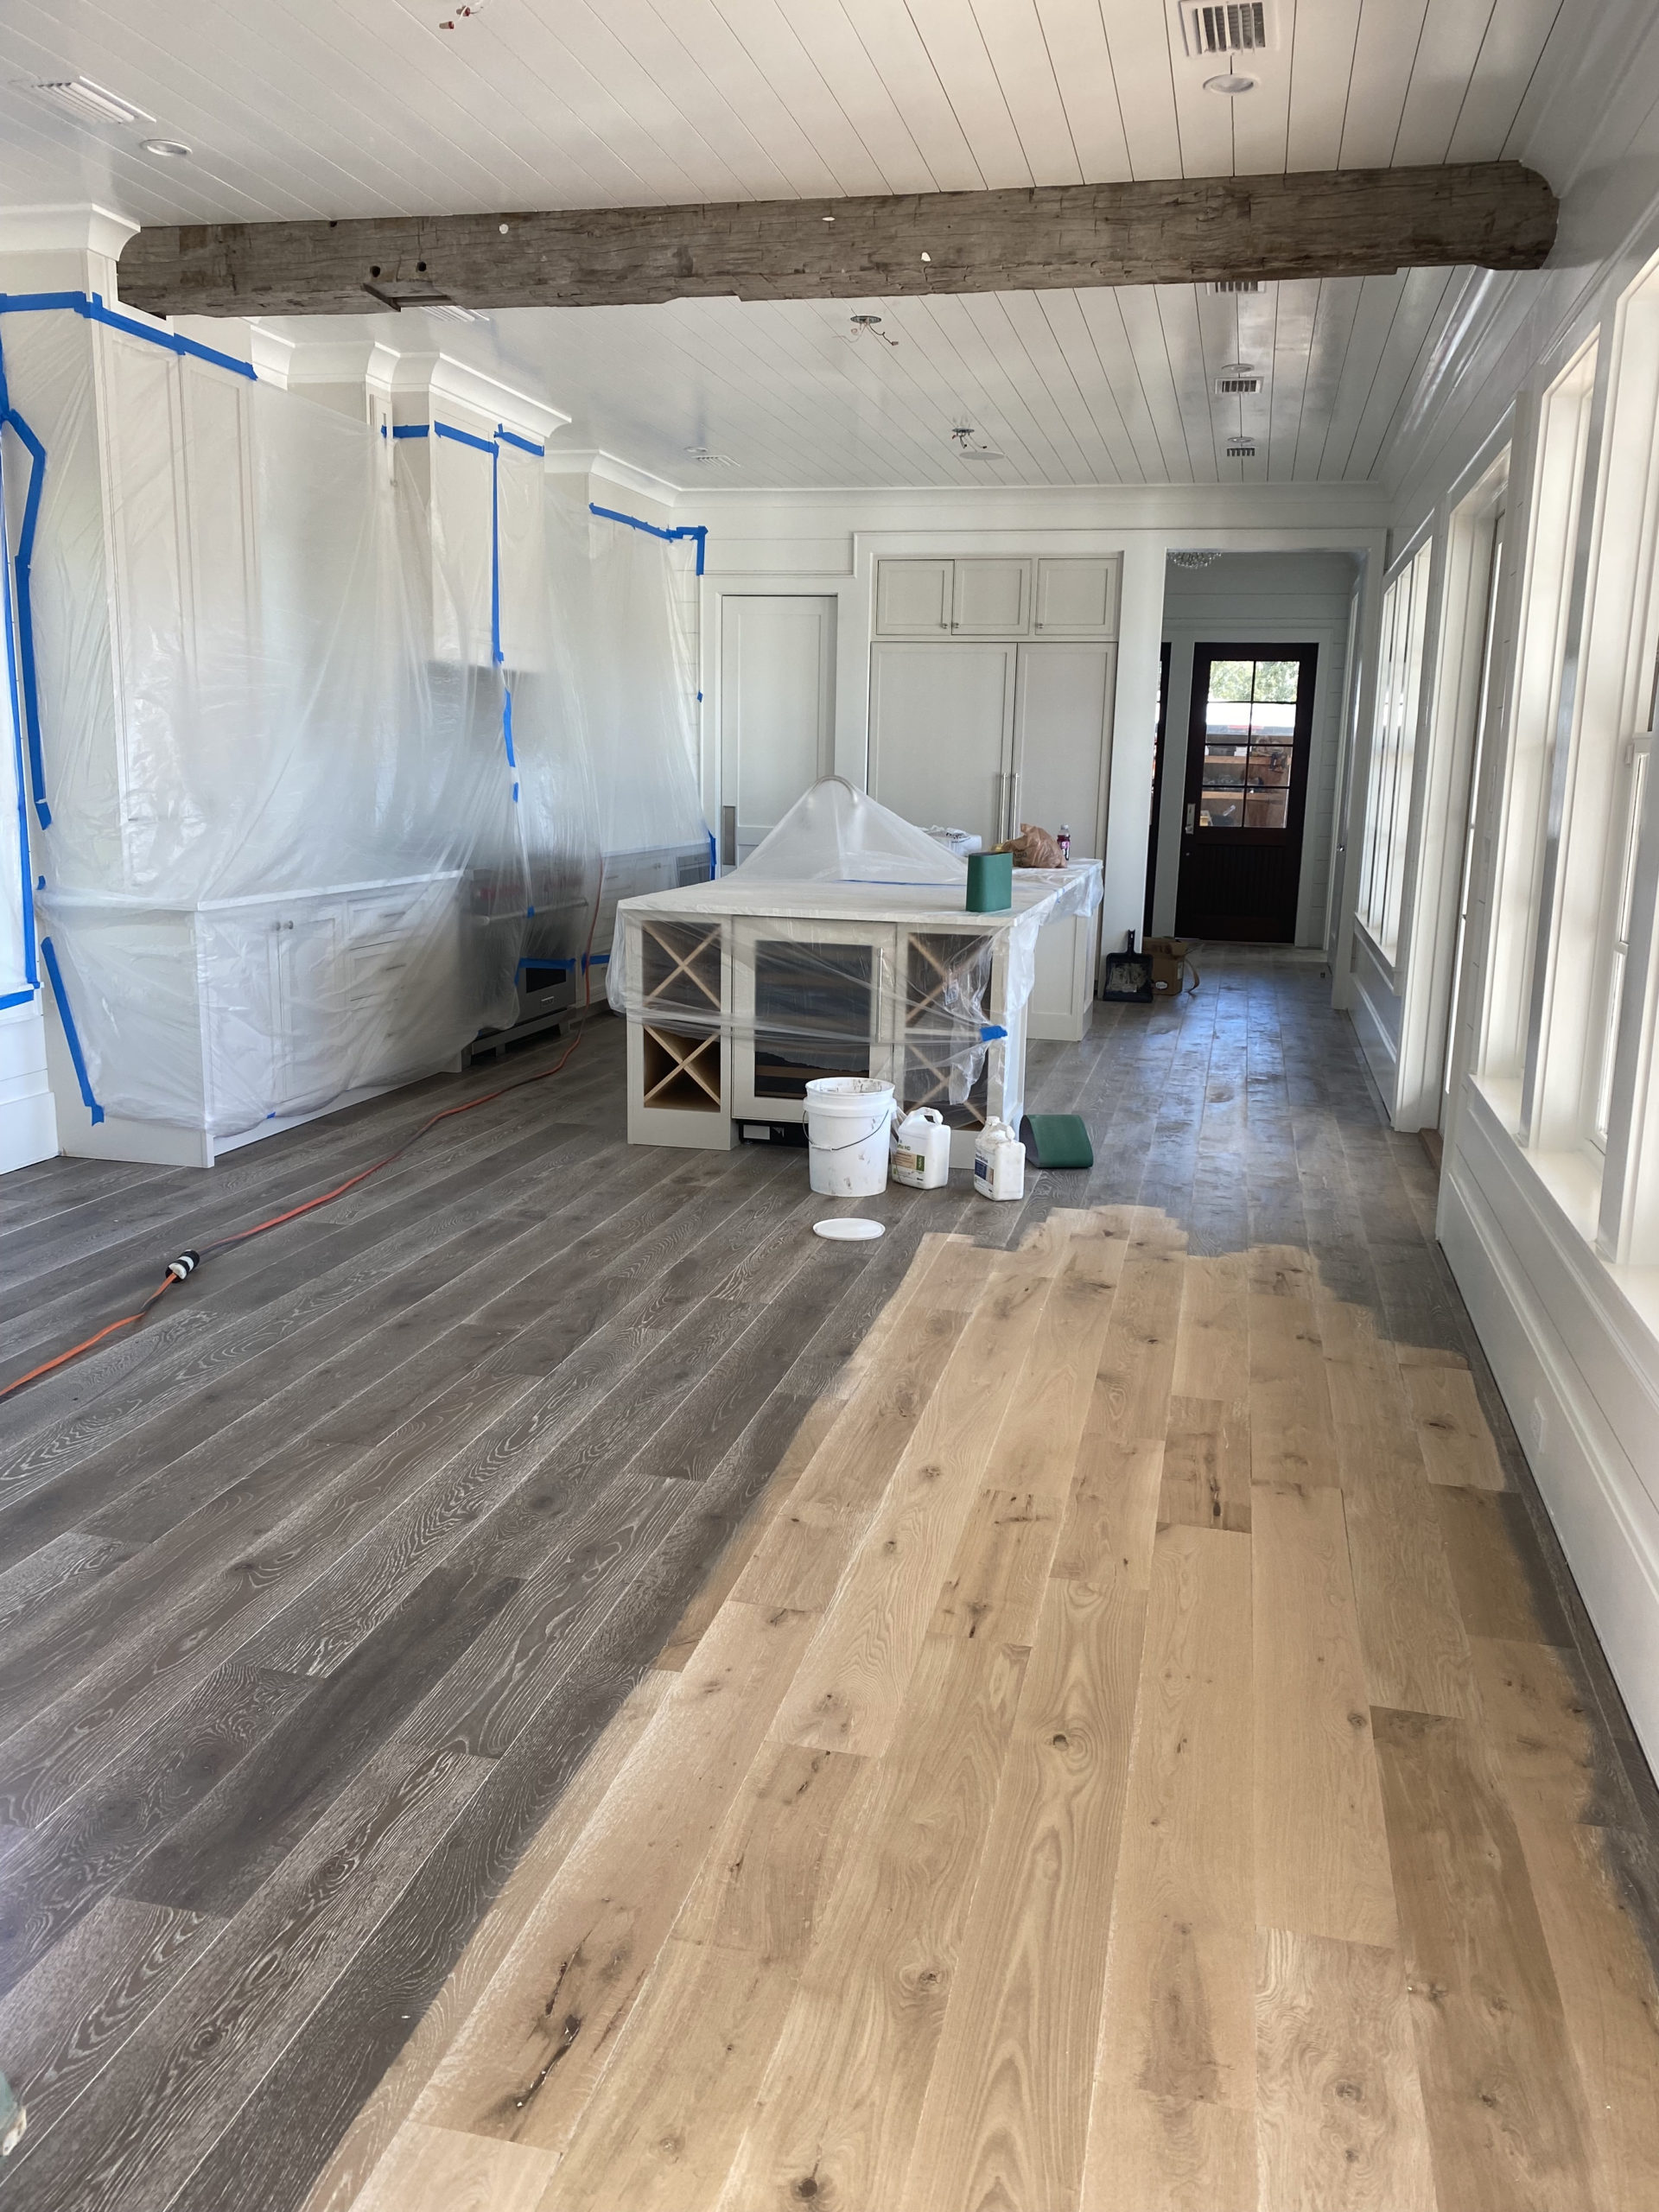
3. Test A Small Area
I started with a closet corner, just to see how deep the wear layer really was. I used the sander lightly and checked the floor every few passes. I could see the natural wood color coming through, but I made sure not to go too far.
4. Sand In Stages
I worked in stages:
- First, I sanded with the coarse grit to remove the old finish and deep scratches.
- Next, I used the medium grit to smooth out rough spots.
- Finally, I finished with the fine grit for a silky surface.
Each stage, I vacuumed and checked the wear layer. If I saw the plywood or a different color appear, I stopped right away.
5. Clean And Finish
After sanding, I vacuumed several times and wiped with a damp cloth. I applied a stain (chose a color I liked), let it dry, and then brushed on two coats of polyurethane for protection.
The result: My floor looked almost brand new. The deep scratches and stains were gone, and the wood had a fresh, even color.
Engineered Wood Vs. Solid Hardwood: Sanding Comparison
Not all wood floors behave the same when sanding. Here’s how engineered wood compares to solid hardwood:
| Floor Type | Wear Layer Thickness | Sanding Limit | Risk Level |
|---|---|---|---|
| Engineered Wood | 1.5–6 mm | 1–2 times | High (if thin) |
| Solid Hardwood | Entire plank | 5–7 times | Low |
Solid hardwood can be sanded many times. Engineered wood is limited by its top layer. This is important if you’re thinking about long-term value or resale.
What Can Go Wrong? Common Mistakes I Learned From
I made some mistakes along the way. Here are a few things you should watch out for:
- Sanding too deep – If you remove too much of the wear layer, you’ll expose the plywood. This cannot be fixed.
- Using a drum sander without practice – These machines are powerful. If you stop in one spot or move too slowly, you’ll create gouges.
- Skipping grits – If you jump from coarse to fine too fast, scratches will show through the finish.
- Not cleaning up dust – Any dust left behind will get trapped in the finish and make the floor look dull.
I learned to go slow, check my progress often, and vacuum between every step.
When You Should Not Sand Engineered Wood
Sanding is not always the answer. Here are times I would avoid sanding:
- Very thin wear layer (under 2 mm)
- Floating floors (not glued or nailed down)
- Heavily beveled edges (edges will look uneven after sanding)
- Veneered or acrylic-impregnated wood (not meant for sanding)
If your floor falls into one of these, try a professional cleaning or a “screen and recoat” instead.

Alternatives To Sanding
If sanding is too risky, there are other ways to refresh your engineered wood:
- Buff and recoat – This removes only the top finish, not the wood.
- Use a floor refresher – Some products add shine and fill minor scratches.
- Spot repair – Touch up deep scratches with a matching wood filler and marker.
I once used a floor refresher in my hallway, and it made a huge difference with almost no effort.
How Long Does Sanded Engineered Wood Last?
After sanding and refinishing, my floor looked great for about 8 years. This depends on foot traffic, pets, and how well you care for it. Most engineered wood floors last 20-30 years, but sanding gives them a second life.
Cost: Diy Vs. Hiring A Pro
I saved a lot by sanding the floor myself, but it took time and effort. Here’s a cost comparison based on my experience:
| Option | Average Cost per sq ft | Typical Total Cost (300 sq ft) |
|---|---|---|
| DIY | $1–$2 | $300–$600 |
| Professional | $3–$6 | $900–$1,800 |
DIY is cheaper, but you risk mistakes. A pro can do the job faster and with less risk, especially if your floor is valuable.
My Top Tips For Sanding Engineered Wood Floors
From my experience, here are my best tips:
- Measure the wear layer before you start. Don’t guess.
- Test in a hidden area to see how your floor reacts.
- Go slow with the sander—fast movements are safer.
- Vacuum often to avoid grit scratches.
- Don’t skip steps—use all three grits for best results.
Non-obvious Insights Most People Miss
When I talked with flooring installers, they shared a few secrets:
- Check for aluminum oxide finish: Some engineered floors have a super-tough finish that’s hard to sand. If your floor barely sands or gums up the sandpaper, stop and ask a pro.
- Humidity matters: Sanding when the air is too dry or wet can cause boards to shrink or swell, making sanding uneven. I learned to check the weather before starting.
- Color matching is tricky: If you sand only one section, the color may not match the rest. I had to refinish an entire room so it looked even.
Environmental Impact
Sanding and refinishing extends the life of engineered wood. This means less waste in landfills. But sanding creates fine dust, so I always wore a mask and kept windows open for fresh air. If you want a greener choice, look for low-VOC finishes.
Is It Worth It? My Honest Opinion
After all my work, I’m glad I sanded my engineered wood floor. It saved money and brought back the beauty of real wood. But I’d only do it if the wear layer is thick enough and the floor is in good shape.
If you’re unsure, it’s smart to call a pro for advice.
For more details about engineered wood floor maintenance, I found this resource very useful: This Old House.
Frequently Asked Questions
Can All Engineered Wood Floors Be Sanded?
No, only floors with a thick enough wear layer (usually 2 mm or more) can be sanded safely. Thin wear layers should not be sanded.
How Can I Tell If My Engineered Floor Can Be Sanded?
Check the product specs, look at the exposed edge (like under a vent), or call the manufacturer. If the top wood layer is thick, you’re likely safe.
How Many Times Can I Sand Engineered Wood Flooring?
Usually one or two times. If the wear layer is over 4 mm, you might get away with sanding it twice.
Can I Sand Engineered Wood By Hand?
You can sand small scratches or spots by hand, but for a whole room, you need a machine sander for even results.
What Finish Should I Use After Sanding?
Polyurethane is the most durable and popular. You can choose oil-based (warmer color, longer drying) or water-based (faster, less odor, lighter color).
If you’re thinking about sanding your engineered wood floor, take time to check the wear layer and plan your steps. With care, you can make your floor look beautiful again—just like I did.
As an Amazon Associate, We earn from qualifying purchases