It was late on a Tuesday. The garage light was buzzing overhead. I was halfway through a simple speaker wire repair when my soldering iron decided to quit. The heating element just died.
I stared at the joint I needed to undo. The stores were closed. My backup iron was at a friend’s house. I had two choices: give up or improvise.
Yes, it is possible to remove solder without an iron. No, it is not magic, and it definitely isn’t perfect. I want to be clear right now. These are workarounds. They are not lab-grade methods.
Table of Contents
Why You Might Need to Remove Solder Without an Iron
This usually happens right in the middle of a fix. The job is small, but your tools aren’t ready. It is frustrating, but it is also a common problem for DIYers.
Common real-life situations
I’ve had my cordless iron run out of battery just as I touched the wire. Maybe you borrowed an iron and already returned it. Now you realize you made a mistake and need to fix it.
I once had to do a field repair on a truck trailer. I was miles from a shop. All I had was a lighter and some basic hand tools. You do what you have to do.
When these methods make sense — and when they don’t
These tricks work best for low-voltage electronics or simple wiring. Think plumbing or automotive wires. They are fine for thick terminals where precision doesn’t matter much.
However, be careful with thin wires. If you need a temporary fix, go for it. If you need a clean rework on a delicate motherboard, wait for a real iron.
Safety First
Just because you aren’t using an iron doesn’t mean there is no heat. “No iron” does not mean no risk. You can still get burned or breathe in bad stuff.
Basic safety rules I follow
I always wear eye protection. Solder can flick up when you pick at it. If I am using friction or chemicals, I wear gloves. Tiny metal shards are sharp.
Ventilation is non-negotiable. Old solder still smokes when you heat it with alternative methods. Open that garage door or turn on a fan.
U.S.-relevant safety notes
In the US, OSHA has strict rules about lead fumes for a reason. Even in a home garage, lead is dangerous. Many older electronics still use leaded solder.
If you are working indoors during winter, don’t seal the room up. If it is summer, put a box fan in the window. Keep the air moving.
Method 1 — Mechanical Removal
This is the cleanest option when the solder joint is already weak. I try this first before I add any heat. It saves a lot of mess.
Tools that actually work
I grab a small flathead screwdriver first. It works like a chisel. Needle-nose pliers are great for wiggling wires loose.
A craft knife or utility blade helps too. You can shave away bits of solder carefully. Just watch your fingers.
Where this works best
This method is perfect for “cold joints.” These are joints that didn’t bond well in the first place. They are usually brittle and gray.
It also works well on cracked solder. If a wire is already loose in the terminal, you can often just wiggle it free.
Where it fails
Do not try this on fully flowed, shiny joints. You will just break the part. If the solder is solid, mechanical force will rip the copper pad right off a circuit board.
Method 2 — Friction Heat Using Simple Tools
This feels sketchy until you try it. Then it makes sense. Friction creates heat. If you rub things together fast enough, they get hot.
Using copper wire or steel wire
I take a piece of spare copper wire. I wrap it or rub it against the solder joint. Then I move it back and forth rapidly.
Copper transfers heat very fast. As the friction builds heat, the solder softens just enough to pull the wire loose.
Real-world example
I used this on a trailer light wire once. It was freezing on the driveway. I had no outlet and no extension cord.
I used a thicker wire to rub against the connection. It took a minute, but the solder eventually gave way. It saved me a trip to the store.
Limitations
This method is slow. You have to be patient. It is also inconsistent. You might get enough heat one second and lose it the next. It is easy to overdo it and fray your wires.
Method 3 — Household Heat Sources
Not all heat sources are equal. Some are a terrible idea. I have seen people ruin good equipment by using the wrong flame.
What people try (and why some fail)
People often grab a lighter or a torch. This is risky. The flame is too hot and uncontrolled. It leaves soot everywhere.
I’ve even seen people use a stove burner. Please don’t do that. It is dangerous and you have zero control over the temperature.
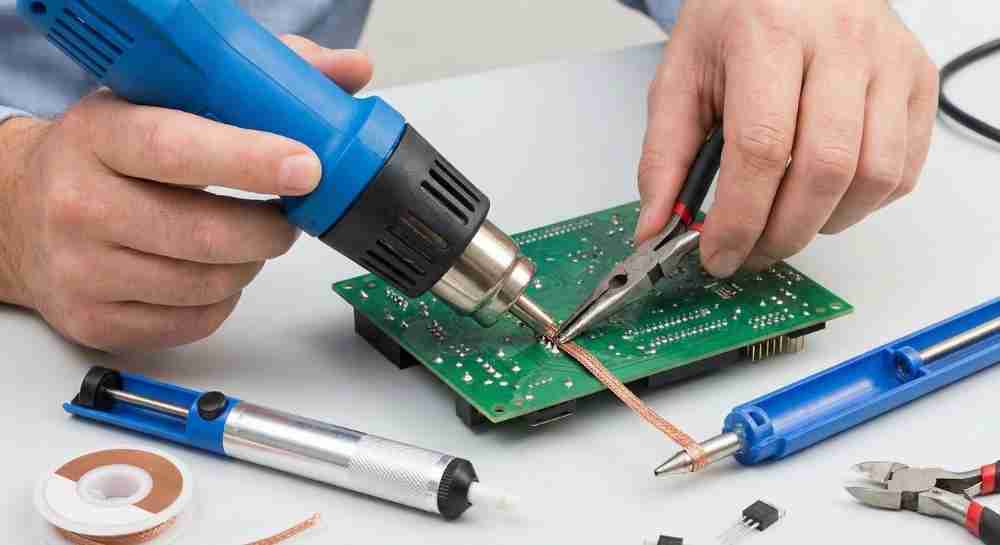
What I actually trust
I trust an adjustable heat gun. If you have one for stripping paint, it might work. You need distance control. Keep it moving so you don’t burn one spot.
Open flames are risky near flux. Flux is flammable. You do not want a small fire on your workbench.
Damage risks to watch for
Watch out for melted insulation. The heat spreads fast. You might free the wire but melt the plastic coating next to it.
On circuit boards, hot air can lift pads. Glue melts before solder sometimes. Warped plastic connectors are also a common tragedy.
Method 4 — Chemical and Absorptive Tricks
This is where expectations need to be realistic. You aren’t going to get a factory finish here. It’s about removal, not beauty.
Flux-assisted softening
Flux helps even without an iron. If you apply fresh flux, it helps the old solder flow at lower temperatures.
It cannot remove solder alone. But it makes mechanical removal or heat gun methods much smoother. It breaks the surface tension.
Absorbing molten solder without braid
I have used a piece of cotton cloth in a pinch. You heat the solder (carefully) and wipe it away quickly.
Why does it work? The fabric grabs the liquid metal. But be careful. Synthetic fabrics will melt into the joint. Stick to cotton. Paper towels usually just burn and leave a mess.
Tools That Make These Methods Easier
These are cheap upgrades that save frustration later. Even if you don’t have an iron, having these helps.
Budget-friendly tools
A manual solder sucker is a lifesaver. It uses a spring to suck up molten solder. It costs very little.
Picks and scrapers are essential. Dental picks are great for prying up legs of components. A brass brush cleans off the debris.
Brands commonly found in U.S. shops
I see Craftsman hand tools in almost every garage. Their small screwdrivers are tough.
For heat guns, DeWalt makes reliable ones that last. Milwaukee accessories, like their utility blades, hold an edge well for scraping.
Mistakes I See Over and Over
Most damage happens here, not during the removal. It happens when you get impatient. I have learned this the hard way.
Rushing the joint
You pull before the solder is ready. The wire snaps or the terminal bends. If it doesn’t move easily, it is not hot enough or loose enough.
Overheating nearby parts
Plastic connectors are the first to die. They warp and then won’t plug back in.
Thin PCB traces are fragile. If you heat them too much with a heat gun, they peel off like stickers. Once that happens, the board is often toast.
Expecting factory-clean results
It is unrealistic to expect a shiny, silver pad without an iron. You will have rough edges. You will have leftover gray blobs. That is okay.
When You Should Stop and Get a Soldering Iron
Sometimes the right tool is the only tool. I know it hurts to stop a project, but sometimes you must.
Jobs that demand proper heat control
If you are working on a circuit board with tiny pads, stop. You need precision. A heat gun is too clumsy.
Reusable connectors also need care. If you melt the housing, you have to buy a new one anyway.
Signs you’re making things worse
If you see the copper lifting off the board, stop immediately. You are doing permanent damage.
If there is a burnt smell that doesn’t go away, you are burning plastic or fiberglass. That is toxic and bad for your electronics.
Final Thoughts
These methods exist for a reason. They are backups, not myths. I have used them to get out of a jam more times than I can count.
Respect the limits of these tricks. If it feels like you are forcing it, you probably are. Know when “good enough” works, and when you need to wait for the store to open.
FAQs – How to Remove Solder Without a Soldering Iron
How to remove solder without a soldering iron at home?
You can remove solder without a soldering iron using friction, a heat gun, or hand tools. These methods work best on small joints and light wires.
Can I remove solder without heat?
Yes, sometimes. If the solder joint is cracked or loose, you can scrape or pull it off with pliers or a small tool without heat.
Is it safe to remove solder without a soldering iron?
It can be safe if you work slow and wear eye protection. Avoid open flames and always watch nearby plastic or wire insulation.
What tools help remove solder without a soldering iron?
Basic tools like needle-nose pliers, a flat screwdriver, or a heat gun help. Many DIYers use common Craftsman or DeWalt tools.
When should I not remove solder without a soldering iron?
Avoid this on delicate circuit boards or fine pads. In those cases, a proper soldering iron gives better control and less damage.