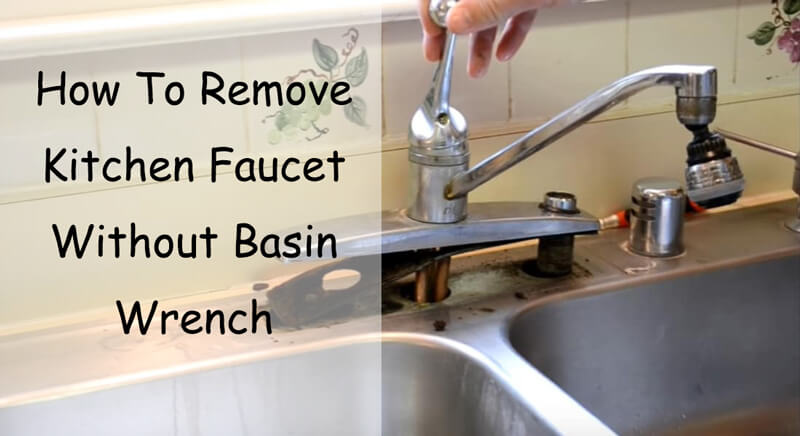
Removing a kitchen faucet sounds simple—until you’re under the sink, staring at a tight space and a rusty nut with no basin wrench in sight. I’ve been there, sweating and frustrated, wishing I could just finish the job. But here’s the good news: you can remove a kitchen faucet without a basin wrench. I did it, and I’ll walk you through exactly how, step by step, with all the little tips I wish I had known from the start.
Prime Day Pick
Limited-time Prime Day price. Check current discount on Amazon.
Why Remove A Faucet Without A Basin Wrench?
Most guides say you need a basin wrench. But what if you don’t have one? Maybe your local store is closed, or you just don’t want to spend extra money on a tool you’ll only use once. That was my case. I wanted to fix a leaky faucet on a Sunday night. No stores were open, and I wasn’t going to wait.
I learned that with some patience and creativity, you can get the job done. You might even learn something new about your own DIY skills.
Prime Day Pick
Limited-time Prime Day price. Check current discount on Amazon.
Tools And Materials I Used
Here’s what I gathered before starting. Most of these are common household tools:
Prime Day Pick
Limited-time Prime Day price. Check current discount on Amazon.
- Adjustable wrench (also called a crescent wrench)
- Channel-lock pliers
- Socket set (with extension, if you have one)
- Flathead screwdriver
- Penetrating oil (like WD-40)
- Flashlight or headlamp
- Towel or sponge (for drips)
- Bucket
- Gloves
I didn’t use all of these every time, but having them nearby made things much easier.

Preparing The Workspace
Before crawling under the sink, I cleared out the cabinet. I laid down an old towel to protect my back and catch any stray drops of water.
Then, I turned off both hot and cold water supply valves under the sink. I tested the faucet to make sure the water was off. Don’t skip this—if you forget, you’ll get soaked.
After that, I put a small bucket under the pipes to catch any water left in the lines.
Steps I Followed To Remove The Faucet Without A Basin Wrench
1. Loosening The Supply Lines
First, I used my adjustable wrench to loosen the nuts that connect the water supply lines to the faucet. Sometimes, these nuts are plastic, and sometimes metal. If they were stuck, I sprayed a little penetrating oil and waited a few minutes. This trick saved me a lot of frustration with old, corroded nuts.
Once loose, I unscrewed them by hand. A little water dripped out, but the towel and bucket took care of it.
2. Finding The Mounting Nuts
The hardest part is getting to the mounting nuts that hold the faucet to the sink. These are usually up behind the sink bowl, in a dark and cramped spot.
Using a flashlight, I looked for the nuts. Some are plastic, some are metal. Most of the time, they look like large hex nuts or wing nuts.
3. Removing Tight Mounting Nuts
If you can reach the nuts with your hand, that’s great. But usually, you need a tool. Here’s what I did:
- For plastic nuts, I used channel-lock pliers. They have a wide jaw and can grip large nuts. I adjusted them to the widest setting and turned counterclockwise.
- For metal nuts, my socket set with an extension worked wonders. Sometimes, a deep socket fit perfectly over the nut. I twisted until it came loose.
If the nut was too tight, I sprayed more penetrating oil and tapped it gently with the handle of my screwdriver to break the rust.
What If The Nut Is Stuck?
This happened to me. The nut wouldn’t move, even with oil and pliers. I tried these options:
- Used a hammer and flathead screwdriver to gently tap the nut and break the rust.
- Wiggled the faucet from above while twisting the nut below. The movement sometimes helped loosen things up.
- If nothing worked, I carefully cut the nut with a small hacksaw blade. It took patience, but it worked for a nut that was rusted solid.
4. Removing The Faucet
Once the mounting nuts were off, I went back up top and gently wiggled the faucet. If it didn’t lift out easily, I cut through old caulk around the base with a utility knife.
Then, I pulled the faucet straight up. Sometimes, a little twisting helped. Underneath, I cleaned off any old putty or grime with a sponge and some cleaner.
How These Tools Compare
Here’s a quick look at how the basic tools I used compare to a basin wrench for this job:
| Tool | Pros | Cons |
|---|---|---|
| Adjustable wrench | Common tool, easy to use | Can’t always fit in tight spaces |
| Channel-lock pliers | Good for large plastic nuts | Slips on metal nuts sometimes |
| Socket set | Great for deep, metal nuts | Needs right size and length |
| Basin wrench | Designed for this job | Not always on hand |
Tips I Wish I Knew Before Starting
- Penetrating oil is a lifesaver. Let it sit for 10-15 minutes on stubborn nuts.
- Wear gloves. The area under the sink is full of sharp edges and old grime.
- Take pictures before you start. If you ever get lost, you can check how things were connected.
- If your arms get tired, take breaks. Working under the sink is hard on your back and shoulders.
- Have a helper if possible. Sometimes a second set of hands above the sink can gently rock the faucet while you work below.
Common Problems And How I Fixed Them
Rusted Or Corroded Nuts
This was the biggest headache. I sprayed penetrating oil, waited, and tried again. If nothing worked, I gently cut the nut with a hacksaw blade.
Tight Spaces
My hands are medium-sized, but the space under the sink is always small. I found that using a socket with an extension helped me reach far-back nuts.
Faucet Stuck To Sink
Sometimes, even with the nuts off, the faucet wouldn’t budge. I slid a putty knife under the base and gently pried. Old caulk or plumber’s putty can glue things down.
How Long Did It Take?
The whole process took me about one hour the first time. The hardest part was removing stuck nuts. With practice, I could do it in 30-40 minutes.
Alternative Tools That Can Help
If you don’t have the exact tools I used, here are some other things that might work:
- Slip-joint pliers for medium nuts
- Vise grips for extra grip on rounded nuts
- Mini hacksaw for cutting stuck parts
- Deep sockets for long faucet shanks
When You Might Still Need A Basin Wrench
I’ll be honest—some setups are just too tight or awkward. If the space under your sink is super narrow, a basin wrench might be the only tool that fits. In that case, you can buy or borrow one. But in most cases, with patience and the right tricks, you can get the job done without it.
Safety Reminders
- Always turn off the water supply first.
- Double-check for leaks after reconnecting everything.
- Use a towel or sponge to dry any drips.
What Surprised Me Most
I thought I would need special tools, but I didn’t. The process was slow, but it worked. I also learned that patience and a little creativity can solve most problems under the sink.
Here’s a breakdown of time spent on each step, just to give you an idea:
| Step | Time (minutes) |
|---|---|
| Clear cabinet and set up | 5 |
| Turn off water and disconnect supply lines | 10 |
| Remove mounting nuts | 30 |
| Lift out faucet and clean area | 10 |
| Total | 55 |

How To Avoid Common Mistakes
Here are mistakes I made and how you can avoid them:
- Forgetting to turn off the water. Always double-check. Test the faucet after turning valves off.
- Losing small parts. Put all nuts and washers in a bowl. They love to roll away.
- Scratching the sink. Place a towel or cardboard on the sink basin before setting tools down.
- Not taking photos. Take a quick picture before you disconnect anything.
Cleaning Up
After removing the faucet, I cleaned up the area. I wiped away old putty and checked for leaks. When installing the new faucet, everything went much smoother because I had already done the hard part.
What I Learned
I learned that most DIY jobs are about problem-solving, not just following instructions. Removing a faucet without a basin wrench is possible if you take your time and use the tools you have. And you’ll probably get a little dirty, but that’s part of the fun.
When To Call A Professional
If you run into a nut that won’t budge, or you see signs of water damage or mold, it’s smart to call a plumber. There’s no shame in getting help if you need it.
For more technical details about plumbing tools, you can check out this guide from Family Handyman.
Frequently Asked Questions
What If I Can’t Reach The Mounting Nuts Under My Sink?
Try using a socket extension or channel-lock pliers. If space is very tight, removing the sink trap may help. Sometimes, lying on your back with a pillow under your shoulders can give you better access.
Can I Use Wd-40 To Loosen Rusted Faucet Nuts?
Yes, spray WD-40 or another penetrating oil on the nut, wait 10-15 minutes, and try again. It often helps loosen rust and makes removal easier.
Is It Safe To Cut A Stuck Faucet Nut With A Hacksaw?
Cutting with a mini hacksaw is safe if you work slowly and protect pipes and wires nearby. Wear gloves and eye protection, and cut only the nut—not the sink or faucet shank.
Do I Need To Replace The Supply Lines When Installing A New Faucet?
If your old supply lines are in good shape, you can reuse them. But if they look worn or corroded, it’s smart to replace them with new ones for safety.
What Can I Do If My New Faucet Leaks After Installation?
Check all connections are tight, but not over-tightened. Sometimes, a little plumber’s tape on the threads can help stop leaks. Make sure you followed all instructions for your new faucet.
Removing a kitchen faucet without a basin wrench is a real test of patience and creativity, but you can do it! Take your time, use the tools you have, and don’t be afraid to try new methods. Trust me, the sense of accomplishment at the end is worth it.
As an Amazon Associate, We earn from qualifying purchases