If you’ve ever looked at your deck and thought, “Wow, this wood looks rough,” you’re not alone. I used to feel the same way every spring. I wanted my deck to look fresh, smooth, and inviting, but sanding a deck always sounded like a huge job. I wondered, can you use a floor sander on a deck? I’ve tried it myself, made a few mistakes, and learned a lot. Let me walk you through everything I wish I had known before I started.
Why I Considered Using A Floor Sander On My Deck
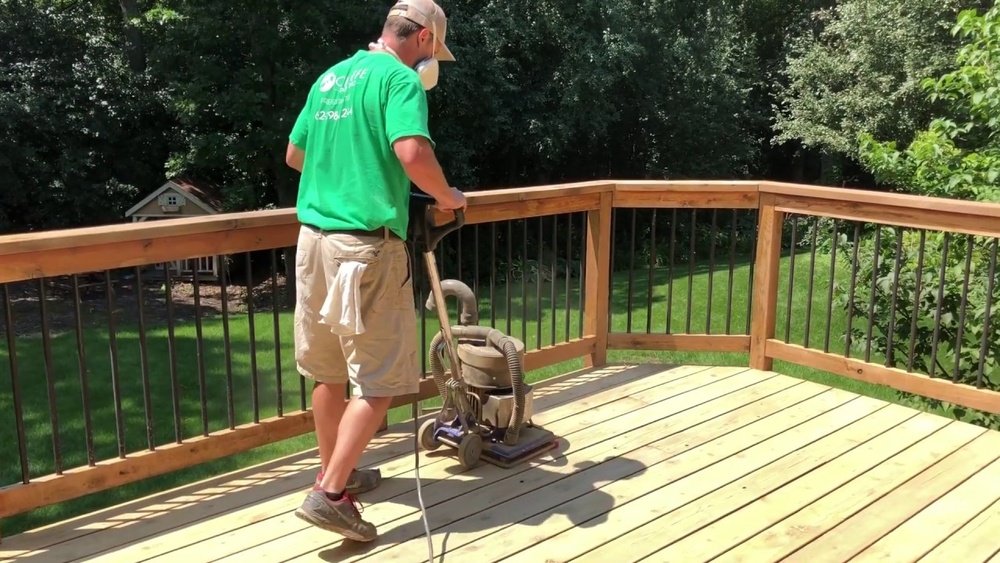
After years of rain, sun, and snow, my deck boards were splintered and gray. I knew sanding was the answer. I’d seen drum sanders and orbital floor sanders at the rental store. They looked powerful, and I thought, “If it works on old hardwood floors, why not my deck?” Plus, using a big sander seemed much faster than a little hand sander. But I soon learned there’s more to this decision than speed.
What Is A Floor Sander?
A floor sander is a machine made to sand flat, hard surfaces like indoor wood floors. The two most common types you’ll find are:
- Drum sanders – These have a spinning drum that sands aggressively. They can strip thick finishes and smooth floors fast.
- Orbital sanders – These move in small circles. They’re less aggressive and easier for beginners.
I rented both types at different times. I’ll explain how each worked for my deck and what I learned.
Can You Use A Floor Sander On A Deck?
The short answer is yes, you can use a floor sander on a deck—but it’s not always the best idea. I tried it because I wanted to save time. However, decks are different from indoor floors in a few key ways:
- Deck boards often have gaps, nails, or screws.
- Wood outside is usually softer and rougher.
- Decks are not always perfectly flat.
Let’s dive into the details.
My Experience: Using A Drum Sander On My Deck
Drum sanders are heavy and strong. I thought they would save me hours. Here’s what really happened:
What Went Well
- The drum sander removed old paint and splinters quickly.
- Large, flat areas looked much smoother after two passes.
What Went Wrong
- The sander was so heavy that it gouged my softer pine boards in seconds if I stopped moving.
- It struggled at the edges and missed spots near railings and steps.
- Nails sticking up even a little tore the sanding belt and made ugly marks.
I learned that drum sanders are risky on decks unless your boards are very flat and hard. One slow pause or bump, and you’ll have a dip that’s hard to fix.
My Experience: Using An Orbital Floor Sander
After my drama with the drum sander, I tried a large orbital sander (sometimes called a square buff sander). It was less scary.
What Went Well
- The orbital sander was much gentler on the wood.
- Mistakes were easier to fix, and I didn’t leave deep gouges.
- It worked better around nails and uneven boards.
What Was Hard
- It took longer to remove thick old stain.
- Edges and tight corners still needed hand sanding.
I’d say orbital sanders are safer for most decks, especially if you’re new to sanding or your boards aren’t perfectly flat.
Floor Sander Vs. Handheld Sander: What’s The Difference?
I’ve used both floor sanders and handheld random orbital sanders. Here’s a quick comparison from what I saw:
| Feature | Floor Sander | Handheld Sander |
|---|---|---|
| Speed | Faster on large areas | Slower, best for small areas |
| Control | Hard to use on uneven decks | Easy to control, good for detail work |
| Surface Finish | Very smooth (if used right) | Smoother, but takes longer |
| Risk of Damage | High with drum sander, low with orbital | Low |
| Best Use | Flat, large areas | Edges, stairs, railings |
From my experience, a combination works best—large sander for open boards, handheld for details.

When Is It Safe To Use A Floor Sander On A Deck?
Here’s what I learned the hard way. Only use a floor sander if:
- Your deck boards are flat, even, and secure.
- All nails and screws are countersunk.
- The wood is dry and not rotten.
If your boards are warped or the fasteners stick up, a floor sander will catch and possibly damage the deck—and the sander.
Step-by-step: How I Sanded My Deck With A Floor Sander
If you decide to go for it, here are the steps I followed. This method helped me avoid most problems.
1. Prepare The Deck
- Remove all furniture, planters, and rugs.
- Sweep and wash the deck. I used a simple hose and brush. Let the wood dry for a day or two.
- Hammer down or countersink any nails or screws.
- Inspect for loose or rotten boards—replace them.
2. Choose The Right Sander And Grit
- For my deck, I picked an orbital floor sander.
- Start with a coarse grit (like 36 or 40) to remove old stain or paint.
- Switch to a medium grit (60 or 80) for a smoother finish.
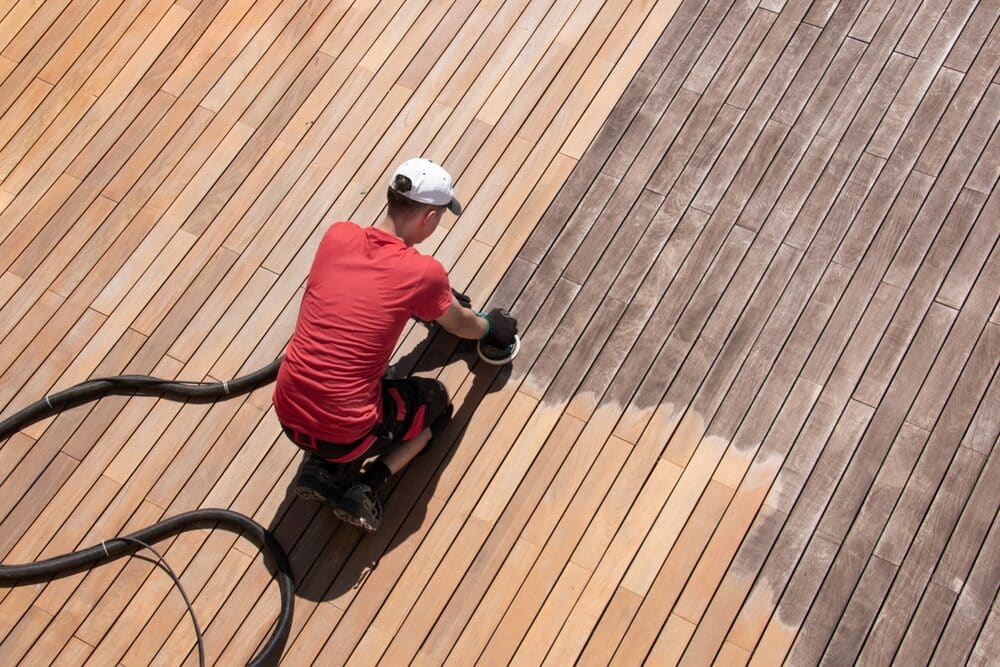
3. Sand In The Right Direction
- Always sand with the grain of the wood. This prevents deep scratches.
- I worked slowly, keeping the sander moving at all times.
4. Do The Edges And Details By Hand
- The big sander can’t reach corners, edges, or between boards.
- I used a small palm sander and some sandpaper for these spots.
5. Clean Up
- Vacuum or sweep up all dust.
- Wipe down the deck with a damp cloth to remove fine particles.
6. Apply Finish
- Wait a day for the wood to dry and settle.
- Apply your chosen deck stain or sealer.
I found this method gave me a deck that felt smooth under bare feet and looked almost new.

Biggest Mistakes I Made (so You Don’t Have To)
I wish someone had told me these things before I started:
- Don’t rush the prep. I skipped checking for nails once, and the sander tore up a belt in minutes.
- Never sand wet wood. It gums up the paper and leaves streaks.
- Don’t stop moving the sander. Even a short pause can gouge the wood.
- Test in a small spot first. Every deck is different; try a corner before doing the whole thing.
Common Problems When Using A Floor Sander On A Deck
After talking with neighbors and learning from my own deck jobs, here are issues people run into:
- Uneven sanding: If your deck isn’t flat, the sander skips or digs.
- Paper clogs fast: Old paint or wet wood will fill up the sandpaper quickly.
- Missed spots: Floor sanders can’t get right up to rails or into grooves.
- Gouges or dips: Going too slow or using a drum sander on soft wood.
Knowing these risks helps you avoid them.
Alternatives To Floor Sanders For Decks
Sometimes, a floor sander is just too much. Here are other options I’ve tried:
- Handheld orbital sander: Slower, but safe and easy to control.
- Pole sander: Good for light smoothing, but not for removing old finishes.
- Chemical strippers: These remove old paint or stain without sanding, but you still need to smooth the wood after.
- Pressure washer: Cleans, but doesn’t smooth the surface.
If your deck is small or has a lot of curved areas, I’d go with a handheld sander. For large, flat decks, a floor sander saves time if you’re careful.
Floor Sander Safety Tips I Learned
Sanding looks easy, but these tips saved my skin—literally:
- Wear a dust mask and goggles. Deck dust is nasty.
- Use hearing protection. Floor sanders are loud.
- Check the cord often. It’s easy to run over it by mistake.
- Keep kids and pets away. The machine can throw debris.
A small splinter in your eye or a cut cord is no fun. I learned to take safety seriously.
Cost Of Sanding A Deck: My Real Numbers
People ask, “Is it worth renting a floor sander?” Here’s what I spent last time:
| Item | Cost |
|---|---|
| Floor sander rental (24 hours) | $60 |
| Sandpaper (5 sheets, mixed grits) | $20 |
| Hand sander rental | $15 |
| Dust mask, ear plugs, gloves | $10 |
| Total | $105 |
Prices will vary by location, but this gives you an idea. Doing it myself was way cheaper than hiring a pro, but it did take most of a weekend.
When To Call A Professional
After all my DIY efforts, I admit there are times to call for help:
- If your deck is very warped or has lots of repairs.
- If you’re not comfortable using big machines.
- If you have a large, multi-level deck.
A pro can finish the job faster and may have tools you can’t rent. But for a typical backyard deck, a careful homeowner can do a great job.
How To Keep Your Deck Smooth After Sanding
I wanted my hard work to last. Here’s what I found helpful:
- Seal or stain right after sanding. Don’t let the deck sit raw for more than a week.
- Sweep often. Dirt and leaves can scratch the surface.
- Check for popped nails each season and fix them right away.
A little regular care saves you from having to sand again soon.
Final Thoughts: Should You Use A Floor Sander On A Deck?
Looking back, I’d say you can use a floor sander on a deck if the boards are flat and you prepare well. For most people, a large orbital sander is safer than a drum sander. The job is dusty and noisy, but the results are worth it—walking barefoot on smooth wood is one of life’s small joys.
If you’re unsure, start with a small area. Take your time. And remember, the goal isn’t perfect—it’s a deck you’ll enjoy for years.
For more on wood sanding machines, the Wikipedia page on floor sanders is a good resource.
Frequently Asked Questions
Can I Use A Drum Sander On A Deck?
You can, but I don’t recommend it unless your deck is very flat and made from hard wood. Drum sanders are powerful and can easily gouge soft or uneven boards. I made deep marks in my pine deck when I tried.
For most decks, a large orbital sander is safer.
What Grit Sandpaper Should I Use For Deck Sanding?
Start with a coarse grit like 36 or 40 if you need to remove old paint or heavy stains. Then switch to 60 or 80 grit for a smoother finish. I found 80 grit left my deck ready for staining.
How Long Does It Take To Sand A Deck With A Floor Sander?
For a deck about 200 square feet, it took me 4 to 6 hours, not counting prep and cleanup. It depends on the condition of the wood and how many passes you make. Add extra time for sanding edges and stairs by hand.
Is It Better To Sand Or Pressure Wash A Deck?
Pressure washing is great for cleaning, but it doesn’t smooth rough wood or remove splinters like sanding. I use a pressure washer first, let the deck dry, and then sand for a smooth surface. Both steps help get the best result.
Do I Have To Sand My Deck Before Staining?
If your deck is rough, gray, or has old finish, sanding gives the best results. New stain soaks in better and looks smoother. If the wood is already smooth and clean, a light sanding may be enough.
Let me know if you have more questions—I’m always happy to share what I’ve learned from my own deck adventures!
As an Amazon Associate, We earn from qualifying purchases