Can You Sand Plywood Edges? My Honest Experience And Tips
Plywood is a popular choice for many projects. It’s affordable, strong, and easy to find. But if you’ve ever worked with plywood, you probably noticed the edges are rough and not as nice as solid wood. I remember my first plywood project.
I built a simple shelf for my room. The top and bottom looked smooth, but the edges were ugly and full of splinters. I wondered, “Can you sand plywood edges and make them look good? ” After years of working with plywood, I’ve learned a lot about sanding those tricky edges.
I want to share what I’ve learned, the mistakes I made, and the techniques that actually work.
Why Are Plywood Edges So Tricky?
When you look at a piece of plywood, you’ll see thin layers of wood glued together. These layers are called veneers. The face (top and bottom) is usually smooth because it’s covered with a fine veneer. But the edge exposes all the layers. Sometimes, there are small gaps, glue lines, and rough spots. That’s why the edges feel sharp and splintery. I quickly learned that sanding plywood edges is not the same as sanding regular wood. If you rush, you can make things worse. The layers can chip off, and the edge might look even messier.
Can You Really Sand Plywood Edges?
Yes, you can sand plywood edges! But you need to be careful and patient. My first time, I used rough sandpaper and pressed too hard. The edge tore up, and I had to start over. Over the years, I found the right way.
With the right tools and technique, you can make plywood edges smooth, safe, and even pretty.
How I Sand Plywood Edges: Step-by-step
Let me walk you through my process. This is what I do every time I want a clean plywood edge.
1. Gather The Right Tools
You don’t need expensive tools, but using the right ones makes a big difference. Here’s what works best for me:
- Sandpaper: I start with 120 grit, then move to 180, and finish with 220 grit.
- Sanding block: This helps keep the sandpaper flat, so you don’t round over the edges too much.
- Orbital sander: For big projects, an orbital sander saves a lot of time.
- Dust mask: Plywood dust isn’t healthy to breathe.
- Vacuum or brush: To clean up the dust between steps.
2. Inspect And Prepare The Edge
Before sanding, I always check the edge. Sometimes there are big splinters sticking out. I use a sharp utility knife to trim these away. If the edge has big gaps, I fill them with wood filler and let it dry. This makes the final result much smoother.
3. Start With Medium Grit Sandpaper
I wrap 120-grit sandpaper around a sanding block. Then I gently sand the edge, moving back and forth with light pressure. It’s important not to press too hard or stay in one spot. If you do, you can tear the layers or create dips.
4. Move To Finer Grits
Once the edge feels smoother, I switch to 180-grit. I repeat the process, but now I focus on removing any scratches left by the rougher paper. Finally, I use 220-grit for a silky finish. By this point, the edge should feel much nicer and look more even.
5. Clean Between Steps
After each grit, I wipe the edge with a damp cloth or use a vacuum. This removes dust and helps me see any rough spots I missed.
6. Optional: Seal The Edge
If I want the edge to look even better, I sometimes use edge banding or apply a thin layer of wood glue mixed with water. This seals the edge and stops splinters from popping up later. Once dry, a quick final sanding with 220-grit makes it perfect.
Comparing Sanding Methods: By Hand Vs. Power Tools
When I first started, I always sanded by hand. It’s slow but gives you control. Later, I tried using an orbital sander. It’s much faster, but you need to be careful not to over-sand. Here’s a comparison of the two:
| Method | Speed | Control | Risk of Damage | Best For |
|---|---|---|---|---|
| Hand Sanding | Slow | High | Low | Small projects, final smoothing |
| Orbital Sander | Fast | Medium | Medium | Large projects, rough sanding |
I usually start with a sander for big jobs, then finish by hand. For small projects, hand sanding is usually enough.
Mistakes I Made (so You Don’t Have To)
I’ve made plenty of mistakes while learning to sand plywood edges. Here are some things I wish I knew earlier:
- Using too rough sandpaper: I once started with 60-grit. It tore up the edges and made deep scratches.
- Sanding too fast: Going quickly can cause the layers to peel.
- Not checking for gaps: If you skip filling holes before sanding, the edge never looks finished.
- Skipping fine grits: If you stop at 120-grit, the edge stays rough.
- Not cleaning between steps: Dust can clog your sandpaper and scratch the surface.
If you avoid these mistakes, your edges will look much better.
How Does Sanding Affect Plywood Strength?
Some people worry that sanding the edges will make plywood weak. In my experience, if you sand gently and don’t remove too much material, the strength stays the same. The layers are glued tightly together. However, if you sand too much or dig in with power tools, you can weaken the edge. I always remind myself: less is more. Sand just enough to get it smooth.

Tips For Getting A Professional Finish
If you want your plywood project to look top-notch, here are a few extra things I do:
- Edge banding: This is a thin strip of wood or plastic you iron onto the edge. It hides the layers and looks like solid wood.
- Wood filler: For large holes or chips, fill them before sanding.
- Primer or sealer: A coat of primer or diluted glue before painting helps the paint stick better and gives a smoother finish.
- Round over the corners: A light pass with sandpaper on the corners makes the edge softer to touch and less likely to chip.
Let me show you a quick overview of the different edge treatments I’ve tried:
| Edge Treatment | Appearance | Durability | Skill Level Needed |
|---|---|---|---|
| Simple Sanded Edge | Visible layers | Good | Beginner |
| Edge Banding | Looks like solid wood | Very Good | Intermediate |
| Wood Filler + Paint | Seamless, painted look | Good | Beginner |
Edge banding needs a bit of practice, but the results are worth it if you want something really polished.
Safety Tips: Protect Yourself And Your Project
Sanding plywood may seem harmless, but there are a few safety steps I always follow:
- Wear a dust mask: Plywood dust can irritate your lungs.
- Use safety glasses: Splinters can fly off while sanding.
- Work in a ventilated area: Dust builds up fast.
- Secure the plywood: Clamp your project so it doesn’t slip while sanding.
I once skipped the mask and ended up coughing for hours. Trust me, it’s worth the extra minute to put on safety gear.

When Should You Not Sand Plywood Edges?
There are times when sanding isn’t the best answer. If the plywood is very thin (like 1/4 inch), aggressive sanding can weaken it. If the edge will be hidden inside a cabinet, I sometimes just knock off the sharp bits and leave it rough.
For outdoor projects, I use sealant instead of sanding for long-term protection.
Plywood Grades And How They Affect Sanding
Not all plywood is the same. The grade of the plywood can make sanding easier or harder. Here’s a quick summary from my experience:
| Plywood Grade | Edge Quality | Best Use |
|---|---|---|
| A-grade | Very smooth, few gaps | Furniture, cabinets |
| B-grade | Smooth, minor defects | Shelves, painted surfaces |
| C-grade | Rough, visible gaps | Construction, hidden areas |
| D-grade | Very rough, lots of voids | Subfloor, underlayment |
If you’re aiming for a nice sanded edge, spend a little extra for A- or B-grade plywood. Lower grades take more work and never look as good.
Non-obvious Insights That Helped Me
Two things I learned that most beginners miss:
- Wet the edge before final sanding: This raises the wood fibers. Sanding after wetting gives a super smooth finish.
- Use a sanding sealer or diluted glue: It hardens the edge and prevents splinters, especially if you plan to paint.
I started doing these a few years ago, and my projects look much more professional now.
Why Bother Sanding Plywood Edges?
Some people ask if it’s worth the effort. In my view, a well-sanded edge makes a huge difference. It feels better, looks more finished, and is safer to touch. I’ve had friends run their hands along my plywood shelves and say, “Wow, this doesn’t feel like plywood at all!” That’s the kind of result I aim for every time.
If you want to see more about plywood and its uses, check out this helpful resource from Wikipedia.
Frequently Asked Questions
Can You Sand Plywood Edges Without Chipping?
Yes, you can. Use fine grit sandpaper (start with 120 or 180) and sand gently. Don’t use too much pressure, and always sand along the edge, not across it. Filling gaps with wood filler first also helps prevent chipping.
What Is The Best Sandpaper Grit For Plywood Edges?
I recommend starting with 120-grit for rough edges, then moving to 180, and finishing with 220-grit. For very smooth results, use a sanding block and change grits as you go.
Should I Use A Power Sander Or Sand By Hand?
Both work well. For large projects, a power sander saves time, but finish by hand for better control. For small pieces, hand sanding is enough and safer for delicate edges.
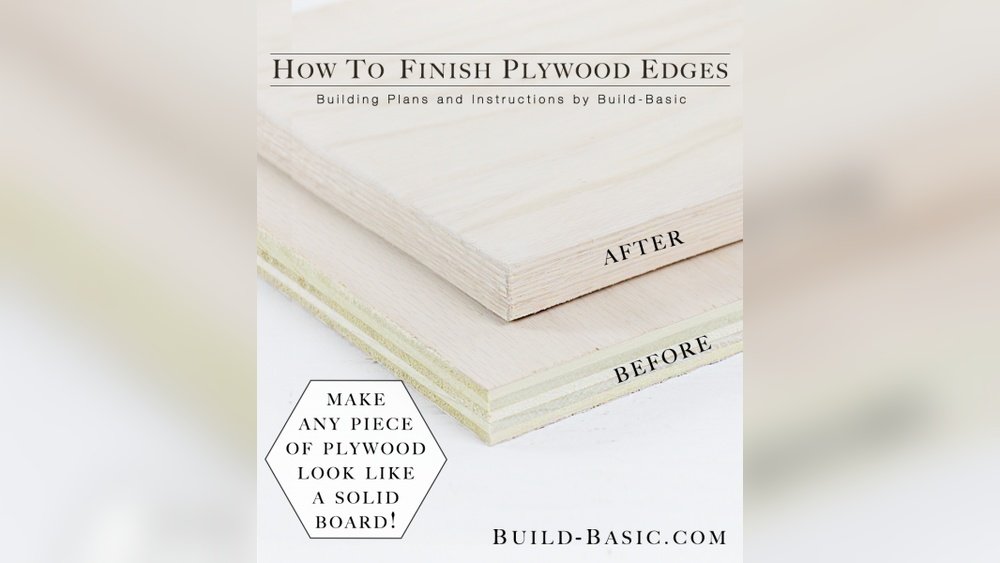
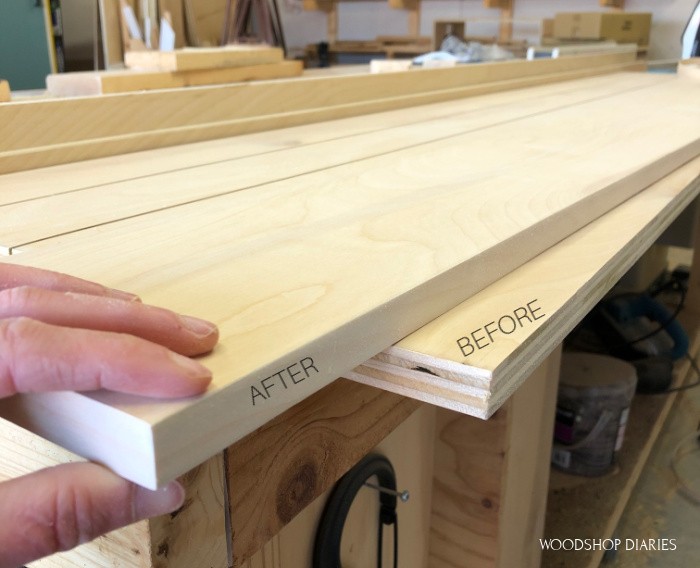
How Can I Make Plywood Edges Look Like Solid Wood?
You can use edge banding, which is a thin strip of real wood or plastic you glue or iron onto the edge. Or, use wood filler and paint for a seamless look. Both methods hide the layers and look professional.
Is Sanding Necessary If I Plan To Paint The Plywood Edge?
Yes, sanding is still important. Paint sticks better to a smooth surface, and sanding removes splinters. For the best finish, sand, seal, and then paint.
Sanding plywood edges can seem tricky at first, but with patience and the right steps, you’ll get great results. Over the years, I learned that a little extra time spent sanding makes every plywood project look and feel much better.
If you’re starting out, don’t worry if it’s not perfect the first time. Keep practicing, and soon you’ll be proud of your smooth, professional edges.
As an Amazon Associate, We earn from qualifying purchases