If you’ve ever tried to hang a shelf or put up a picture, you know how stressful it is to find a stud in the wall. Trust me, I’ve made plenty of holes in the wrong spots. Then I found the Stanley Stud Finder, and it changed everything for me. Let me walk you through how to use it, step by step, with all the tips and stories I wish I’d known from the start. Whether you’re hanging a TV or just a small frame, this guide will help you do it right the first time.
Why Finding A Stud Matters
When I first started doing DIY projects, I didn’t realize how important it was to find a stud. I just hoped the drywall would hold. Spoiler: it didn’t. My shelf crashed down, taking everything with it. Drywall is not made for heavy things. That’s where a stud comes in. It’s a strong wooden beam behind your wall. If you anchor screws or nails into it, your stuff stays up. No surprises.
What Is A Stanley Stud Finder?
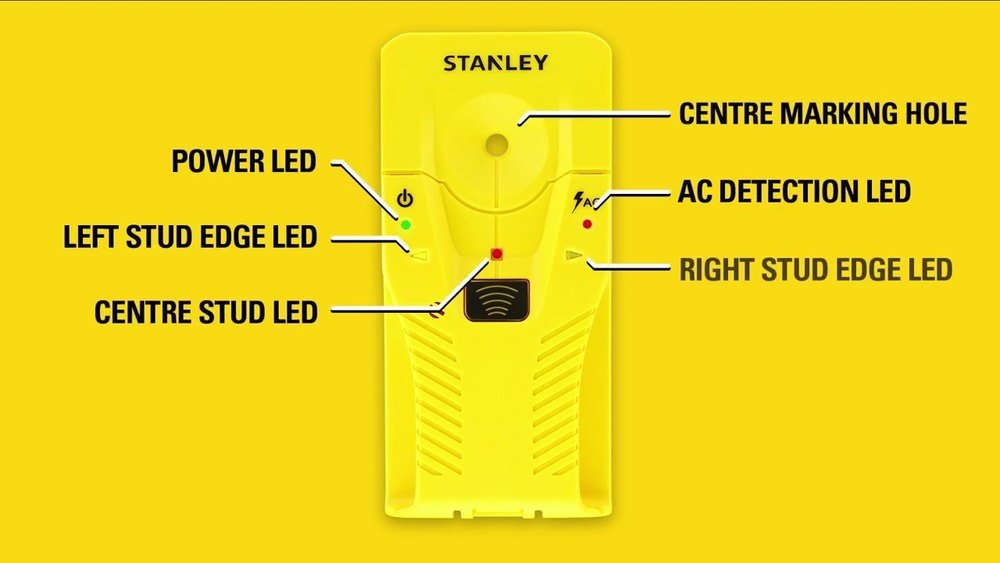
The Stanley Stud Finder is a small handheld tool. It helps you find the wooden beams (studs) hiding behind your wall. It uses sensors to detect changes in wall density. When the sensor finds the edge of a stud, it lets you know—usually with a light or a beep.
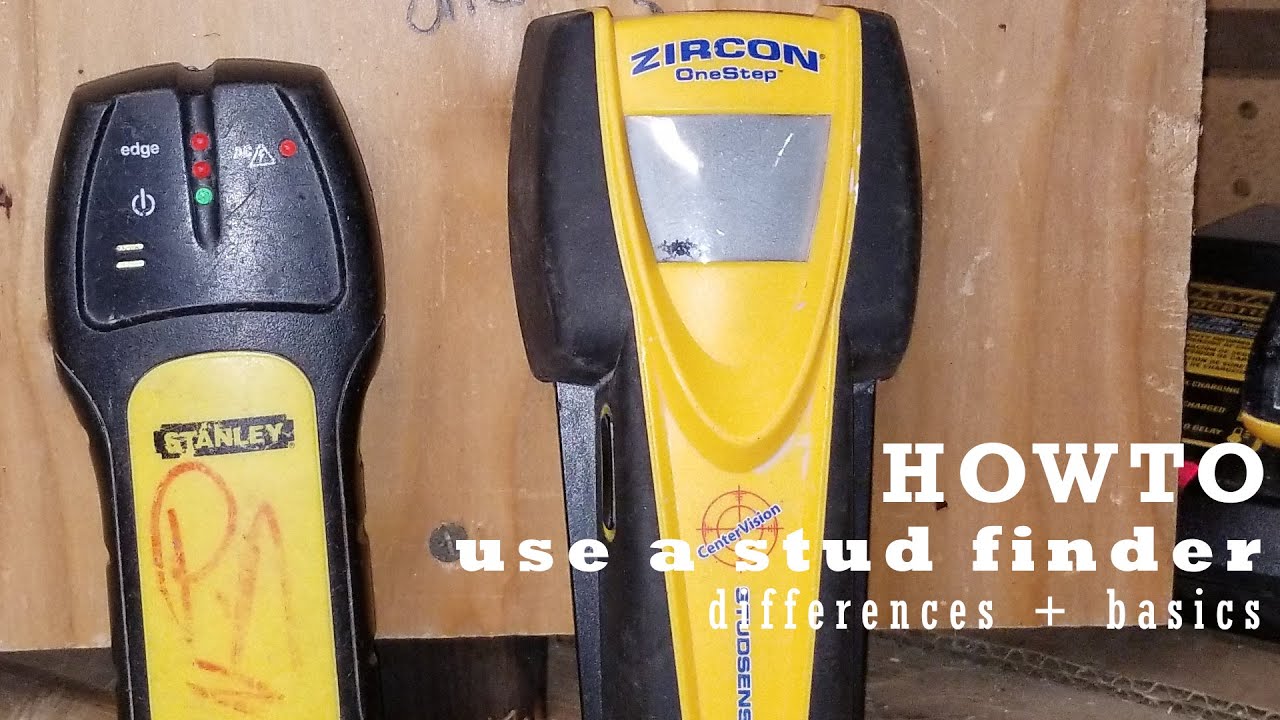
There are different models. Some are simple and just find edges. Others are digital and show the center of the stud. I started with a basic one, and even that worked wonders.
Types Of Stanley Stud Finders
It’s easy to get confused in the hardware store. Here are the main types I’ve tried:
| Model | Detection Type | Display | Special Features |
|---|---|---|---|
| Stanley Stud Sensor 150 | Edge detection | LED lights | Simple, affordable |
| Stanley FatMax Stud Sensor 300 | Edge & center detection | LCD screen | Deeper scan, AC wire warning |
| Stanley Stud Sensor 200 | Edge detection | LED lights | Wider scan width |
I started with the Sensor 150 and later tried the FatMax 300. Both worked well, but the 300 gave me more confidence.
Getting Ready: What You Need
Before you start, make sure you have:
- The Stanley Stud Finder (with batteries if needed)
- A pencil or painter’s tape (for marking)
- A step stool or ladder (if working high)
- Patience (seriously, don’t rush!)
Remove any large furniture from the wall. Clear away picture frames or mirrors. You want a flat, clean surface to work on.
Check The Batteries
Some Stanley models need a battery. Always check before you start. I once tried scanning for five minutes before I realized my battery was dead. Save yourself the frustration!
How To Use A Stanley Stud Finder: Step By Step
Let’s get to the good part. Here’s how I use my Stanley Stud Finder every time:
1. Turn It On
Press and hold the power button. Some models need you to keep holding it while you scan. Don’t let go until you finish scanning.
2. Place It Flat On The Wall
This step is easy to miss. The sensor must be flat—no tilting or wobbling. If it’s not, the reading will be off. I made that mistake once and drilled in the wrong spot. Lesson learned.
3. Calibrate The Stud Finder
Most models calibrate automatically. Just place it on the wall and wait a few seconds. You may see a blinking light or hear a beep when it’s ready. If you lift it off the wall during calibration, start over.
4. Slide Slowly Along The Wall
Move the stud finder slowly in a straight line. I usually go left to right. If you move too fast, it can’t pick up the change in density.
5. Watch For The Signal
When the device finds the edge of a stud, it signals you. For my Sensor 150, a light comes on. The FatMax 300 beeps and shows it on the screen. Mark this spot with your pencil.
6. Find The Other Edge
Now, move the stud finder past the first mark and keep going. When you get another signal, mark it again. The stud is between those two marks.
7. Mark The Center
For edge-detection models: Measure the distance between your two marks. The center is halfway between them. For center-detecting models: The device will tell you when you hit the center—just mark it.
8. Double-check
This is a step beginners often skip (I used to!). Move the tool a few inches above or below your first scan and try again. If your marks line up, you found a real stud. If not, try again. Sometimes things like pipes or wires can confuse the sensor.
Real-life Tips From My Experience
After using a Stanley Stud Finder for years, I’ve found a few tricks:
- Start with a fresh battery. A weak battery gives bad readings.
- Scan at different heights. Sometimes, one scan is thrown off by something in the wall.
- Don’t press too hard. A light touch works better.
- If you get odd results, recalibrate. Just lift it off and start over.
- Avoid wall textures like heavy paint or wallpaper. Try to find a smooth spot.
Common Mistakes And How To Avoid Them
When I first started, I made these mistakes often:
Scanning Too Fast
If you rush, the sensor can’t keep up. I used to move the device quickly and miss the stud entirely. Slow and steady wins here.
Not Calibrating
If you forget to calibrate or move the tool during calibration, your reading will be wrong. Always start with a fresh calibration.
Trusting Only One Scan
Sometimes, things like pipes or wires trick the stud finder. Always scan a second time at a different height.
Drilling Without Marking
I drilled once without marking the spot. My drill slipped, and I missed the stud. Always mark with a pencil or tape.

What Can Interfere With The Stanley Stud Finder?
Not everything goes smoothly. Sometimes, you’ll get strange results. Here are things I learned can interfere:
| Problem | What Happens | How to Fix |
|---|---|---|
| Metal pipes or wires | False positives (it thinks there’s a stud) | Scan at multiple heights; use AC scan if available |
| Thick wall texture | Poor contact, weak signals | Find a smoother area, apply less pressure |
| Low battery | Inconsistent readings | Replace the battery before scanning |
| Wet or damp walls | Unreliable readings | Let the wall dry before using |
My Step-by-step Example: Hanging A Tv
Let me share a real story. I wanted to mount my TV. That’s heavy, so finding the exact center of the stud was critical. Here’s what I did:
- Checked my Stanley FatMax 300 for a fresh battery.
- Cleared the area and removed picture frames.
- Turned on the stud finder and placed it flat on the wall.
- Calibrated by waiting for the beep.
- Moved slowly across where I wanted to hang the TV.
- Marked the first edge with a pencil.
- Kept moving and marked the second edge.
- Found the center between the two marks and double-checked with a second scan higher up.
- Drilled a small test hole to confirm wood behind the drywall.
- Mounted the bracket and hung the TV—no falling, no surprises.
I was nervous at first, but following these steps made it easy and stress-free.
Digital Vs. Basic Models: Which One Is Better?
If you’re just starting out, the basic Stanley model is fine. But if you do a lot of projects, a digital model is worth it. Here’s a quick comparison:
| Feature | Basic Model | Digital Model |
|---|---|---|
| Edge or Center Detection | Edge only | Both edge and center |
| Display | LED lights | LCD screen |
| AC Wire Warning | No | Yes |
| Price | Lower | Higher |
| Ease of Use | Simple | Very clear, less guesswork |
I love my digital model for tricky jobs, but I still use my basic one for quick tasks.
How Often Should You Re-scan?
This is something people rarely talk about. I recommend re-scanning if:
- You move to a new spot on the wall
- You change the height by more than a few inches
- You take a break and come back later
Walls are not always consistent. Double-checking saves headaches.

Safety First: Watch Out For Wires
Modern Stanley Stud Finders with AC detection can warn you about live wires. Never assume there are no wires in the wall. If your device beeps or lights up in AC mode, do not drill there.
I once ignored a warning and hit a wire. Luckily, I didn’t get shocked, but it could have been bad. Always use this feature if you have it.
Cleaning And Storing Your Stanley Stud Finder
I learned this the hard way—don’t leave your stud finder in a damp garage or in direct sunlight. Clean it with a dry cloth after each use. Store it in a cool, dry place. This keeps the sensors accurate and extends the tool’s life.
When The Stud Finder Doesn’t Work
Sometimes, you do everything right and still can’t find a stud. This happens with old homes, plaster walls, or if the wall has metal mesh. In these cases:
- Try scanning from the other side of the wall if possible.
- Tap the wall lightly; a stud sounds solid, while empty space sounds hollow.
- Ask for help or use a small drill bit to probe gently (but be careful).
If you still have trouble, check the manual or the official Stanley Tools website for support.
Frequently Asked Questions
What If My Stanley Stud Finder Keeps Beeping Everywhere?
If your device beeps all over the wall, check the battery first. Also, make sure you are not near a large metal item or an electric wire. Try recalibrating on a plain section of the wall.
Can I Use A Stanley Stud Finder On Plaster Walls?
Stud finders work best on drywall. On thick plaster or walls with metal lath, they often give false readings. You might need a special stud finder for these walls or use old-school tapping and measuring.
Do I Have To Mark The Wall, Or Can I Just Remember The Spot?
I always mark the spot, even with tape. Memory can be tricky, and it’s easy to forget the exact place. A small pencil mark saves a lot of trouble.
How Far Apart Are Studs Usually Placed?
In most homes, wall studs are 16 inches apart (measured from center to center). Sometimes, especially in older homes, they might be 24 inches apart. If you find one stud, measure in 16-inch steps to find the next.
Is It Safe To Drill After Finding A Stud?
It’s safe as long as you avoid wires and pipes. Always use the AC scan mode if your stud finder has one. Drill slowly at first and stop if you feel resistance that isn’t wood.
—
Using a Stanley Stud Finder made my DIY life easier and a lot less stressful. With a little practice and patience, you’ll avoid mistakes and save time. Remember, slow and steady scanning works best. Mark your spots, double-check, and don’t ignore warnings. You’ll be hanging shelves and frames like a pro in no time. If you ever get stuck, don’t be afraid to ask for help or check out more resources online. Good luck with your next project!
As an Amazon Associate, We earn from qualifying purchases