When I first started fixing things around my house, I didn’t know much about tools. I grabbed any old screwdriver I could find. Sometimes, I’d get lucky and the screw would go in smoothly. Other times, my hands would hurt, and I’d get frustrated twisting the tool back and forth. That changed the day I discovered the ratcheting screwdriver. If you’ve never used one, you’re in for a treat. Let me share what I’ve learned, what makes this tool so useful, and why I think every toolbox needs one.
What Is A Ratcheting Screwdriver?
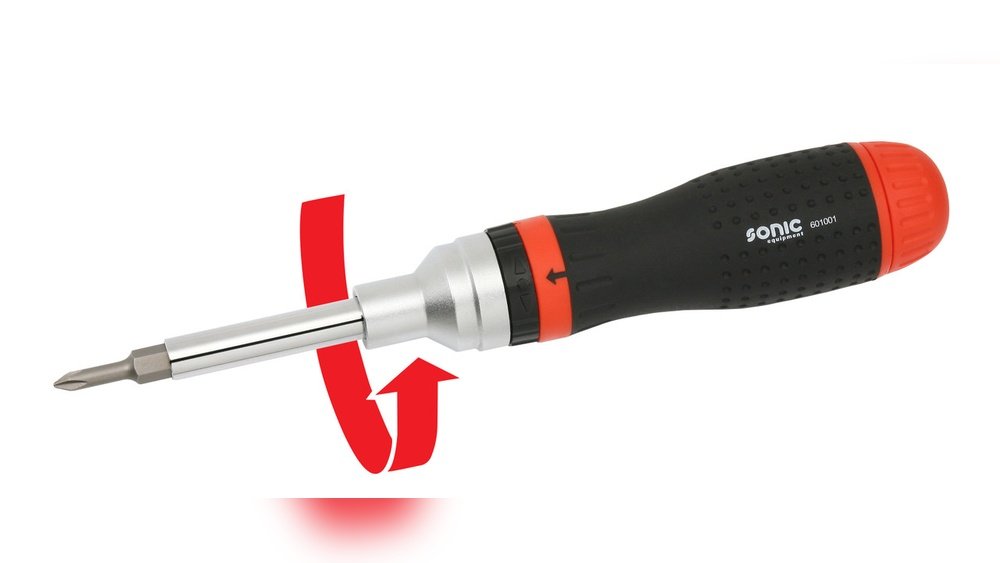
A ratcheting screwdriver looks like a regular screwdriver, but it hides a clever feature inside. The “ratcheting” part means the tool can turn screws in one direction while staying still in your hand. You don’t have to lift your hand, readjust, and twist again. The handle just spins, and the bit moves the screw forward (or backward). This simple upgrade makes a huge difference in speed and comfort.
The first time I used one, I was hanging shelves in my garage. I realized I didn’t have to let go of the handle after every half turn. My hand stayed in place and the job went much faster. Honestly, it felt like cheating compared to a regular screwdriver.
How Does A Ratcheting Screwdriver Work?
The magic is inside the handle. There’s a ratchet mechanism—a set of small gears and a pawl. When you twist the handle, the gears lock, turning the screw. When you move your hand back, the ratchet lets the handle spin without moving the bit. You can keep your grip and keep working.
Most ratcheting screwdrivers have a small switch. You can set it to turn right (clockwise), turn left (counterclockwise), or lock it in place. This means you can drive in screws or remove them using the same tool. I love the flexibility.
When I’m building furniture, I can switch directions in a second.

Main Parts Of A Ratcheting Screwdriver
Let me break down the parts. Knowing them helps when you’re choosing one at the store.
- Handle: Usually thicker and more comfortable to grip.
- Ratchet mechanism: Built inside the handle. This is what makes it special.
- Bit holder: Holds the screwdriver bit steady.
- Bits: The actual tips that fit into screws. Most are removable and come in sets.
Some models have a storage compartment in the handle for extra bits. I find this handy because I always lose bits if they’re loose in my toolbox.
Why Use A Ratcheting Screwdriver?
Here’s why I reach for my ratcheting screwdriver again and again:
1. Saves Time And Effort
You don’t have to reset your hand after each turn. That means you finish jobs faster.
2. Reduces Hand Strain
My hands used to get tired and sore after long projects. The ratcheting action takes away the stress.
3. Works In Tight Spaces
In corners or inside cabinets, you often can’t make a full turn. The ratchet helps you turn screws even with small movements.
4. Multiple Uses
With the right bits, you can handle all kinds of screws—flat, Phillips, Torx, and more.
Types Of Ratcheting Screwdrivers
I’ve seen a few main types. Picking the right one depends on your needs.
Standard Ratcheting Screwdriver
This is the basic kind. It looks like a regular screwdriver with a ratchet switch. Many come with a small set of bits.
Stubby Ratcheting Screwdriver
These are short and fat. They fit in your palm and work well in tight spots. I use mine for jobs under the sink or inside electronics.
Precision Ratcheting Screwdriver
These are smaller and designed for tiny screws—like in eyeglasses or laptops. If you fix gadgets, you’ll want one.
Multi-bit Ratcheting Screwdriver
This type holds several bits in the handle. You swap them out as needed. It’s great for moving between different screw types.
Insulated Ratcheting Screwdriver
These are made for electrical work. The handle is insulated to protect you from electric shocks. Always look for safety ratings if you work near wires.
Here’s a quick comparison of the main types:
| Type | Best For | Main Feature |
|---|---|---|
| Standard | General repairs | Simple, reliable |
| Stubby | Tight spaces | Compact size |
| Precision | Small screws | Fine control |
| Multi-bit | Versatility | Bit storage in handle |
| Insulated | Electrical work | Shock protection |
How To Use A Ratcheting Screwdriver
If you’ve never used one, let me walk you through it.
1. Choose The Right Bit
Match the bit to your screw. Snap it into the holder.
2. Set The Ratchet Direction
Use the switch to set “forward” for driving in, or “reverse” for taking out screws.
3. Grip The Handle
Hold it comfortably. Place the bit into the screw head.
4. Twist The Handle
The screw turns. When you reach the end of your twist, keep holding the handle and move your wrist back. The ratchet lets the handle spin without turning the bit.
5. Repeat
Keep going until the screw is tight or loose.
I recommend practicing on a scrap piece of wood first. It takes a minute to get used to the feel.
Key Features To Look For
Over the years, I’ve tried cheap and expensive models. Here’s what matters most:
Comfortable Handle
A good grip is everything. Look for rubberized or contoured handles. They don’t slip, even with sweaty hands.
Smooth Ratcheting Mechanism
Some tools “click” loudly and feel rough. A smooth, quiet ratchet is nicer to use and often lasts longer.
Quality Bits
Low-quality bits can strip screws or break. Hardened steel bits last longer and fit better.
Easy Bit Changes
Magnetic holders or quick-release chucks make swapping bits fast and easy.
Bit Storage
Built-in storage keeps bits from getting lost. I lost count of how many bits vanished before I started using a multi-bit handle.
Durability
Check the build quality. Heavy-duty metal parts are better than cheap plastic. I once snapped a plastic handle in half—lesson learned.
Here’s a direct comparison of two popular models I’ve tried:
| Feature | Model A | Model B |
|---|---|---|
| Handle Material | Rubber/Metal | Plastic |
| Ratchet Quality | Smooth, quiet | Clicky, rough |
| Bit Storage | Yes | No |
| Bit Quality | Hardened steel | Soft metal |
Real-world Uses
I use my ratcheting screwdriver for almost everything:
- Building flat-pack furniture (IKEA stuff, anyone?)
- Fixing door hinges and handles
- Assembling bikes and scooters
- Installing light switches or outlets (with an insulated model)
- Opening up computers and small electronics
One time, I had to install shelves in a closet with almost no room to move. A stubby ratcheting screwdriver saved the day. I could turn the screws with just a few inches of space.
Common Mistakes To Avoid
Here’s what I wish someone told me when I started:
1. Don’t Use The Wrong Bit Size
Using a bit that’s too small or too big will strip the screw head. Always match the bit to the screw.
2. Don’t Force A Stuck Screw
If a screw won’t move, use a little oil or try loosening it with a manual screwdriver first. Forcing it can break your ratchet.
3. Don’t Overload The Tool
Ratcheting screwdrivers are great, but not for heavy-duty jobs like large deck screws. Use a drill for those.
4. Keep It Clean
Dust and grime can get inside the ratchet and make it stick. Wipe your tool after use.
5. Store Bits Properly
Bits can fall out and get lost. Keep them in the handle or a bit case.
How Does A Ratcheting Screwdriver Compare To Other Tools?
Many people ask, “Why not just use a power drill?” Good question. Here’s a simple comparison:
| Tool | Best For | Pros | Cons |
|---|---|---|---|
| Ratcheting Screwdriver | Manual, precise jobs | Quiet, portable, no batteries | Slower for big jobs |
| Power Drill | Heavy-duty work | Very fast, powerful | Heavy, noisy, needs power |
| Standard Screwdriver | Simple tasks | Cheap, easy | Slow, tiring for big jobs |
If you do a lot of repairs, you’ll probably want both a ratcheting screwdriver and a drill. But for everyday fixes, the ratcheting screwdriver gets used the most at my house.

Two Insights Most People Miss
First, the quality of the ratchet really matters. Cheap ones can slip or jam. Invest a little more and you’ll notice the difference every time you use it.
Second, the shape of the handle affects how tired your hand gets. Try a few in the store before you buy. A handle that fits your grip is worth every penny.
How To Care For Your Ratcheting Screwdriver
This tool can last for years if you treat it right:
- Wipe off dirt and dust after each use.
- Store bits in the handle or a container.
- If the ratchet gets sticky, add a drop of light oil.
- Don’t use it as a pry bar or hammer.
If you follow these tips, your screwdriver will be ready for any job.
When Should You Replace Your Ratcheting Screwdriver?
You’ll know it’s time if:
- The ratchet slips and won’t hold.
- The handle cracks.
- Bits no longer stay in place.
- It feels rough or squeaky, even after cleaning.
I usually get several years out of a good one. My oldest ratcheting screwdriver is still going strong after five years.
Where To Learn More
If you want to dive deeper into how ratcheting screwdrivers are designed, I recommend checking out the technical breakdown on Wikipedia. It explains the mechanics and history in more detail.

Frequently Asked Questions
What Is The Difference Between A Ratcheting Screwdriver And A Regular Screwdriver?
A ratcheting screwdriver lets you turn the handle back and forth without moving the screw in the opposite direction. A regular screwdriver needs you to lift and reset your hand for each turn.
Can I Use A Ratcheting Screwdriver For All Types Of Screws?
Yes, as long as you have the right bits. Most sets include Phillips, flat, Torx, and more. Always match the bit to the screw for best results.
Is A Ratcheting Screwdriver Safe For Electrical Work?
Only if it’s an insulated model with proper safety ratings. Never use a metal-handled tool near live wires.
How Do I Fix A Sticky Ratchet?
Try cleaning the tool and adding a drop of light oil to the mechanism. If it still sticks, it might be time for a new one.
Why Do Some Bits Keep Falling Out?
This usually means the bit holder is worn or the bits aren’t the right size. Try new bits, or upgrade to a screwdriver with a magnetic or locking holder.
Using a ratcheting screwdriver has saved my hands, my patience, and plenty of time. Once you try one, you’ll never want to go back to regular screwdrivers. They’re simple, clever, and make any job a little bit easier. If you haven’t tried one yet, give it a shot—your hands will thank you.
As an Amazon Associate, We earn from qualifying purchases