Can You Sand Glass Edges? My Personal Guide to Smoother, Safer Glass
If you’ve ever worked with glass, you know it can be both beautiful and dangerous. I remember the first time I broke a window pane while helping my dad fix our old shed. The edges were sharp, almost invisible, and honestly, pretty scary.
I wondered, “Can you sand glass edges to make them safe? ” Over the years, as I took on more DIY projects, I learned that you can. In fact, sanding glass edges is something I’ve done many times, and it’s easier than most people think.
I want to share what I’ve learned, the mistakes I made, and the tricks that saved me time—and my fingers. Whether you’re a hobbyist or just want to make your glass projects safer, this guide will walk you through everything you need to know.
Why Sand Glass Edges?
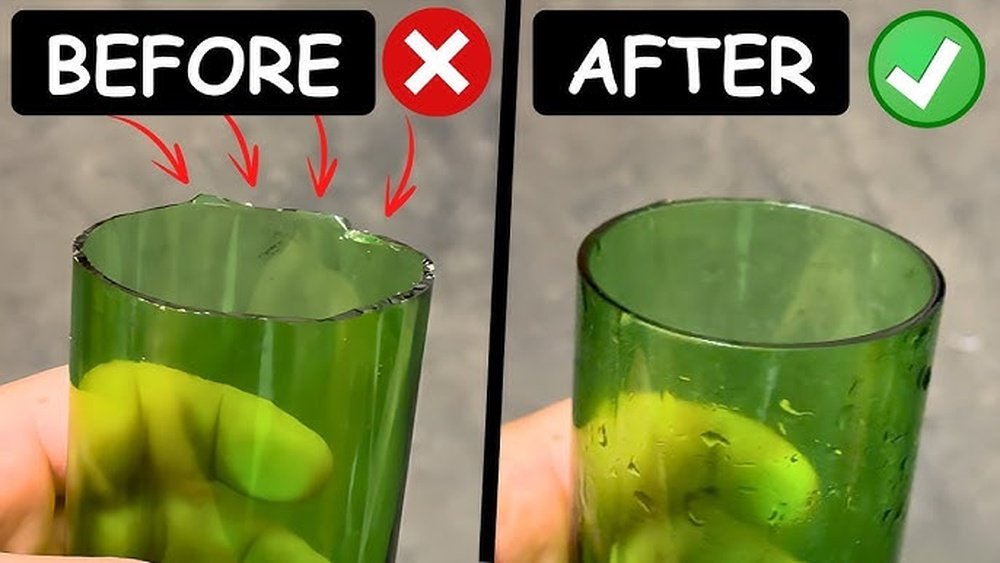
Sanding glass edges is not just about looks. It’s about safety. Freshly cut glass has edges that can slice through skin in seconds. I learned this the hard way. After cutting a glass shelf for my bathroom, I skipped sanding and ended up with a nasty cut while cleaning it. I realized that even a small glass project can be risky without smoothing the edges.
Besides safety, sanding helps you:
- Prevent chips and cracks from spreading.
- Make glass pieces fit together better.
- Improve the final appearance, so your project looks professional.
I’ve also noticed that sanded edges gather less dust and are easier to clean. For anyone with kids or pets, this makes a big difference.
Tools And Materials You Need
You don’t need a fancy workshop to sand glass edges. I started out with some basic supplies. Here’s what I’ve found works best:
- Safety gloves (thick, cut-resistant)
- Safety goggles
- Dust mask (glass dust is not safe to breathe)
- Sanding block or diamond hand pad
- Silicon carbide sandpaper (grits: 80, 120, 220, 400)
- Water (for wet sanding)
- Towel (to dry glass)
- Masking tape (for marking or protecting areas)
For larger projects, you might want a glass grinder or a rotary tool with a diamond bit. But for most home jobs, hand sanding works fine.

Step-by-step: How I Sand Glass Edges
Let me take you through the steps I use. These steps work for everything from picture frames to custom shelves.
Step 1: Safety First
Always put on your gloves and goggles. I also recommend a dust mask. Tiny glass bits can fly up or stick to your hands. I learned to never skip this step, no matter how small the piece.
Step 2: Prepare Your Glass
Clean the glass with soap and water. Dry it well. If you only want to sand some edges, use masking tape to protect the areas you want to keep sharp.
Step 3: Start With Coarse Grit
Begin with 80-grit sandpaper. If you’re sanding by hand, wrap the paper around a block or use a diamond pad. Wet the sandpaper a bit—it keeps dust down and stops heat buildup.
Hold the glass firmly on a towel so it doesn’t slide. Move the sandpaper back and forth along the edge. Keep your pressure light. I learned the hard way that pressing too hard can crack the glass.
Step 4: Smooth With Finer Grits
After a few minutes, wipe the edge to check your progress. Once the sharpness is gone, switch to 120-grit, then 220-grit, and finally 400-grit for a polished look. Each step makes the edge smoother.
Here’s a quick look at how the grits compare:
| Grit | Use | Result |
|---|---|---|
| 80 | Start, remove sharpness | Rough, rounded edge |
| 120 | Smooth rough edge | Less jagged |
| 220 | Fine finishing | Even smoother |
| 400 | Polishing | Soft, safe edge |
Step 5: Clean Up
Rinse the glass and dry it with a towel. Check for any sharp spots. If you find any, repeat the process with a finer grit.
Wet Sanding Vs. Dry Sanding: What’s Better?
I’ve tried both, but I always come back to wet sanding. When you sand glass dry, dust gets everywhere, and the paper wears out fast. Wet sanding keeps the dust down and helps the sandpaper last longer.
Here’s how they compare based on my experience:
| Method | Pros | Cons |
|---|---|---|
| Wet Sanding | Less dust, cooler, smoother finish | Messier, needs water |
| Dry Sanding | Quick setup, no water needed | More dust, wears paper faster, riskier |
Whenever possible, I fill a small tub with water and dip the sandpaper in. It makes a big difference, especially for indoor projects.
Common Mistakes I’ve Made (so You Don’t Have To)
Everyone makes mistakes, but with glass, the price can be high. Here are some things I wish I knew from the start:
- Skipping safety gear: I once got a glass splinter in my finger. It was tiny but very painful. Always wear gloves and goggles.
- Rushing: Trying to sand too fast or with too much pressure can chip or break the glass. Go slow and steady.
- Using the wrong grit: Starting with very fine sandpaper takes forever. Start coarse, then move finer.
- Not wetting the sandpaper: I once filled my room with glass dust. Wet sanding controls dust and is safer.
- Neglecting cleanup: Glass dust is invisible but can be dangerous. Always clean your workspace and wash your hands.
A non-obvious tip: If you sand a lot of glass, change your water often. Glass particles settle at the bottom and can scratch your next project if left too long.
When Should You Call A Pro?
Most home projects are easy to handle, but there are times when I call in a professional. If you’re working with:
- Thick glass (over 1/2 inch)
- Tempered or laminated glass
- Curved or shaped edges
These jobs need special tools and skills. I once tried to sand a thick aquarium panel and cracked it. For anything expensive or structural, let the pros handle it.
Can You Polish Glass Edges, Too?
After sanding, you might want a clear, shiny edge. This is called polishing. I sometimes use a felt wheel on a rotary tool with some cerium oxide polish. It takes time, but the result is stunning—almost like factory glass. For small crafts or art, even toothpaste on a cloth can add a bit of shine.
But be careful: too much heat from polishing can crack the glass. Move slowly, and keep things cool.
Practical Uses For Sanded Glass Edges
I’ve used sanded glass edges in lots of projects:
- Shelves: No risk of cuts when dusting or moving things.
- Picture frames: Safer to handle, especially with children around.
- Tabletops: Smooth edges look nicer and feel better.
- Crafts and mosaics: Safer to work with small pieces.
Sanding makes these projects last longer and look much more professional.
Is Sanding Glass Edges Worth The Effort?
From my experience, the answer is yes. It takes a bit of time, but the peace of mind is worth it. You protect yourself, your family, and your work. Plus, the final result just looks better.
For anyone starting out, my advice is simple: start small, use the right tools, and never rush. The more you practice, the easier it becomes.
Two Insights I Wish I Knew Earlier
Let me share two things that surprised me:
- Edge color changes: Sanding can make the edge look white or “frosted.” If you want a clear edge, you’ll need to polish it after sanding.
- Noise matters: Sanding dry makes a high-pitched sound that can be annoying and even dangerous to your ears over time. Wet sanding is much quieter.

Where To Find More Information
If you want to dive deeper, there are great resources online. For example, you can learn more about glass safety and handling at Wikipedia.
Frequently Asked Questions
What Grit Sandpaper Is Best For Glass Edges?
Start with 80-grit for rough edges, then move to finer grits like 120, 220, and finish with 400 for a smooth, safe edge.
Can I Use A Regular Sander On Glass?
I wouldn’t recommend it. Regular sanders are too aggressive and can crack or chip glass. Hand sanding or a glass grinder is much safer.
Is It Possible To Sand Tempered Glass?
You can smooth very small chips, but sanding tempered glass can weaken it or cause it to shatter. For large jobs, always call a pro.
How Long Does It Take To Sand Glass Edges By Hand?
For a small piece, like a picture frame, it usually takes 5 to 10 minutes. Larger or thicker pieces will take longer.
Do I Need To Use Water When Sanding Glass?
Using water is safer and gives a smoother finish. It keeps dust down and helps the sandpaper last longer, so I always use it when possible.
Sanding glass edges may seem tricky, but once you try it, you’ll see it’s manageable and rewarding. With patience and the right steps, anyone can make sharp glass safe and beautiful. If you’re unsure, start with a small scrap piece.
That’s how I learned—and I still keep my fingers!

As an Amazon Associate, We earn from qualifying purchases