Testing your car’s air conditioning compressor might sound tricky at first. But trust me, if you know what to look for and have a little patience, you can do it yourself. I’ve worked on my own cars for years. I’ve also helped friends who thought their AC was “dead” when it was really a small issue.
I’m going to walk you through the same steps I use, explain why each one matters, and share a few stories so you understand both the “how” and the “why. ”
Why Test The Auto Ac Compressor?
A working AC compressor is the heart of your car’s cooling system. If it fails, cold air disappears. Sometimes, the problem is simple—a loose wire or low refrigerant. Other times, the compressor itself is worn out.
I remember one summer, my old Honda started blowing warm air. I thought I’d need a new compressor, but after testing, I found a bad relay. That saved me hundreds of dollars. Testing first always helps you avoid guessing and wasting money.
Safety First: Preparing For The Test
Before you start, make sure your car is parked on flat ground. Turn the engine off. Let it cool if you’ve been driving. Wear gloves and safety glasses. AC systems run on high pressure. You don’t want refrigerant spraying in your face.
I once ignored the gloves and ended up with a tiny cut that stung for days. Don’t rush this part.
Here’s what you’ll need:
- Basic hand tools (screwdrivers, pliers)
- Multimeter (for electrical tests)
- Manifold gauge set (to check refrigerant pressure)
- Safety glasses and gloves
- Owner’s manual (for wire diagrams or fuse box location)
Signs Your Ac Compressor Might Be Failing
You don’t always need to guess. Your car will give you clues. Here are the signs I’ve seen most often:
- No cold air comes out, even with AC on full blast.
- Loud clicking or grinding noises when AC is running.
- Compressor clutch doesn’t engage.
- Visible leaks or oily spots around AC lines.
- Burning smell from engine bay.
If you see any of these, it’s time to test.
Step-by-step: How I Test An Auto Ac Compressor
I like to break the process into clear steps. That way, I don’t miss anything.
1. Visual Inspection
First, I just look. Open the hood, find the compressor (usually near the front, with a belt attached). I check for:
- Cracked belts
- Loose wires
- Broken connectors
- Leaks around the compressor
One time, a friend’s car had a loose plug. Plugging it back fixed the AC instantly. So, never skip this step.
2. Listen For Unusual Noises
Start the engine. Turn the AC to max cold. Listen near the compressor. A healthy compressor makes a soft hum. If you hear grinding, rattling, or loud clicking, something’s wrong inside.
I once heard a high-pitched squeal—turns out, the belt was slipping, not the compressor itself.
3. Check The Compressor Clutch
The clutch is the small disk on the front of the compressor. When you turn on the AC, you should see it spin (engage). If it doesn’t move, the problem may be electrical or mechanical.
- If the clutch never moves: Could be a fuse, relay, or broken clutch.
- If it tries to move but slips: Belt might be loose or worn.
I carry a small flashlight to see this better, especially in daylight.
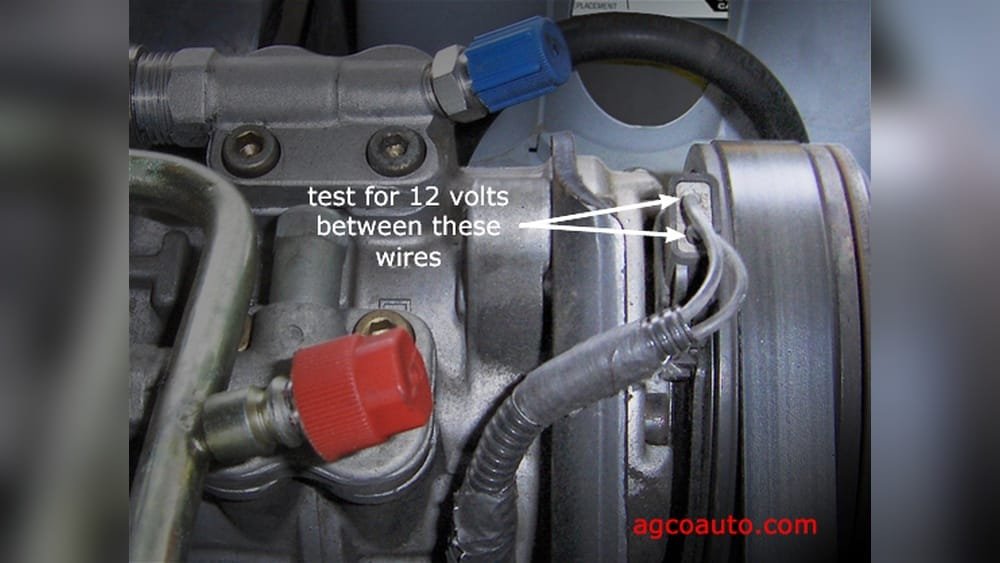
4. Check Electrical Connections
Grab your multimeter. With the car off, unplug the compressor’s electrical connector. Set your multimeter to measure resistance (ohms).
- Touch one probe to the compressor’s terminal, and the other to ground.
- You should get a low resistance reading (often 3-5 ohms for the clutch coil).
- No reading or infinite resistance means the coil is open—time for a new clutch or compressor.
I once spent an hour chasing a “bad compressor” that was really just a corroded wire. Cleaning the contact fixed it.
5. Test The Compressor Relay And Fuses
Find your car’s AC relay and related fuses (the owner’s manual helps here). Swap the relay with another of the same type, or test it with your multimeter (for continuity). Replace blown fuses.
More than once, I’ve fixed AC with a $2 fuse instead of a $500 compressor.
6. Check Refrigerant Pressure
Connect the manifold gauge set to the high and low pressure ports. With the engine running and AC on, you should see:
- Low side: 25–45 psi (depends on car and weather)
- High side: 200–250 psi
Here’s a simple comparison I made for myself:
| Condition | Low Side Pressure | High Side Pressure | Possible Cause |
|---|---|---|---|
| Normal Operation | 25–45 psi | 200–250 psi | System working well |
| Both Low & High Pressure Low | <25 psi | <150 psi | Low refrigerant |
| Low Side High, High Side Low | >50 psi | <150 psi | Compressor failure |
| Low Side Low, High Side High | <25 psi | >250 psi | Restriction/blockage |
If both sides show low pressure, your system may just need refrigerant. If the low side is high and the high side is low, your compressor may not be pumping.
7. Feel The Ac Lines
With the system running, carefully touch (with gloves!) the two AC lines going into the compressor:
- Suction line (larger): Should feel cool.
- Discharge line (smaller): Should feel warm or hot.
If both are the same temperature, the compressor isn’t moving refrigerant. I learned this trick from a mechanic friend, and it’s helped me spot problems fast.
8. Test By Jumping The Compressor Clutch (advanced)
This step should only be done if you’re comfortable. Find the AC compressor’s electrical connector. With the engine off, use a wire to connect the battery’s positive terminal to the clutch wire (check the manual for exact wire).
- If the clutch clicks and spins, the clutch is good.
- If nothing happens, the clutch or coil is bad.
I only do this as a last resort, and I always use a fused jumper wire to be safe.
9. Check For System Blockages
Sometimes, the compressor is fine but can’t move refrigerant because of a blockage (like a clogged orifice tube).
A quick way to check: Feel the lines. If one is much colder than the other, with ice or frost, you may have a blockage.
I once chased a “bad compressor” for hours, only to find a clogged expansion valve. The compressor was fine.
10. Scan For Trouble Codes
Many modern cars store error codes for AC problems. I use a cheap OBD2 scanner to check for codes like “AC clutch circuit malfunction. ” This can point you straight to electrical problems.
Even if you’re not a tech expert, many auto parts stores will scan codes for free.
Common Mistakes I’ve Made (so You Don’t Have To)
Testing an AC compressor can go wrong in simple ways. Here’s what I’ve learned the hard way:
- Guessing instead of testing. I replaced parts that weren’t broken.
- Not checking fuses first. It’s almost always the cheapest fix.
- Skipping visual checks. A loose wire or obvious leak is easy to miss.
- Not using safety gear. Pressurized refrigerant can hurt you.
- Jumping the clutch without a fuse. I fried a wire once—cost me extra repair time.
If you follow the step-by-step process, you’ll avoid most of these.
Compressor Test Results: What They Mean
After you finish, you’ll have a better idea what’s wrong. Here’s how I interpret my test results:
| Test Result | What It Means | Next Step |
|---|---|---|
| Clutch doesn’t engage | Electrical problem or bad clutch | Check fuses/relays, test clutch coil |
| No noise, but no cold air | Low refrigerant or weak compressor | Check pressures, add refrigerant if needed |
| Loud grinding or squealing | Internal compressor failure | Replace compressor |
| Pressure readings off | See pressure table above | Fix leaks, clear blockages, or replace parts |
Non-obvious Tips For Accurate Testing
After years of trial and error, here are two things most beginners miss:
- Test when the car is fully warmed up. AC systems behave differently when cold. I’ve made wrong calls testing first thing in the morning.
- Check both electrical and mechanical parts. Sometimes, the electrical side is fine but the compressor is internally damaged. Sometimes, the compressor is strong but never gets power.
Also, always keep notes. Write down what you checked and what you found. That way, if you need a pro’s help, you can show them what you already tried.
When To Call A Professional
If you find metal shavings in the lines, hear loud banging, or see green dye leaking, it’s best to call a mechanic. Some repairs need special tools and training. I’ve done most AC jobs myself, but I won’t mess with full system flushes or refrigerant recovery—those need special machines.

Where I Learned More
If you want to dig even deeper into AC systems, I found the guides on Wikipedia very helpful. They explain more about how compressors work and why pressure matters.
Frequently Asked Questions
How Do I Know If My Ac Compressor Is Bad Or Just Low On Refrigerant?
If both pressure readings are low but the compressor clutch works, you probably need more refrigerant. If the clutch doesn’t engage or you hear grinding noises, the compressor itself may be bad.
Can I Test My Ac Compressor Without Special Tools?
You can do basic checks—like listening for sounds, checking the clutch, and looking for leaks—with just your eyes and ears. But for pressure tests or electrical checks, you’ll need at least a multimeter and gauges.
Is It Safe To Add Refrigerant If My Compressor Isn’t Working?
No. If the compressor doesn’t run, adding refrigerant won’t help and could damage the system. Always fix the root problem first.
How Much Does It Cost To Replace A Bad Ac Compressor?
Parts and labor vary, but in my experience, it often costs $500–$1,200 at a shop. DIY can be cheaper if you have the right tools and skills.
Why Does My Ac Compressor Make Noise Only When The Ac Is On?
That usually means internal wear or damage. The compressor’s parts only move when the AC is on, so noises at that time often point to compressor problems.
Testing your auto air conditioning compressor is not as hard as it sounds. With patience, clear steps, and a few tools, you can find most problems yourself. Fixing the right thing the first time saves time, money, and a lot of sweaty summer drives.
If you get stuck, don’t be afraid to ask for help—sometimes a second set of eyes is all you need.

As an Amazon Associate, We earn from qualifying purchases