If you’ve ever used an air compressor, you know how helpful they can be for so many jobs—like filling tires, powering tools, or even spray painting. But when I first got my own compressor, I didn’t realize how important the pressure switch was until things started going wrong. I remember the first time I tried to set the pressure switch by just “guessing” because I couldn’t understand the manual. My compressor kept running when it shouldn’t. That mistake taught me a lot, and I want to make sure you don’t go through the same confusion.
Getting the pressure switch set correctly is not just about making your tools work. It’s also about safety and keeping your compressor running longer. So, in this guide, I’ll walk you through everything I’ve learned about how to set an air compressor pressure switch, step by step.
I’ll use real examples, share what worked (and what didn’t), and explain why every step matters. Let’s get started!
What Is An Air Compressor Pressure Switch?
Let’s keep it simple. The pressure switch is like the brain of your air compressor. It turns the compressor on and off by sensing the air pressure inside the tank. When the air pressure drops too low, the switch tells the compressor to start. When the pressure gets high enough, it shuts the compressor off.
When I first opened my compressor, I found the pressure switch inside a small metal box near the motor. It looked complicated, but it’s really just a smart on-off switch. If you ever feel lost, just remember: the pressure switch is what keeps everything running safely.
Why Setting The Pressure Switch Correctly Matters
I made the mistake once of ignoring the pressure settings. My compressor kept running, making a loud noise, and finally shut down completely. The problem? The pressure switch was set too high. Here’s why it’s important to get this right:
- Safety: Too much pressure can burst hoses or even damage your tank.
- Tool Performance: Tools like nail guns or spray guns work best at certain pressures.
- Compressor Life: Running at wrong pressures can wear out your compressor fast.
It only takes a small adjustment, but it can save you money and trouble. I learned it’s not just about working faster—it’s about working safer, too.

How An Air Compressor Pressure Switch Works
Before you start adjusting anything, it’s good to understand what’s going on inside. I used to picture the switch as a magic box. Now, I know it’s more like a smart sensor.
Here’s what happens:
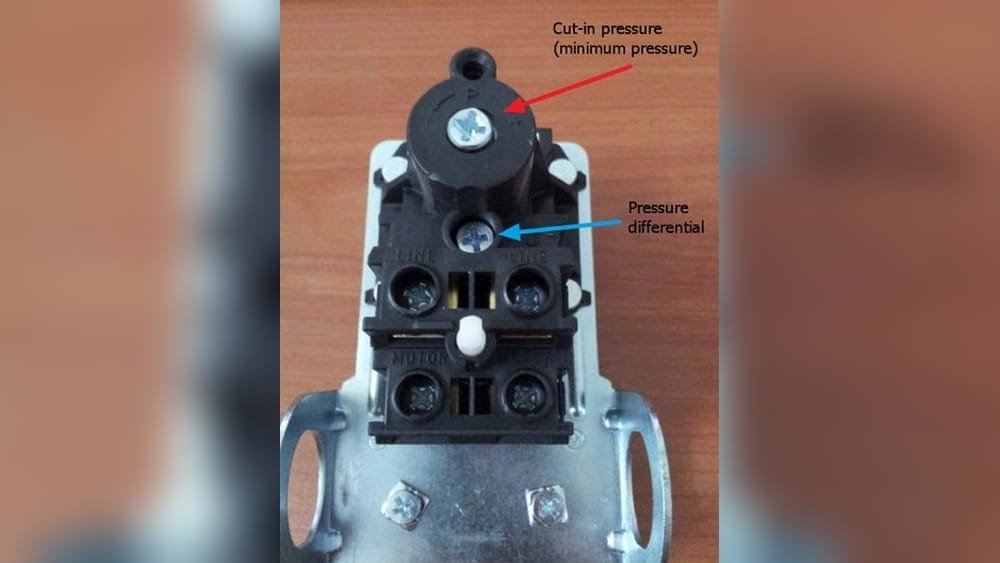
- Cut-In Pressure: This is the lowest pressure in the tank. When air drops below this point, the switch starts the motor.
- Cut-Out Pressure: This is the highest pressure allowed. When the tank reaches this, the switch stops the motor.
Most switches have two springs inside. One adjusts the cut-in, and the other adjusts the cut-out. Sometimes, you’ll see a single adjustment knob that changes both at once (with a fixed difference between the two points). The manual for your compressor should show you what type you have.
Tools And Safety Precautions
When I first started, I used to jump right in without thinking about safety. That’s not smart! Here’s what you need:
Tools:
- A flathead or Phillips screwdriver (depends on your switch)
- Safety glasses (air under pressure can be dangerous)
- Small wrench (some covers have bolts)
- Air pressure gauge (to check your settings)
Safety Tips:
- Always turn off and unplug your compressor before you start.
- Drain the air from the tank so there’s no pressure inside.
- Wear safety glasses. I once got sprayed by a bit of water when draining the tank—not fun!
Trust me, these steps only take a minute and can keep you safe.
Step-by-step: How To Set Your Air Compressor Pressure Switch
Now, let’s get into the main part. I’ll walk you through what I do every time I need to set or reset my pressure switch.
1. Unplug And Drain The Compressor
This is always my first step. I unplug the power cord and open the drain valve at the bottom of the tank. I wait until all the air is out. This keeps me safe if anything goes wrong while I’m working.
2. Remove The Pressure Switch Cover
You’ll see a small box near the compressor’s motor. Usually, it’s held on with screws or clips. I use my screwdriver or wrench to remove the cover. Inside, you’ll see the adjustment screws or knobs and some wires.
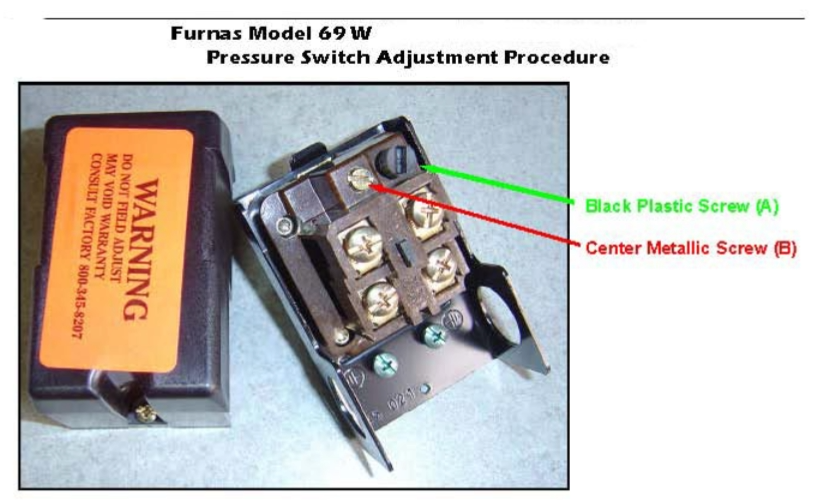
3. Identify The Adjustment Screws
Some pressure switches have two screws—one for cut-in and one for cut-out. Others have a single screw that moves both. I always check my manual or look for a label inside the cover. If you don’t have a manual, look for markings near the screws (sometimes “DIFF” for differential, “MAIN” for main pressure).
4. Set The Cut-in Pressure
This is the pressure where the compressor starts. I usually set this first. Here’s how I do it:
- Close the drain valve and plug the compressor in.
- Let the compressor fill the tank until it stops (at its current cut-out).
- Use an air tool or open the drain valve slowly to let air out.
- Watch the pressure gauge. When the compressor starts, note the pressure—that’s your current cut-in.
- To raise the cut-in pressure, turn the screw clockwise. To lower it, turn counterclockwise. (Check your manual—some switches are reversed!)
- Make small adjustments, then repeat the test.
I learned the hard way that too high a cut-in can make the compressor cycle too often. Too low, and your tools might not work well.
5. Set The Cut-out Pressure
This is when the compressor stops filling the tank. Here’s my process:
- With the compressor running, watch the pressure gauge.
- When the motor stops, note the pressure—this is your current cut-out.
- To raise it, turn the cut-out screw (or main screw) clockwise. To lower it, turn counterclockwise.
- Do small changes and test after each adjustment.
Important: Never set the cut-out above the tank’s rated maximum pressure. You’ll find this rating on a label on the tank. Pushing past this is dangerous—I’ve seen tanks dent and hoses burst.
6. Check The Pressure Differential
The “differential” is the gap between cut-in and cut-out. Most compressors work best with a gap of 20–40 PSI. For example, mine is set at 90 PSI cut-in and 120 PSI cut-out. This keeps cycling reasonable and gives my tools enough power.
Some switches have a separate differential screw. If yours does, you can fine-tune how often the compressor cycles. A smaller gap means the compressor will start and stop more often. I found that too small a gap wears out the motor faster.
7. Test The Compressor
After every adjustment, I let the compressor run through a full cycle. I watch the gauge and listen for any strange sounds. I also check for air leaks around the pressure switch. If something feels off, I go back and check my settings.
8. Replace The Cover
Once I’m happy with the settings, I unplug the compressor and put the cover back on. Tighten the screws or bolts securely. Safety first!
Example: Setting The Pressure Switch On My Home Compressor
Let me share a real example. My small home compressor is rated for a max of 125 PSI. When I got it, the cut-in was set at 80 PSI and cut-out at 125 PSI. But my nail gun works best at 90–100 PSI. Here’s what I did:
- Drained the tank and unplugged everything.
- Opened the switch cover.
- Adjusted the cut-in screw to 90 PSI.
- Set the cut-out to 120 PSI.
- Ran a few cycles and tested my nail gun.
After this, my nail gun worked perfectly, and the compressor cycled less often. I also noticed less noise and wear on the motor.

Common Mistakes And How To Avoid Them
Over the years, I’ve made some mistakes and seen others make them too. Here are a few common ones:
- Skipping the Manual: Every compressor is a bit different. The manual usually has a diagram showing the adjustment screws. If you can’t find yours, look online for your model.
- Setting Pressures Too High: It’s tempting to get more power, but this can break tools or damage your tank. Always stay within the manufacturer’s limits.
- Ignoring Leaks: After setting the switch, always check for leaks. A little leak can waste a lot of air (and electricity).
- Adjusting While Pressurized: Always drain the tank before making big changes. I once got sprayed with oily air—don’t repeat my mistake.
- Forgetting to Test: After setting, run a full cycle and use your tools. Make sure everything works as expected.
Comparing Pressure Switch Types
I used to wonder if all switches were the same. They’re not! Here’s a quick comparison that helped me pick the right one for my second compressor:
| Switch Type | Adjustment | Best For | Typical Use |
|---|---|---|---|
| Single Adjustment | Main pressure only | Simple tasks | Small home compressors |
| Dual Adjustment | Cut-in and cut-out | Fine tuning | Workshop, pro use |
| Electronic | Digital controls | High accuracy | Industrial compressors |
For most home and garage users, the single or dual adjustment switches work great. Electronic switches are usually overkill unless you’re running a big shop.
What’s The Ideal Pressure Setting?
A question I get a lot is: what should I set my compressor to? Here’s what I’ve learned from experience:
| Tool Type | Recommended Cut-In (PSI) | Recommended Cut-Out (PSI) |
|---|---|---|
| Nail Gun | 70–90 | 100–120 |
| Spray Gun | 40–60 | 80–100 |
| Impact Wrench | 80–100 | 110–130 |
| Tire Inflation | 90–100 | 120–125 |
Always check your tool’s manual for the best pressure range. I once set my compressor too low for my impact wrench, and it just wouldn’t budge a bolt!
Extra Tips From My Experience
Here are a few things I wish I’d known earlier:
- Mark Your Settings: Use a marker to write your settings inside the switch cover. If you ever need to reset, it’s easy to remember.
- Listen for Changes: If your compressor starts cycling more often or makes new noises, check your pressure switch. It might be time to adjust or replace it.
- Regular Maintenance: Dust and moisture can affect switch performance. I clean my switch area every few months.
- Don’t Ignore the Air Filter: A clogged filter can mess with pressure readings.
When To Replace The Pressure Switch
Even with good care, switches wear out. If your compressor won’t turn on or off at the right times, or if you see burn marks inside the switch, it’s time to replace it. I replaced mine after five years when the contacts wore out.
You can buy new switches online or at hardware stores. Just match the voltage and pressure range to your compressor. For more technical details, I sometimes refer to Wikipedia for extra background.
Frequently Asked Questions
What Happens If I Set The Pressure Switch Too High?
Setting it too high can cause the compressor to run past its safe limits. This can damage the tank, hoses, or even cause them to burst. Always stay within the manufacturer’s recommended pressure range.
Can I Adjust The Pressure Switch While The Compressor Is Running?
It’s best to turn off and unplug the compressor before making adjustments. Adjusting under pressure can be unsafe and may damage the switch.
How Often Should I Check My Pressure Switch Settings?
I check mine every few months or whenever I notice changes in performance. If you use your compressor daily, check more often.
Do All Compressors Use The Same Type Of Pressure Switch?
No. There are different types based on size, use, and accuracy needs. Always check your manual to see which kind you have.
My Compressor Still Cycles Too Often After Setting The Switch. Why?
This can be caused by air leaks, a faulty check valve, or a very small pressure differential. Check for leaks first, then review your settings.
Setting your air compressor pressure switch correctly can make your work easier and safer. It took me a few tries to get it right, but now I can do it with confidence. If you follow these steps and tips, I’m sure you’ll get the best performance from your compressor and keep it running for years.
As an Amazon Associate, We earn from qualifying purchases