Removing spot welds was something I thought would be easy the first time I tried. I figured you just grab a drill and go. But, wow, I learned fast that there’s a big difference between “removing” and “destroying” spot welds.
The right way saves you time, money, and a lot of headaches. If you’re getting into car restoration, bodywork, or need to separate spot-welded panels for any reason, I want to share exactly how I do it. I’ll walk you through tools, methods, safety, and tricks I wish I knew earlier.
What Are Spot Welds And Why Remove Them?
Spot welds are those little round welds you see on car panels and other metal parts. Factories use them because they’re quick and strong. You’ll find them everywhere on cars, appliances, and even furniture. I started noticing them everywhere after my first project.
But sometimes you need to remove spot welds. Maybe a car panel is rusted, or you want to replace a section without damaging the rest. If you’re restoring a car, spot welds are your daily enemy (and friend).
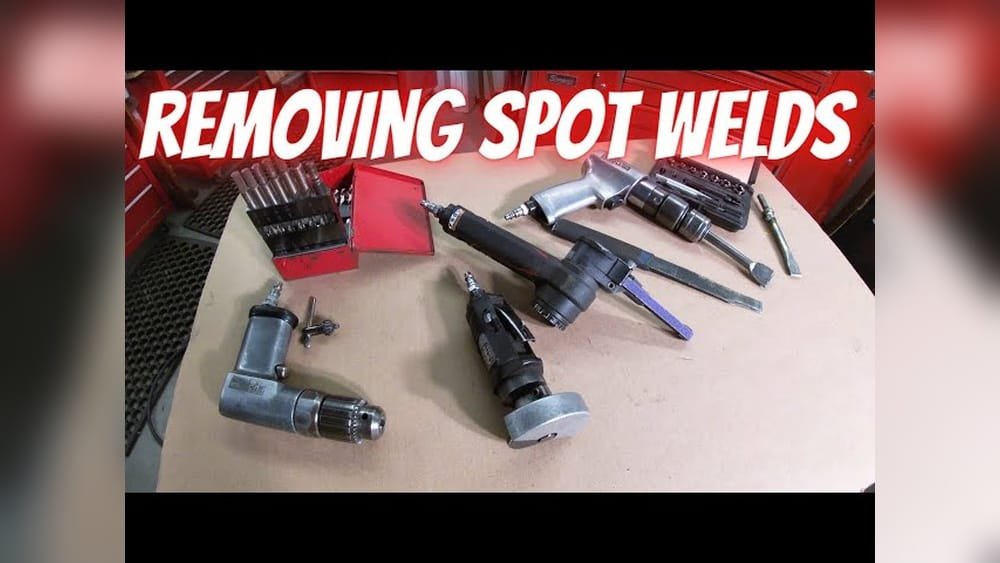
Essential Tools For Removing Spot Welds
After trying a few cheap tools and making a mess, I learned to use the right gear. Here’s what has worked best for me.
| Tool | Best For | Cost | Skill Needed |
|---|---|---|---|
| Spot Weld Cutter Bit | Clean panel separation | Medium | Beginner |
| Twist Drill Bit | Quick jobs | Low | Beginner |
| Air Chisel | Large welds, speed | Medium-High | Intermediate |
| Angle Grinder | Cutting, cleanup | Medium | Intermediate |
| Panel Separator Tool | Prizing panels gently | Low | Beginner |
A good spot weld cutter is worth every cent. I burned through a few cheap ones before buying a quality bit. It cuts only the weld, not the metal under it. An angle grinder helps if things get stuck or rusty. And don’t forget safety glasses and gloves — I’ve had tiny hot metal shavings fly everywhere.

Preparing To Remove Spot Welds
Preparation is more important than I thought. I used to jump straight in, but this cost me time and ruined parts. Here’s what I do now:
- Clean the area. Use a wire brush or sandpaper. You want to see each spot weld clearly.
- Mark each weld. I use a sharpie to circle every weld so I don’t miss any.
- Set up good lighting. I’ve missed welds or drilled wrong because of shadows.
- Wear safety gear. Seriously, don’t skip this. Eye injuries are no joke.
Methods For Removing Spot Welds
There’s more than one way to skin a cat, as they say. I’ve tried almost all the common methods. Here are the main ones, with my own tips for each.
Using A Spot Weld Cutter
This is my go-to for clean results. The cutter is like a mini hole saw. It cuts just enough to separate the panels.
- Place the tip in the center of the spot weld.
- Go slow. High speed burns out the bit and makes a mess.
- When you feel the bit break through the first panel, stop. Don’t go deeper.
Pro Tip: I use a center punch to make a little dent in the weld first. This keeps the bit from wandering.
Using A Drill Bit
A standard twist drill bit works if you don’t have a spot weld cutter. It’s cheaper, but not as clean.
- Choose a bit close to the size of the weld (about 8mm).
- Drill straight through the weld, but try not to go into the bottom panel.
- You may need to wiggle the panels apart with a panel separator tool.
This method can leave bigger holes. I only use it if I plan to weld over the area later.
With An Air Chisel
For thick or rusty welds, an air chisel is a beast. It’s fast but less precise.
- Fit a flat chisel blade.
- Place it at the edge of the weld, between the panels.
- Pull the trigger gently. Too much force will warp the metal.
I use this on hidden or non-cosmetic parts, like floor pans. It’s not for detailed work.
Using An Angle Grinder
Sometimes, welds are so rusted you can’t even see them. An angle grinder with a cut-off wheel helps.
- Grind down the weld until you see a faint ring.
- Use a spot weld cutter or drill to finish.
- Clean up any rough edges with a flap disc.
I always wear a mask and goggles for this. Grinding throws hot sparks and dust everywhere.
Panel Separator (seam Buster)
After breaking the welds, I slide a panel separator tool (also called a seam buster) between panels. Light taps with a hammer split them apart without bending.
Non-obvious insight: Sometimes, even after drilling, panels stick. This is usually because you missed a tiny bit of the weld, or there’s sealant. Don’t force it. Go back and check each spot.

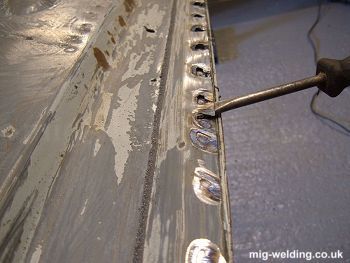
Real-world Example: Removing Car Door Skin
Let me walk you through a job I did on a rusty car door. The bottom edge was full of spot welds, and I wanted to replace the skin without damaging the frame.
- I cleaned the whole edge with a wire wheel.
- Used a punch to mark each weld.
- Cut each weld with a spot weld cutter. I took my time, maybe 15 seconds per weld.
- Slid a seam buster in and tapped gently.
- When I hit resistance, I checked and found two welds I missed.
- After separating the skin, I cleaned up rough spots with a grinder.
It took about an hour for 20 welds, but I saved the frame and made it easier to fit the new panel. The first time I tried this, I rushed and warped the frame. Now, I always go slow.
Comparing Spot Weld Removal Methods
I’ve tried all the methods above, and each has its place. Here’s how they stack up for speed, cost, and finish quality.
| Method | Speed | Panel Damage Risk | Finish Quality |
|---|---|---|---|
| Spot Weld Cutter | Medium | Low | Excellent |
| Drill Bit | Medium-High | Medium | Fair |
| Air Chisel | High | High | Poor |
| Angle Grinder | Low | Medium | Good |
If I care about the finished look, I always use a spot weld cutter. If I’m working on a hidden floor pan, I might use an air chisel just to save time.
Common Mistakes And How To Avoid Them
I’ve made plenty of mistakes, so let me save you the trouble.
- Drilling too deep. It’s easy to go through both panels, making a big hole. Go slow and feel for the bit breaking through.
- Not marking welds. Miss one weld, and you’ll bend the panel trying to pry it off.
- Using dull bits. Dull bits slip and overheat. I sharpen or replace mine often.
- Skipping safety gear. Metal shavings in the eye can end your day fast.
- Forcing panels apart. If it won’t move, check for missed welds or hidden sealant.
Non-obvious insight: Even if a panel “comes off,” don’t toss it right away. Sometimes you’ll need to check where the welds were to line up the new panel.
Repairing And Preparing After Weld Removal
Once the panels are separated, you’ll usually have rough edges or leftover weld material. Here’s what I do next.
- Grind down leftovers. Use a flap disc on an angle grinder to smooth out any weld nubs.
- Clean the metal. Any rust or old paint should come off before you weld new panels.
- Check alignment. Before welding the new panel, dry fit it and make sure everything lines up. I’ve skipped this and had to re-do the job.
- Prime bare metal. To prevent rust, always use weld-through primer on exposed edges.
Safety Tips I Learned The Hard Way
Spot weld removal sounds safe, but trust me, there are risks. Here’s what I do now, after a few close calls:
- Wear eye protection. Metal shavings are sharp and hot.
- Use gloves. Edges get razor-sharp after cutting.
- Don’t rush. Most injuries happen when you try to force tools or hurry.
- Work in a ventilated area. Paint and rust dust are bad for your lungs.
- Keep a fire extinguisher nearby. Sparks can ignite rags or fuel in old cars.
When To Call A Professional
I’m all for learning by doing, but sometimes I call in a pro. If you’re working on a classic or high-value car, or if the metal is part of the structure (like the frame), it’s better to get help. The cost of a mistake can be much higher than hiring someone for a few hours.
Also, if you don’t have the right tools or a safe place to work, find a shop. I’ve done both — nothing wrong with getting help on the tough stuff.
Extra Resources
If you want to see spot welds in action, or learn more about the science behind them, check out Wikipedia’s spot welding page. It’s full of diagrams and explains why factories use spot welds so much.
Frequently Asked Questions
What Is The Easiest Way To Remove Spot Welds At Home?
If you’re starting out, a spot weld cutter and a hand drill are the easiest. Mark the welds, drill slowly, and separate the panels with a seam buster.
Can I Reuse Panels After Removing Spot Welds?
Yes, if you use the spot weld cutter and go slowly, you can save both panels. Clean up the edges before welding them back.
How Do I Avoid Damaging The Panel Under The Weld?
Go slow, and stop drilling as soon as you feel the bit break through the top layer. Practice on scrap metal first to get the feel.
Is There A Way To Remove Spot Welds Without Power Tools?
You can use a chisel and hammer, but it’s much slower and harder. For a few welds, it works, but for a big job, power tools save time.
How Many Spot Welds Are On A Car Panel?
It depends on the car and panel size. For example, a door skin can have 20–50 spot welds. Floor pans and roofs have even more.
—
I hope this guide saves you some frustration and maybe a few band-aids. Removing spot welds is a skill, but with the right tools and patience, anyone can do it. If you take your time and follow these steps, you’ll get clean results and keep your project moving forward.
Good luck, and don’t forget your safety glasses!
As an Amazon Associate, We earn from qualifying purchases