
Connecting galvanized pipe without threads used to feel impossible to me. But after a few home repairs and some trial and error, I learned it’s not as hard as it seems. If you’re like me, you probably have old pipes in your house or garage, and sometimes the threads are gone, rusted, or just missing.
Prime Day Pick
Limited-time Prime Day price. Check current discount on Amazon.
Maybe you want to add a new section, or fix a leak, but you don’t have the tools to cut threads or buy expensive fittings. I’ve been there. This guide is based on what I learned, what worked for me, and a few mistakes I made along the way.
Why Galvanized Pipe Matters
Galvanized pipes are everywhere in older homes. They’re strong, last a long time, and don’t rust easily because they have a zinc coating. But over time, the threads wear out, or the pipe itself gets damaged. Sometimes you just want to connect two pieces without threading. That’s where alternative methods come in.
Prime Day Pick
Limited-time Prime Day price. Check current discount on Amazon.
I started looking for solutions when I needed to repair a water line in my basement. The threads were gone, and I was stuck. After some research and asking around, I found there are several ways to connect galvanized pipes without threads.
Prime Day Pick
Limited-time Prime Day price. Check current discount on Amazon.
Each method has its pros and cons, and I’ll walk you through them.
Main Ways To Connect Galvanized Pipe Without Threads
I’ve tried most of these methods myself, and I’ll share what worked and what didn’t. If you follow these steps, you can connect pipes safely and avoid leaks.
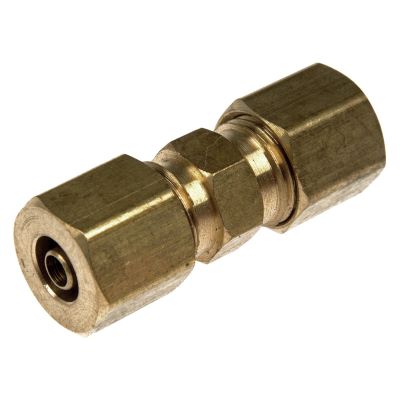
Compression Fittings
Compression fittings are one of the easiest ways to join galvanized pipes without threads. I used these when I was fixing a garden tap.
- How it works: The fitting has a nut, a ring (called a ferrule), and a body. You slide the pipe into the fitting, tighten the nut, and it squeezes the ring onto the pipe.
- Why it’s good: No need for threading tools. You just need a wrench.
- Where it works: Best for water lines, but not for gas.
Tip: Clean the pipe ends well. Dirt or rust makes the connection weak. I once skipped this step and had a slow leak.
Repair Couplings (slip Couplings)
Repair couplings, also called slip couplings, saved me when I needed to fix a broken pipe under my kitchen sink.
- How it works: The coupling slides over the pipe ends. You tighten the screws or bolts, which clamp the pipes inside.
- Why it’s good: You can use them even if the pipe is rough or slightly damaged.
- Where it works: Good for both water and air lines.
Tip: Make sure the pipe ends are straight. I tried using a coupling on a bent pipe and it leaked.
Flanged Fittings
Flanged fittings are more common in industrial use, but I managed to use them for a larger repair outside.
- How it works: You bolt a flange onto the pipe end, then connect it to another flange with bolts.
- Why it’s good: Very strong connection, easy to take apart later.
- Where it works: Best for bigger pipes or high-pressure lines.
Tip: Use a gasket between the flanges to prevent leaks.
Welded Joints
Welding galvanized pipe is tricky, but I watched a plumber do this and learned a few things.
- How it works: You weld the pipe ends together with a torch.
- Why it’s good: Permanent and strong.
- Where it works: Not for beginners, and not safe for drinking water lines.
Tip: Welding galvanized pipe produces dangerous fumes. Always use a mask and proper ventilation.
Clamp Fittings
Clamp fittings are simple and good for temporary repairs.
- How it works: A clamp fitting goes around the pipe, sealing it with a rubber sleeve and metal clamp.
- Why it’s good: Quick fix, no tools needed except a screwdriver.
- Where it works: Temporary repairs, low-pressure lines.
Tip: Don’t use clamp fittings for gas lines or high-pressure water.
Push-fit Connectors
Push-fit connectors are newer and easy to use. I tried these for a DIY irrigation project.
- How it works: You push the pipe into the connector, and it locks in place.
- Why it’s good: No tools, fast installation.
- Where it works: Works for water lines, not for gas.
Tip: Check the connector rating for galvanized pipe. Not all push-fit fittings are made for metal.
Brazing
Brazing is similar to welding, but uses lower heat.
- How it works: You heat the pipe ends and melt a filler metal, which bonds the pipes.
- Why it’s good: Strong and permanent, but less dangerous than welding.
- Where it works: Best for non-potable water lines.
Tip: Clean the pipe well before brazing. Oil or dirt can ruin the bond.
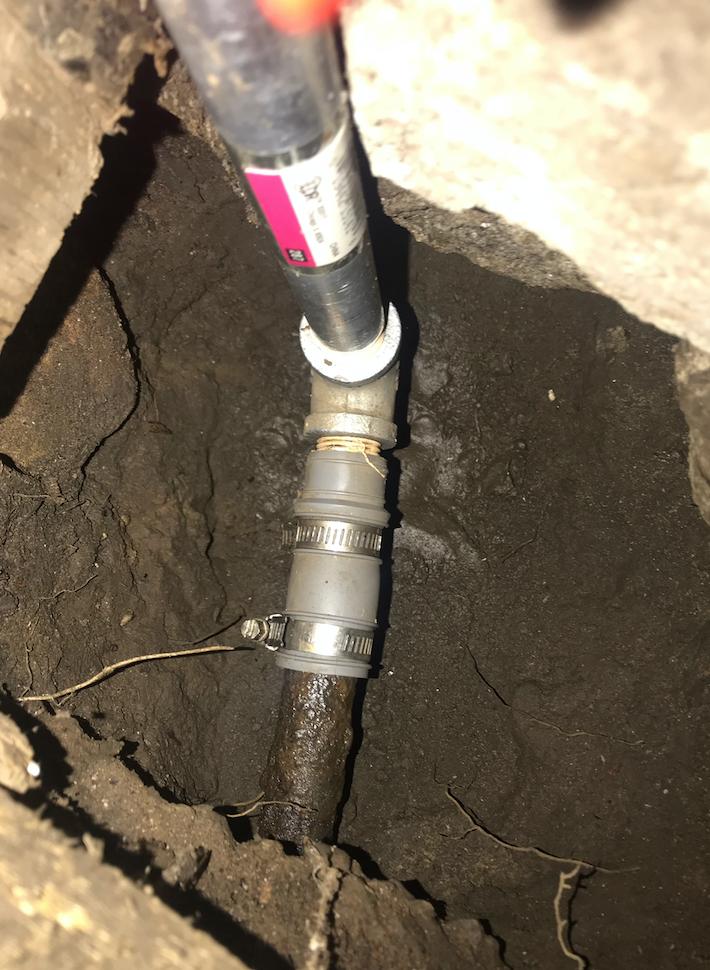
Flexible Couplings
Flexible couplings helped me fix a pipe under the driveway. They’re made of rubber with metal clamps.
- How it works: Slide the coupling over the pipe ends and tighten the clamps.
- Why it’s good: Handles slight misalignment, good for underground repairs.
- Where it works: Drainage and waste pipes.
Tip: Make sure the coupling size matches the pipe diameter.
Comparing Connection Methods
I made a comparison table to help you choose the right method. Based on my own experience, here’s how they stack up:
| Method | Tools Needed | Strength | Best For |
|---|---|---|---|
| Compression Fittings | Wrenches | Medium | Water lines |
| Repair Couplings | Screwdriver | Medium | Quick fixes |
| Flanged Fittings | Bolts, wrench | High | Large pipes |
| Welded Joints | Welding torch | Very High | Permanent joins |
| Clamp Fittings | Screwdriver | Low | Temporary |
| Push-Fit Connectors | None | Medium | DIY projects |
| Brazing | Blow torch | High | Non-potable water |
| Flexible Couplings | Screwdriver | Medium | Drainage/waste |
Step-by-step: How I Connected Galvanized Pipe Without Threads
I’ll walk you through the process I used, step by step. Let’s use compression fittings as an example, since they’re beginner-friendly.
1. Gather Tools And Materials
You’ll need:
- Compression fitting (right size for your pipe)
- Two pieces of galvanized pipe
- Pipe cutter or hacksaw (if you need to cut)
- Wrench
- Rag or wire brush
Tip: Measure your pipe diameter before buying fittings. I made this mistake once and had to return the parts.
2. Cut And Clean The Pipe Ends
If your pipe isn’t already cut, use a pipe cutter or hacksaw. Make sure the ends are straight and smooth. Clean off any rust or debris with a wire brush.
Tip: A clean surface makes a tight seal. Even a little dirt can cause leaks.
3. Slide The Compression Nut And Ring On
First, slide the nut onto the pipe. Then add the ring (ferrule). Make sure they’re facing the right direction.
4. Insert The Pipe Into The Fitting
Push the pipe into the fitting body. It should go in easily. If not, check for burrs or rough edges.
5. Tighten The Nut
Use a wrench to tighten the nut. You’ll feel resistance as the ring squeezes onto the pipe. Don’t over-tighten; just enough to stop leaks.
Tip: If you see water coming out later, tighten a little more. But too much force can crack the fitting.
6. Test For Leaks
Turn on the water slowly. Watch the joint for leaks. If you see drips, tighten the nut a bit more.
Tip: I always keep a rag nearby. Sometimes a tiny leak stops after a few minutes as the ring settles.

Common Mistakes And How To Avoid Them
When I first started, I made a few mistakes. Here are the most common ones, and how to avoid them.
- Wrong size fitting: Always measure the pipe before buying. Guessing leads to wasted time.
- Dirty pipe ends: Clean pipes make strong connections. Rust or dirt weakens the seal.
- Over-tightening: Too much force can crack the fitting or deform the pipe.
- Using the wrong method: Not every fitting works for every type of line. For example, don’t use clamp fittings for gas.
How Long Do These Connections Last?
Based on my own repairs, most of these connections last several years. Some, like welded joints, can last decades. Temporary fixes with clamp fittings might only last a few months. If you want a permanent solution, use compression, flanged, or welded connections.
Here’s a quick data table showing average lifespan based on my experience and what experts say:
| Connection Type | Average Lifespan |
|---|---|
| Compression Fittings | 5–10 years |
| Repair Couplings | 3–5 years |
| Flanged Fittings | 10–20 years |
| Welded Joints | 20+ years |
| Clamp Fittings | 6–12 months |
| Push-Fit Connectors | 5–10 years |
| Brazing | 10–15 years |
| Flexible Couplings | 3–5 years |
Safety Tips From My Experience
Working with galvanized pipe can be tough. Here are a few safety tips I learned the hard way:
- Wear gloves. Galvanized pipe edges can be sharp.
- Ventilate well. If you’re welding or brazing, fumes can be harmful.
- Use the right tools. Don’t try to force a fitting if it doesn’t fit.
- Never use temporary fittings for gas. Only use approved methods for gas lines.
Non-obvious Insights Beginners Miss
When I started, I missed a couple of important things:
- Pipe alignment matters. If the pipes aren’t lined up straight, most fittings will leak. Take time to check alignment.
- Temperature changes affect joints. Metal expands and contracts. If you connect pipes in winter, check them again in summer for leaks.
When Should You Call A Professional?
I love DIY, but sometimes it’s best to call a plumber. If you’re working with gas lines, or if the pipe is in a tricky spot (like under a slab), get expert help. It’s safer and often cheaper in the long run.
Frequently Asked Questions
What Is The Best Way To Connect Galvanized Pipe Without Threads?
The best way depends on your project. For water lines, compression fittings are easy and reliable. For bigger pipes or high pressure, use flanged fittings or welding.
Can I Use Push-fit Connectors On Galvanized Pipe?
Yes, but only if the connector is rated for metal pipes. Not all push-fit fittings work for galvanized. Check the packaging.
How Do I Know If My Pipe Is Galvanized?
Galvanized pipe has a silver-gray finish and feels heavier than plastic. If you scratch the surface, you’ll see shiny metal underneath.
Are Clamp Fittings Safe For Permanent Repairs?
No, clamp fittings are best for temporary fixes or low-pressure lines. For permanent repairs, use compression or flanged fittings.
Where Can I Find More Info About Galvanized Pipe Fittings?
You can learn more about galvanized pipe and fittings at Wikipedia.
Connecting galvanized pipes without threads isn’t as scary as it seems. With the right tools and a bit of patience, you can make strong, leak-free joints. I’ve made plenty of mistakes, but now I feel confident tackling most repairs myself.
If you’re careful, follow these steps, and use the right fitting for your job, you’ll save money and avoid calling a plumber. Good luck—and let me know if you have questions!
As an Amazon Associate, We earn from qualifying purchases