Replacing the line on a string trimmer is one of those jobs I used to dread. I always thought it would be confusing and messy. But after doing it many times over the years, I realized it’s not that hard if you break it down into simple steps.
Prime Day Pick
Limited-time Prime Day price. Check current discount on Amazon.
Today, I want to walk you through the whole process, sharing what I’ve learned and the mistakes I made—so you don’t have to repeat them. If you’ve ever stood in your yard with a tangled trimmer head and a roll of line, you’re in good company.
Let’s make this job easy, quick, and frustration-free.
Prime Day Pick
Limited-time Prime Day price. Check current discount on Amazon.
Why Replacing Trimmer Line Matters
A string trimmer—sometimes called a weed eater or weed whacker—relies on a strong, flexible line to cut grass and weeds. Over time, this line wears down, snaps, or tangles. If you don’t replace it, you’ll notice your trimmer starts to lose cutting power. I’ve tried pushing a dull, short line through thick weeds, and it’s not fun. It’s also a waste of energy and puts stress on the machine.
Prime Day Pick
Limited-time Prime Day price. Check current discount on Amazon.
Fresh line does more than just cut better. It saves you time, keeps your tool running smoothly, and helps your yard look neat. It can also prevent damage to your trimmer’s motor, since the tool won’t struggle as much.
The Tools And Materials You’ll Need
Before you start, make sure you have everything ready. Here’s what I always gather:
- Replacement trimmer line (check your trimmer manual for the right diameter and shape)
- A clean rag (wiping down parts is always a good idea)
- Safety gloves (optional, but I like to protect my hands)
- Scissors or a sharp knife
- My string trimmer (powered off and unplugged, of course!)
It’s easy to think all trimmer lines are the same, but trust me, using the wrong size can jam the head or fly out during use. When I first started, I grabbed the thickest line I could find, thinking it would last longer. It didn’t fit. Make sure you use what’s recommended for your model.
Types Of String Trimmer Heads
Not all string trimmers are built the same. I learned this the hard way when I tried to follow an online video that didn’t match my trimmer at all. There are a few common types of heads:
- Single-line heads: Use one piece of line.
- Dual-line heads: Use two lines, often feeding out in opposite directions.
- Bump feed heads: You tap the head on the ground to advance more line.
- Automatic feed heads: Line advances by itself.
- Fixed line heads: You just insert pre-cut pieces.
Knowing your head style helps a lot. Most home trimmers use either bump feed or automatic feed. Take a quick look at your trimmer manual or the head itself.
Step-by-step: How I Replace Line On My String Trimmer
I’ll walk you through the process as I do it—this is what’s worked best for me, and I’ll point out where I used to get stuck.
1. Turn Off And Unplug
First things first: safety. I always turn off the trimmer and unplug it if it’s electric. For gas trimmers, I disconnect the spark plug wire. It sounds basic, but I’ve heard stories of trimmers starting up by accident. No thanks!
2. Remove The Trimmer Head Cover
Most trimmer heads have a cover that snaps or screws on. I press the tabs on the side and gently lift off the cover. If it’s stuck, I use a flathead screwdriver to help, but I’m careful not to break the plastic.
I learned to keep track of all parts—I once lost a spring in the grass and spent 20 minutes searching.
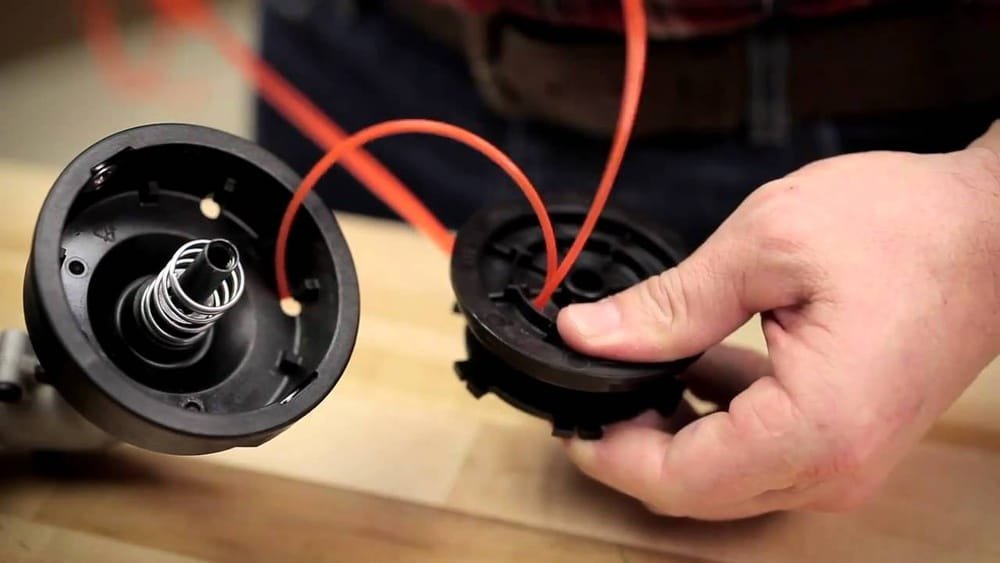
3. Take Out The Spool
Inside the head, there’s a round spool that holds the line. I pull it out carefully. Sometimes there’s a spring underneath—don’t lose it! If the old line is still wrapped on, I unwind it and toss it out. If the spool is dirty, I give it a quick wipe with a rag.
4. Measure And Cut New Line
Now comes the part where I used to mess up. How much line do you need? Most manuals say 10 to 20 feet. If you use too much, it won’t fit. Too little, and you’ll run out quickly. I pull out about 15 feet for my trimmer, then cut it in half if I need two lines.
There are different line shapes—round, twisted, square—and thicknesses. Thicker lines last longer but only fit certain heads. I stick with what the manual says. If you’re not sure, look for a sticker on the trimmer or check the brand’s website.
5. Wind The Line Onto The Spool
This is the step that gets most people frustrated. I used to just wrap the line any way, but it always jammed. Here’s what I do now:
- Find the small holes or notches on the spool. Insert the end of the line in one of these holes to anchor it.
- Wind the line in the direction of the arrow printed on the spool. This keeps the line from tangling.
- Wrap the line neatly and tightly, making sure each loop sits next to the last, not on top.
- If you have a dual-line spool, wind the second line on the other half, the same way.
- Leave about 6 inches of line sticking out at the end. This will feed through the eyelets in the head.
If you get lost, remember: neat wraps prevent jamming. Messy wraps almost always cause problems. I learned this after rewinding my spool three times in a row once!
6. Replace The Spool In The Head
Take the spool and thread the ends of the line through the holes or eyelets in the trimmer head. Hold the lines in place so they don’t slip back inside. Gently press the spool down into the head.
7. Snap Or Screw The Cover Back On
Put the cover back and make sure it’s secure. If it won’t close, check if the line is blocking anything. Sometimes the spring isn’t seated right. I always double-check before moving on.
8. Test The Feed
Before you start trimming, gently pull the lines to make sure they move freely. Then, if you have a bump feed head, tap it on the ground to check the line feeds out. If it doesn’t, open the head and check for tangles.
Comparing Trimmer Line Types
Over time, I’ve tried a few different types of lines. Here’s a quick look at how they compare in my experience:
| Line Shape | Pros | Cons | Best For |
|---|---|---|---|
| Round | Durable, less breakage | Not as sharp | Light grass |
| Twisted | Quieter, cuts well | Can be harder to wind | Medium weeds |
| Square | Sharp edges, cuts fast | Wears down quicker | Tough weeds |
My go-to is twisted line for most of my yard. It’s a good mix of strength and sharpness.
Mistakes I’ve Made (so You Don’t Have To)
I’ll be honest, I’ve made plenty of mistakes when learning to change trimmer line. Here are a few:
- Using line that’s too thick for my trimmer. It wouldn’t feed and jammed the head.
- Wrapping the line in the wrong direction. The line flew out or got tangled as soon as I turned on the trimmer.
- Overfilling the spool. It just made a mess and jammed the feed.
- Not seating the spring under the spool. The head wouldn’t click back together and kept popping open.
- Forgetting to unplug the trimmer. Don’t skip this!
If you avoid these, you’ll save yourself a lot of time.
How Often Should You Replace Trimmer Line?
I used to wait until the line was completely gone, but I learned that’s not the best way. For an average yard, I replace or refill the line every few weeks during the growing season. If you hit lots of fences, rocks, or thick weeds, you’ll need to refill more often. I check the line before every mow.
Choosing The Right Trimmer Line For Your Needs
With so many options in the store, it’s easy to grab the wrong line. Here’s what I consider when buying new line:
| Feature | Why It Matters | My Experience |
|---|---|---|
| Diameter | Fits your trimmer, affects cutting power | Too thick jams, too thin breaks fast |
| Shape | Sharpness and noise level | Twisted line is quieter |
| Material | Durability and price | Nylon lasts longest for me |
For most home use, a 0.080″ to 0.095″ diameter line works well. Check your manual!

When To Replace The Whole Trimmer Head
Sometimes, the problem isn’t the line—it’s the head itself. If the head is cracked, the spring is missing, or the line won’t feed even after rewinding, it may be time to get a new head. I replaced my head once after six years of heavy use.
It cost less than $20 and made my trimmer work like new.
Tips For Easy Line Replacement
Here are a few extra things I’ve learned:
- Lay out all your parts on a clean towel so nothing gets lost.
- Take a photo of the spool before you remove the line. It’s a quick reference if you forget how to wind it.
- If you use your trimmer a lot, pre-cut several lines and keep them in a bag in your garage. It makes future replacements much faster.
- For stubborn grass, consider using a square or star-shaped line—it cuts thick weeds better.

Quick Troubleshooting Guide
If your trimmer line isn’t feeding properly, here’s what I check:
- Is the line wound in the correct direction?
- Is the line the right thickness for your trimmer?
- Is there too much or too little line on the spool?
- Is the head cover snapped on tight?
- Is the spring in place (if your model uses one)?
Most problems are simple fixes, and a careful rewind solves them.
How Long Does It Take?
Once I got the hang of it, changing the trimmer line takes me about five minutes. The first few times took longer, but now it’s just a quick part of my yard work routine.

Environmental Tip
Don’t toss used trimmer line on the ground. Some lines are recyclable, but check your local rules. I collect mine in a small bucket and throw it away safely.
Where To Find More Help
If you’re still stuck, check your trimmer’s manual or look for videos from your trimmer’s brand. I also found the EPA’s Safer Choice site helpful for learning about more eco-friendly yard tools.
Frequently Asked Questions
How Do I Know What Size Trimmer Line To Use?
Check your trimmer’s manual or look for a sticker on the tool. Most home trimmers use 0.065″ to 0.095″ line. Using the wrong size can cause jams.
Can I Use Any Brand Of Trimmer Line?
Yes, most brands work as long as the line is the right diameter and shape for your trimmer. I’ve mixed brands many times without issues.
Why Does My Line Keep Breaking?
The most common reasons are hitting rocks, fences, or using old, brittle line. Try a thicker or fresh line if you have this problem.
How Do I Stop The Line From Tangling Inside The Spool?
Wind the line neatly, tight, and in the right direction (follow the arrow on your spool). Don’t overfill the spool, and keep lines flat—not crossed.
Is It Better To Buy Pre-wound Spools?
Pre-wound spools are faster and less messy, but more expensive. I use them if I’m short on time, but I usually wind my own—it saves money and lets me pick the best line.
Switching out your trimmer line doesn’t have to be a headache. With a bit of practice and the right approach, you’ll be back to trimming in no time. Your yard—and your patience—will thank you!
As an Amazon Associate, We earn from qualifying purchases