Keeping a hedge trimmer sharp isn’t just about getting neat hedges—it’s about safety, speed, and saving money. The first time I realized my electric hedge trimmer was dull, I struggled for hours, sweating and hacking at my bushes. The cuts were ragged, and the motor sounded like it was working too hard.
Prime Day Pick
Limited-time Prime Day price. Check current discount on Amazon.
I blamed the trimmer, but the real issue was the blades. That day, I promised myself I’d learn how to sharpen an electric hedge trimmer the right way. Now, after years of trial, error, and a few mistakes, I want to share what I’ve learned.
If you want smooth, clean cuts and longer life for your tool, this guide is for you.
Prime Day Pick
Limited-time Prime Day price. Check current discount on Amazon.
Why Sharp Blades Matter
A sharp blade makes a world of difference. When my trimmer is sharp, I notice I work faster and my arms don’t get as tired. Clean cuts also keep my hedges healthy. Dull blades tear branches, leaving rough edges that invite disease.
Prime Day Pick
Limited-time Prime Day price. Check current discount on Amazon.
Plus, a sharp trimmer is much safer. It doesn’t get stuck or kick back, which can be dangerous. Saving money is a bonus too. Instead of buying new blades or even a new trimmer, regular sharpening keeps my tool working for years.
Tools And Materials You’ll Need
Before you start, gather everything. I learned the hard way that searching for tools halfway through makes the job longer and more frustrating. Here’s what I use every time:
- Flat file or sharpening stone – A flat file works best for most electric hedge trimmers, but a sharpening stone can help with fine-tuning.
- Protective gloves – I always wear gloves. Even dull blades can cut skin.
- Safety glasses – Little metal filings can fly up, and you don’t want those in your eyes.
- Clean cloth or rag – Wiping down the blades first is important.
- Lubricating oil – This keeps the blades moving smoothly after sharpening.
- Screwdriver or wrench – Sometimes you need to remove the blades, depending on your trimmer model.
- Brush – I use an old toothbrush to clean away dirt and sap.
I found that having all these items close by makes the process easy and safe.
Getting Ready: Preparation Steps
Before I even touch the blades, I always unplug my trimmer. This sounds obvious, but it’s easy to forget. Electric trimmers can start with a bump or if the trigger is pressed accidentally. I double-check the plug or remove the battery if it’s cordless.
Next, I clean the blades. Sap, dirt, and leaves stick to the metal and make sharpening harder. I use a damp cloth and that old toothbrush to scrub away debris. For stubborn spots, a little dish soap helps. The cleaner the blade, the better the sharpening.
Finally, I set up my work area. A well-lit table is best. If you can, work outside or over a drop cloth. Tiny metal filings are sharp and hard to see on the floor.
Understanding Your Hedge Trimmer’s Blades
Not all electric hedge trimmers are the same. Most use a double-sided, reciprocating blade system. That means two blades move back and forth, cutting in both directions. Each blade has a row of teeth, each with a small angled edge. Over time, these edges get rounded and dull.
Here’s a simple comparison of blade types I’ve seen:
| Blade Type | Common Use | Sharpening Difficulty |
|---|---|---|
| Single-sided | Small gardens, light trimming | Easy |
| Double-sided | Medium to large hedges | Moderate |
| Laser-cut hardened | Heavy-duty, professional | Hard |
Most home trimmers use the double-sided type. These can be sharpened by hand, but you need to follow the original angle of the teeth for the best results.

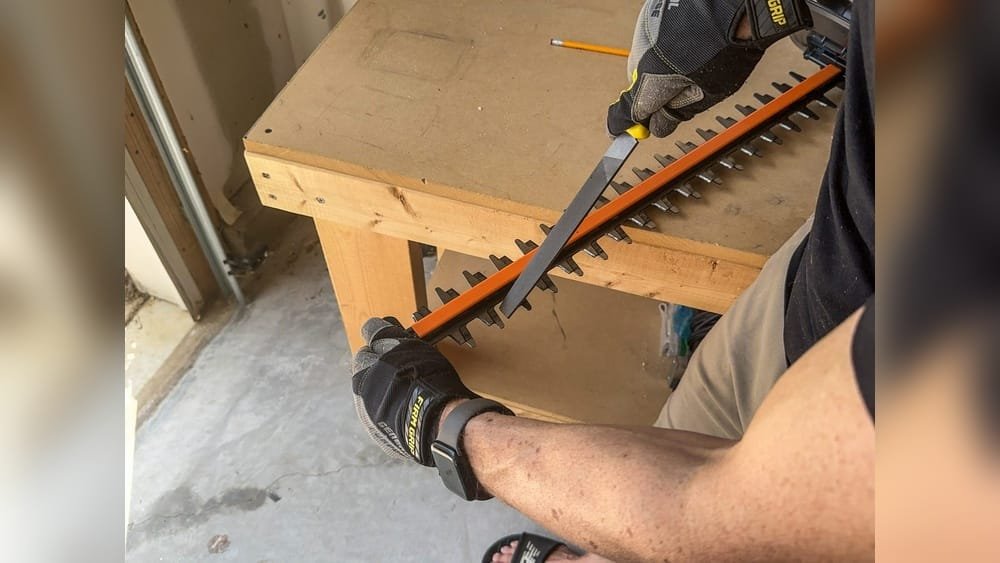
Step-by-step: How I Sharpen My Electric Hedge Trimmer
I’ve made mistakes before—sharpening at the wrong angle, not cleaning first, or forgetting oil. Follow these steps for a smooth experience.
1. Disconnect The Power
Safety first. I always unplug the cord or remove the battery. If you’re not sure, double-check before starting. It’s not worth the risk.
2. Clean The Blades
I wipe down the blades with a damp cloth and scrub off any sap or grit. Clean metal is much easier to sharpen.
3. Secure The Trimmer
If you have a vise, use it to hold your trimmer steady. I sometimes use a clamp or even ask a friend to hold it still. The goal is no movement while you work.
4. Find The Beveled Edge
Each tooth has a beveled edge (the sloped part). This is where you want to file. I use a flashlight if the light is bad, just to see the angle.
5. Sharpen With A Flat File
I hold the file flat against the beveled edge, matching the original angle. Usually, it’s about 45 degrees. I push the file away from me, in one direction, not back and forth. About 5–10 strokes per tooth is enough. I count to keep it even across all teeth.
6. Remove Burrs
After sharpening, the back side of the blade will have small metal burrs. I gently file these off. Don’t skip this step—burrs can make the trimmer jam.
7. Repeat For All Teeth
I move along the blade, sharpening each tooth the same way. If some teeth are badly damaged, I may need more strokes, but I try to keep the angle consistent.
8. Clean And Lubricate
When I’m done, I wipe the blades with a clean cloth to remove filings. Then, I add lubricating oil. This helps the blades slide smoothly and prevents rust.
9. Reassemble And Test
If I removed the blades, I put them back carefully, making sure the screws are tight. Then, I plug the trimmer in and do a test cut on a small branch. The difference is amazing—smooth, clean cuts with much less effort.
Here’s a quick look at the main steps and their time:
| Step | Time Needed | Difficulty |
|---|---|---|
| Disconnect power | 1 minute | Easy |
| Clean blades | 5 minutes | Easy |
| Sharpen teeth | 15–25 minutes | Medium |
| Remove burrs | 5 minutes | Easy |
| Lubricate & test | 5 minutes | Easy |
Common Mistakes And How I Avoid Them
When I first started, I made plenty of mistakes. Here are the most common ones and what I do differently now.
- Filing back and forth: I used to file in both directions, which made the edge uneven. Now, I only file in one direction.
- Wrong angle: Sharpening at the wrong angle makes the blade dull fast. I always follow the original bevel.
- Forgetting to clean: Dirt and sap on the blade make sharpening harder and less effective. I always clean first.
- No lubrication: I skipped oil once, and the blade rusted. Now, I always oil after sharpening.
- Rushing: Taking my time leads to better results and fewer accidents.

When To Replace Instead Of Sharpen
Sometimes, blades are too far gone. If teeth are missing or bent, or if the edge is chipped badly, sharpening won’t help. I had a trimmer where a few teeth snapped off after hitting a metal fence. No amount of filing could fix it.
That’s when I replaced the blade.
Here’s a simple comparison I use:
| Blade Condition | Sharpen or Replace? | Reason |
|---|---|---|
| Lightly dull | Sharpen | Quick fix |
| Chipped | Replace | Can’t cut cleanly |
| Bent or missing teeth | Replace | Unsafe to use |
| Rusty but not damaged | Sharpen & oil | Surface fixable |
How Often Should You Sharpen?
I used to wait until the trimmer struggled. Now, I sharpen after every 20 hours of use, or at least at the start of each season. If I notice the trimmer pulling, vibrating, or leaving ragged cuts, I don’t wait.
A quick touch-up saves time and effort later.

Advanced Tips I’ve Learned Over The Years
- Use a marker: I sometimes color the bevel with a black marker before sharpening. This way, I can see exactly where I’ve filed. If the marker is gone, I’ve hit the right spot.
- Battery models: If you use a cordless trimmer, always remove the battery first. It’s safer, and you avoid accidental starts.
- Store with oil: After sharpening and oiling, I wrap the blade in a rag for storage. This prevents rust and keeps the edge sharp longer.
- Sharpen before and after storage: I found that sharpening right before storing for winter, and again before spring, keeps the trimmer in top shape.
One thing beginners often miss: If you use your trimmer a lot, tiny metal filings can build up between the blades. I use a thin brush or even compressed air to clear these out. It makes a big difference in how smooth the trimmer runs.
Safety First: My Rules
- I never skip gloves or glasses. Metal splinters are painful and hard to remove.
- I keep kids and pets away while sharpening.
- I always check the manual for my trimmer model. Some brands have special instructions.
- After sharpening, I keep the trimmer unplugged until I’m ready to use it again.
Resources For More Information
If you want more in-depth details, I found the guide at the Wikipedia Hedge Trimmer page helpful. It covers different types of hedge trimmers and their care.
Frequently Asked Questions
How Do I Know When My Trimmer Needs Sharpening?
If the trimmer pulls, vibrates, or leaves ragged edges, it’s time to sharpen. When I notice these signs, I don’t wait.
Can I Use A Power Tool To Sharpen The Blades?
You can use a rotary tool, but I prefer a hand file. Power tools can remove too much metal and change the blade’s angle. Hand filing gives me more control.
Is It Safe To Sharpen Blades Without Removing Them?
Yes, in most cases. I usually sharpen with the blades in place, as long as the trimmer is unplugged and stable. If the manual says to remove them, I follow that advice.
How Often Should I Oil The Blades?
I oil the blades after every use, and always after sharpening. This prevents rust and keeps the movement smooth.
What Should I Do If A Blade Tooth Is Broken?
If a tooth is broken or missing, I replace the blade. Using a trimmer with damaged teeth can be dangerous and won’t give clean cuts.
Keeping your electric hedge trimmer sharp doesn’t have to be hard. With the right tools, a bit of care, and these simple steps, you’ll get better results and make your trimmer last much longer. Trust me—once you see the difference, you’ll never go back to using a dull blade again.
As an Amazon Associate, We earn from qualifying purchases