Removing the head from a Ryobi string trimmer seemed hard to me at first. I remember standing in my garage, staring at my grass trimmer, thinking, “How do I even start?” If you’re feeling the same way, don’t worry. I’ve been there, and I want to walk you through the whole process. I’ll share what worked for me, mistakes I made, and tips that saved me time. Even if you’re not a tool expert, you can do this. Let’s dive in.
Why Remove The Ryobi String Trimmer Head?
You might wonder why you’d want to remove the head in the first place. There are a few reasons I’ve run into:
- Replacing worn-out parts: The string trimmer head gets a lot of use. Eventually, it wears down or cracks.
- Upgrading the head: Sometimes, you want a better head, maybe one that feeds string easier or works faster.
- Fixing a jam: If the string gets stuck or the head won’t spin, you need to open it up.
- Cleaning: Grass, dirt, and debris can build up inside the head over time.
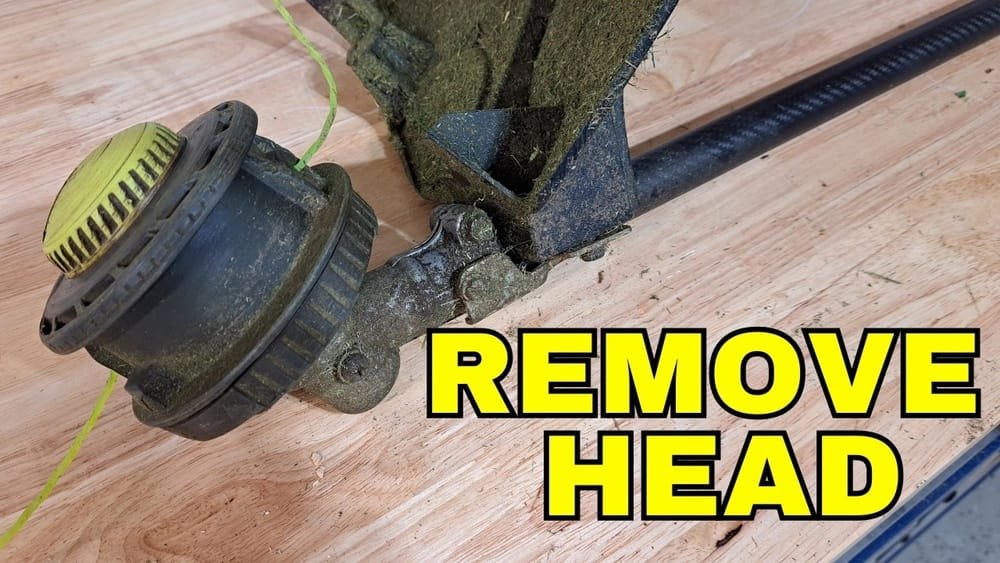
The first time I tried, my trimmer head was stuck. Grass had wrapped around the shaft, and the string was jammed inside. I realized I needed to take off the head to fix it.
Know Your Ryobi Trimmer Model
Before you start, check what Ryobi trimmer model you have. Heads come in a few styles. Some use a bump-feed system. Others have a fixed-line head or a speed-feed head. The way you remove the head depends on the model.
I own two Ryobi trimmers. One is the older gas model. The other is a newer electric version. The process is almost the same, but a few details are different.
Here’s a quick look at the main types:
| Head Type | Common Models | Removal Difficulty |
|---|---|---|
| Bump Feed | RY253SS, RY40220 | Medium |
| Fixed Line | RY15124, RY15523 | Easy |
| Speed Feed | Expand-It, RY4CSS | Medium |
Check your trimmer’s manual or look for the model number on the label. This helps you find the right instructions.

Tools You’ll Need
You don’t need fancy tools. Here’s what I use every time:
- Work gloves: Keeps your hands safe and clean.
- Flathead screwdriver: Helps pry off stubborn parts.
- Locking pin or small nail: Useful for locking the shaft in place.
- Adjustable wrench: Sometimes needed for older heads.
- Clean towel: Wipe off grease and debris.
From my experience, the right tools make things much easier. Once, I tried using a butter knife instead of a screwdriver. It slipped and almost cut me. Stick to proper tools if you can.
Safety First
Before you touch your trimmer, make sure it’s off. If it’s electric, unplug the battery. For gas models, disconnect the spark plug. I once forgot this step and the head spun a little while I was working. It scared me and could have caused a real injury.
Never work on a trimmer that’s still plugged in or powered.

Step-by-step: How I Remove The Ryobi String Trimmer Head
I want to make this as simple as possible. Here are the steps I always follow. I’ll note places where I got stuck the first time, so you can avoid my mistakes.
1. Prepare The Trimmer
Lay the trimmer flat on a workbench or the ground. Put on your gloves. Wipe away any dirt so you can see the head clearly.
2. Find The Locking Hole
Most Ryobi trimmers have a small locking hole near the head. It’s usually on the metal shaft right above the head. This is where you insert a pin or nail to keep the shaft from spinning.
The first time, I spent ten minutes searching for this hole. Sometimes grass covers it up. Clean the area and look closely.
3. Lock The Shaft
Insert a locking pin, small nail, or screwdriver into the hole. Wiggle it until you feel it “catch. ” This stops the head from spinning while you remove it.
If you skip this, the head will just turn and never unscrew. I tried holding it with my hand. Trust me, it doesn’t work and you’ll get frustrated.
4. Unscrew The Trimmer Head
Most Ryobi heads unscrew by turning clockwise (which is the opposite of normal screws). This confused me at first. I kept turning the wrong way and thought the head was stuck forever.
Hold the head and turn it clockwise. Use a wrench if it’s too tight. Sometimes the head is really stubborn, especially if it’s old or full of debris.
Here’s a quick comparison of Ryobi trimmer head directions:
| Model | Unscrew Direction |
|---|---|
| Most Ryobi (bump feed, fixed line) | Clockwise |
| Some Expand-It models | Counter-clockwise |
If you’re not sure, check your manual. But in my experience, most heads come off clockwise.
5. Remove The Head
After a few turns, the head should come off in your hand. Sometimes, a metal washer or spring sits under the head. Don’t lose these! The first time, I dropped a washer and had to search my garage floor for 20 minutes.
Set the head, washer, and any loose parts aside.
6. Clean The Area
While the head is off, use your towel to clean the shaft and remove any built-up grass or dirt. This helps the new head fit better and prevents future jams.
I skipped this once, and the new head never sat flat. It wobbled and made a loud noise when I used the trimmer.
7. Install A New Or Cleaned Head (optional)
If you’re replacing the head, now is the time to put on the new one. Slide it onto the shaft, replace the washer and spring, and screw it on counter-clockwise (the opposite of removal). Tighten by hand.
Make sure it’s snug, but don’t over-tighten. I once used a wrench and cracked the plastic. Hand-tight is enough for most models.
Common Problems And How I Fixed Them
The first few times I removed my trimmer head, I ran into problems. Here’s what I learned:
Head Won’t Unscrew
This happened because dirt or old grass was jammed inside. I sprayed a little WD-40 around the base and let it sit for five minutes. After that, it turned much easier.
Locking Pin Won’t Fit
Sometimes, the hole is blocked. I used a small screwdriver to poke out debris. A little patience goes a long way.
Lost Parts
I lost a washer once, which made the new head fit poorly. I found replacements at my local hardware store. Bring the old part with you to match the size.
Wrong Replacement Head
I once bought a universal head from a big box store. It didn’t fit my shaft. Make sure the replacement is made for Ryobi trimmers. The shaft size matters.
How Long Does It Take?
After some practice, I can remove a Ryobi string trimmer head in under 5 minutes. The first time, it took me about 20 minutes because I wasn’t sure what I was doing. Don’t rush. Take your time, and it gets easier each time.
Mistakes I Made (so You Don’t Have To)
I wish someone had told me these tips before I started:
- Forgetting to unplug the trimmer: Always remove power before working.
- Turning the wrong way: Most heads unscrew clockwise, not counter-clockwise.
- Not cleaning the shaft: Dirt and grass can block the head from coming off or fitting back on.
- Losing small parts: Work over a towel or tray to catch washers and springs.
- Buying the wrong head: Check your model and shaft size before buying replacements.

When Should You Replace The Head?
You don’t need to remove the head every time you replace the string. But if you notice any of these, it’s time to take it off:
- The head is cracked or broken.
- The string won’t feed, even after reloading.
- The head wobbles or makes noise.
- You want to upgrade to a better head.
A new head can make your trimmer work like new again. I noticed a big difference in cutting power after replacing mine.
Comparison: Ryobi Vs. Other Brands
I’ve used a few other brands over the years. Ryobi trimmer heads are not much harder to remove than other brands, but the direction can be confusing.
Here’s how Ryobi compares to others:
| Brand | Head Removal Direction | Ease of Removal |
|---|---|---|
| Ryobi | Clockwise | Medium |
| Stihl | Counter-clockwise | Easy |
| Echo | Counter-clockwise | Easy |
| Husqvarna | Clockwise | Medium |
Ryobi’s biggest quirk is the unscrewing direction. Once you know that, the rest is pretty standard.
Non-obvious Tips Most People Miss
Here are a few things I wish I’d known at the start:
- Use a real locking pin or nail, not a pen or pencil. I broke a pen tip inside the hole once. It took ages to get out.
- Check for hidden washers or springs. Don’t just yank the head off. These small parts are easy to lose and hard to replace.
- Lubricate threads before reinstalling. A little grease or WD-40 makes future removal much easier.
- Take a photo before removing. If you forget how things fit, this helps a lot.
These small things can save you a lot of headaches later.
Where To Find More Help
If you’re stuck, Ryobi has official guides and videos. I found a step-by-step video on YouTube from Ryobi’s own channel, which helped me the first time. Sometimes, seeing the process can make it clearer. If you need the official manual, you can find it at the Ryobi Tools Manual Page.
Final Thoughts
Removing the head from a Ryobi string trimmer isn’t as scary as it seems. I’ve made mistakes, gotten frustrated, and lost parts, but now I can do it with my eyes closed. Just remember to unplug, use the right tools, and turn the head the correct way. Take your time, and don’t force anything.
Once you know how, you can clean, fix, or upgrade your trimmer anytime. It feels good to fix your tools yourself. If I can do it, so can you.
Frequently Asked Questions
How Do I Know If My Ryobi Trimmer Head Is Stuck?
If the head won’t move after you lock the shaft and turn it the correct way, it’s probably stuck. Try spraying a little WD-40 around the base and let it sit for a few minutes. This usually helps loosen it.
Can I Remove The Head Without A Special Tool?
Yes, you can use a small nail or even a sturdy screwdriver to lock the shaft. You don’t need a special Ryobi tool. Just make sure whatever you use fits snugly and won’t break.
What If I Lose A Washer Or Spring?
Don’t panic. Take the parts you have to a hardware store and look for replacements. Most stores have a variety of washers and springs. Make sure the size matches your old parts.
Is Removing The Head The Same For All Ryobi Models?
Most models use the same basic process, but a few have differences. Always check your user manual for your specific model. Some heads unscrew the other way or have extra clips.
How Often Should I Remove And Clean The Trimmer Head?
If you use your trimmer a lot, check and clean the head every few months. If you notice the string jams or the head wobbles, open it up and clean it right away. Regular cleaning keeps your trimmer running well.
As an Amazon Associate, We earn from qualifying purchases