Hey friends, Maruf here. Welcome back to ToolsEngineers. Today, we have a fun tool chat. I want to talk about a weird issue. It happened in my Florida workshop last week. My trusty leaf blower just would not start up.
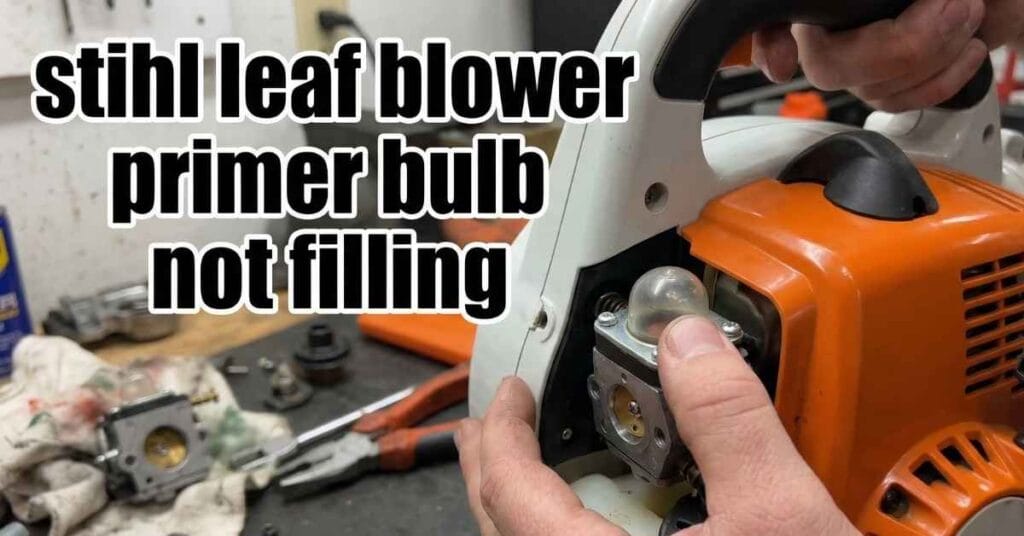
The main issue was simple. I pressed the small plastic pump. But, the Stihl leaf blower primer bulb not filling was obvious. It just stayed full of air. No gas would go inside it. I knew I had to fix it fast.
It is very frustrating when yard work waits. The sun beats down hard in the south. You just want the tool to work right. But machines can act up from time to time. Let me share how I solved this big mess.

Signs Your Leaf Blower Needs Help
Your tool will tell you when it is sick. You just have to watch and listen well. Long before the bulb stays dry, hints pop up. I notice these small hints all the time. They save me from worse tool trouble later on.
The Motor Sputters and Dies
A clear sign is a weak engine run. The blower might start on the first pull. But then, it coughs and dies right away. This means it starves for fresh gas. The flow is weak and breaks the cycle.
When it sputters, do not force the motor. Pulling the cord more will not fix the block. It just tires out your arm for no good. I stop and check the fuel path right then. It is the smartest move you can make.
The Tool Lacks High Power
Another sign is a drop in blowing force. You squeeze the grip, but wind stays low. The pitch of the engine sounds very flat. It lacks that high scream we all know. This points to a fuel mix error.
A bad fuel mix hurts the engine parts. It makes the motor run far too hot. Heat will warp the metal block over time. If you hear a flat tone, stop your work. You need to inspect the gas flow fast.
How I Found the Problem in My Shop
I put the blower on my workbench. The first step is to look closely. You need good light to see small parts. I saw that the bulb was not torn. It just lacked the fuel it needed to run.
When the Stihl leaf blower primer bulb not filling happens, do not panic. It is a common flaw with gas tools. Air gets trapped inside the small tubes. Gas cannot push past the air block. This stops the whole motor from firing up.
Why the Bulb Stays Dry
There are three main reasons for this snag. First, the gas lines might be bad. Old gas makes the plastic lines rot fast. Second, the small filter inside the tank might clog. Dirt blocks the gas flow to the top.
The last reason is the carb unit. This part mixes air and gas for the spark. If it gets dirty, it blocks the flow. The bulb tries to pull gas but gets nothing. It just sucks thin air instead of fuel.
Parts That Break the Most
I want to show you the parts I check. It helps to know what breaks first. The table below lists the top bad parts. You can see the signs of wear for each. This makes your search much faster.
| Bad Part | Sign of Wear | My Quick Tip |
| Fuel Line | Cracks or stiff plastic | Bend it to see if it snaps. |
| Fuel Filter | Dark blockages or dirt | Shine a light in the gas tank. |
| Primer Bulb | Stiff or cracked dome | Press it to feel for soft bounce. |
| Carburetor | Gunk on the inside jets | Spray it with clean tool wash. |
The table shows the main culprits. I always start with the cheapest parts. A simple tube costs just a few cents. A whole new carb costs much more. It makes sense to check the cheap stuff first.
Steps to Fix the Stihl Leaf Blower Primer Bulb Not Filling
Now, let us get our hands dirty. You will need a few basic hand tools. A screw driver and some pliers will do. Make sure you work in a safe space. Keep away from sparks or open flames always.
Do not rush this repair job. Take your time to see how parts fit. Take a picture with your phone first. It helps you put things back the right way. I do this every time I open a tool.
Check the Fuel Lines First
I take off the air filter cover. This shows the lines going to the tank. I look for cracks in the yellow tubes. If they are hard, they let air sneak in. Air leaks cause the Stihl leaf blower primer bulb not filling issue.
I use my pliers to pull the old line. I cut a new line to the same length. Then, I push it back onto the small pegs. It must have a very tight seal. Loose tubes will just cause more headaches later.
Clean the Small Parts Next
If the lines are good, I check the filter. I fish it out of the gas tank with wire. If it looks dark, I just toss it out. A clean filter lets the gas flow free. This is a very fast and cheap swap.
Next is the carb unit itself. I take out the holding screws with care. I spray the tiny holes with a good wash. This melts the old green gas gunk away. You want those tiny holes clear and open.
| Tool I Use | Why I Use It | Cost |
| Long Pliers | To grab the tank filter | Low |
| Torx Driver | To remove the case screws | Low |
| Wire Hook | To fish out the gas line | Free |
| Carb Spray | To melt bad gas gunk | Low |
These tools save me so much time. You do not need a fancy shop set. Just basic items get the job done right. I keep them in a small box nearby. They are always ready for a quick yard fix.
What Worked Best for Me
In my case, the fix was easy. The main gas line had a tiny crack. It was hard to see at first glance. But the small crack let in too much air. The pump just sucked wind all day long.
I swapped the bad line for a fresh one. It took me about ten minutes total. I put the fresh gas in the clean tank. Then, I pressed the clear pump dome twice. Gas rushed right into the small space.
The Stihl leaf blower primer bulb not filling problem was gone. The tool roared to life on the first pull. It felt great to fix it on my own. It saved me a trip to the repair shop. It saved me hard cash, too.
How to Keep the Gas System Clean
You can stop these flaws before they start. It just takes a bit of smart care. The gas you buy is the key to it all. Bad fuel hurts small engines very fast. I learned this the hard way years ago.
Always Use Fresh Fuel
Gas goes bad in just one short month. It drops a sticky green gel as it ages. This gel clogs the tiny paths in your tool. I only buy enough fuel for one month now. This keeps my fuel fresh and my tools clean.
I also use a fuel additive each time. This mix keeps the gas stable for longer. It acts like a shield for the soft parts. You just pour a splash in your gas can. It is a cheap way to dodge a big bill.
Run the Tank Dry for Winter
Cold months bring long rest times for yard gear. Leaving fuel in the tank is a huge mistake. The gas will rot while the tool sits cold. It will eat the soft lines from the inside out.
I always run my blower till the tank is dry. I press the pump to get every last drop out. Then I pull the cord until the engine stops. A dry tool wakes up happy in the warm spring. This is my top rule for tool care.
My Honest View on Stihl Tools
I want to give you my real thoughts here. Stihl makes very strong and tough gear. I have used them for many long years. They build parts that can take a beating. The motor blocks are true works of art.
But they are not perfect all the time. The gas tubes they use are quite soft. They seem to crack faster than some other brands. The Stihl leaf blower primer bulb not filling is a known glitch. I wish they used stronger plastic for the lines.
Still, I love my blower and keep it close. The repair parts are cheap and easy to find. Working on them is simple for a home user. The good facts far outweigh the few bad traits. I will keep using them on my yard.
| Fix Choice | Time Needed | Cash Spent | My Choice? |
| Swap Lines | Ten minutes | Five bucks | Yes |
| Clean Carb | Half an hour | Ten bucks | Yes |
| Buy New Tool | Two hours | Two grand | No way |
This chart shows why I fix my gear. Buying new tools is just too much cash. A simple fix keeps the old tools running hard. It brings a real sense of pride, too. I love hearing the motor run smooth again.
Final Thoughts on This Easy Repair
I hope my story helps you out today. Yard tools can be stubborn at times. But they are just machines with small parts. You can learn to fix them with some care. Do not let a small glitch stop your work.
When the Stihl leaf blower primer bulb not filling happens, stay calm. Check the tubes and the small parts first. You will find the air leak very fast. Then, you can get back to your yard chores.
Keep your gear clean and use fresh gas. Good habits stop these flaws from popping up. Thank you for reading my post today. I will share more tool tips with you soon. Happy fixing to all my great readers out there.