It happened on a Tuesday. It always seems to happen on a Tuesday.
I was working on a trailer hitch in the driveway. The sun was hot. I was tired. I had three holes left to drill. The steel was thick. My drill bit was old and tired, but I pushed it. I leaned my weight into the drill.
Then, the smoke started.

The smell of burning oil hit my nose. It smelled like hot pennies. The drill whined loud. But the bit was not cutting. It just spun in place. It rubbed a shiny, hot circle into the steel.
I was stuck. My bench grinder was at my shop. That shop is a twenty-minute drive away. I did not want to drive that far. I did not want to go to the store to buy a new bit for five dollars.
I looked down at the concrete. My Makita 9557PB angle grinder sat there.
I thought, “Why not?”
That day, I learned how to sharpen a drill bit with an angle grinder. It was not pretty at first. I ruined a bit before I fixed one. But I got the feel for it. Now, I know this is a skill every worker needs. It saves time. It saves money. And honestly? It feels good to fix a broken tool.
Here is exactly how I do it.
The Problem: Why Do Drill Bits Die?
Before we fix it, we must know what broke.
I pulled the bit out of the drill. I looked at the tip. It was bad. The sharp edge was gone. It was smooth and round.
Drill bits do not just get dull. They lose their shape. A sharp bit is a ramp. It scoops metal up and out. A dull bit is a flat floor. It rubs. It creates heat.
If you push a dull bit, two bad things happen.
1. The Steel Gets Hard
You heat up the steel you are drilling. Hot steel changes. It gets hard. Now it is even harder to drill than before.
2. The Bit Loses Its Temper
The bit gets too hot. I saw this on my bit. The tip turned blue.
Steel is heat-treated to be hard. If you heat it until it turns blue, you ruin it. The metal becomes soft. Soft metal cannot cut hard metal. If your bit is blue, it is dead. You must grind past the blue part to find good steel again.
I had both problems. My bit was dull. And the tip was blue.
The Solution: My Setup
I made a big mistake the first time. I held the grinder in my left hand. I held the drill bit in my right hand.
Do not do this.
I will say it again. Do not hold the grinder in your hand.
You cannot hold it steady. You have two moving objects. The angles will be wrong. It is also not safe. You need the grinder to sit still. This lets you use both hands on the tiny drill bit.
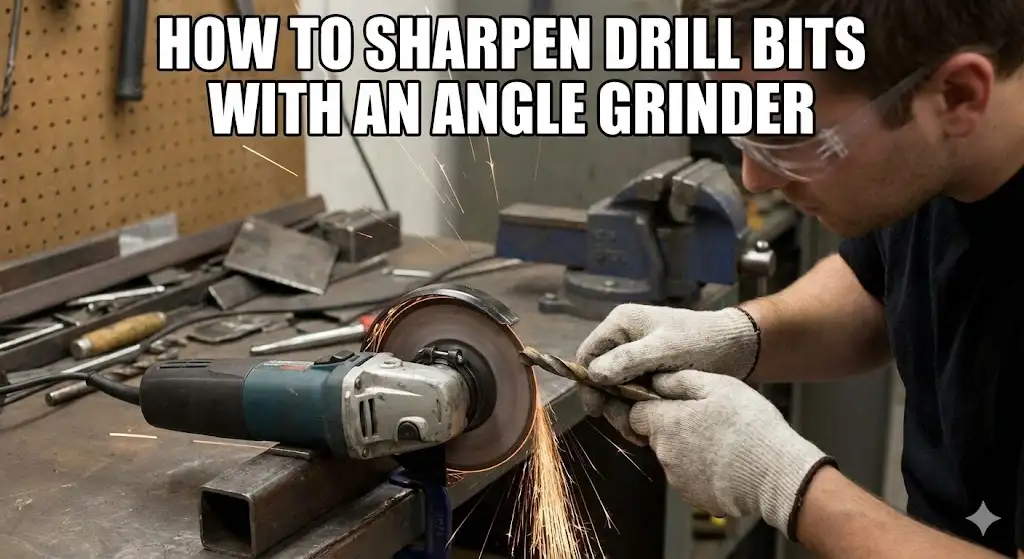
Step 1: Secure the Tool
I took my angle grinder. I clamped it into my bench vise. I made sure it was tight.
I turned it so the disc faced up at me. It looked like a flat table.
If you do not have a vise, you can use a strap. Strap it to a heavy table. The tool must not move.
Step 2: Pick the Right Disc
I had a standard grinding wheel on my Makita. It works. But it is rough. It eats metal very fast. It makes a lot of heat.
If you have one, use a 120-grit Flap Disc.
- It runs cooler.
- It cuts slower.
- It leaves a smooth finish.
If you only have a stone wheel, that is okay. Just use a light touch.
Step 3: Take Off Your Gloves
This sounds wrong. We are told to wear gloves for safety. But this is a rotary tool. It spins fast.
Gloves are cloth. Cloth can snag on the spinning disc. If it snags, it pulls your hand in. That is very bad.
I took my gloves off. I put my safety glasses on. I also put on a face shield. Sparks fly fast. I like my eyes.
The Anatomy of a Sharp Bit
You need to know what to look for. A drill bit has a specific shape.
- The Lip: This is the cutting edge. It shaves the metal.
- The Heel: This is the part behind the lip.
- The Chisel Point: This is the very center tip.
Here is the key rule. The Heel must be lower than the Lip.
Think of an apple peel. The knife edge cuts the skin. The back of the knife is tilted up, away from the apple. If the back of the knife hits the apple first, the edge cannot cut.
On a drill bit, we call this “relief.” The back must slope down. If the back is high, the bit will just rub.
The Process: Step-by-Step
This is the hardest part to explain in words. But I will break it down. You are trying to grind two angles at once.
- The Point Angle: This is the “V” shape at the tip. It is usually 118 degrees.
- The Relief Angle: This is the downward slope behind the edge.
The “Cut and Roll” Motion
I practiced this with the grinder off first. I suggest you do the same.
1. The Approach
I rested my hand on the body of the grinder. This keeps my hand steady. I brought the bit up to the wheel. I matched the angle of the tip. For most bits, this is about 60 degrees from the face of the wheel.
2. The Touch
I gently touched the cutting edge to the wheel. The wheel spins down. The sparks should fly away from the edge.
3. The Roll (The Secret)
This is the magic move. As soon as the metal touches the wheel, I do three things at the same time:
- I push slightly.
- I twist the bit to the right (clockwise).
- I drop my hand. This lowers the back of the bit.
This motion grinds the heel down. It creates the slope we need.
Keep It Cool
Heat is the enemy. Remember the blue tip? We want to avoid that.
I put a cup of water next to the vise.
- Grind for one second.
- Dip in water.
- Grind for one second.
- Dip in water.
The water keeps the steel hard. If you see the tip turn brown or blue, you got too hot. You must grind that color away. I learned this the hard way. I burned my first bit. I had to grind it down a half-inch to fix it.
How to Check Your Work
After I ground both sides, I stopped. I looked at the bit. How do I know if it is sharp?
I use three simple tests.
1. The Eye Check
I look straight down at the top of the bit.
Look at the center line. We call this the chisel point. It should be a straight line. It should be right in the middle.
If it looks like an “S” shape, the grind is bad.
If it is off to one side, one lip is too long. I go back and grind the long side.
2. The Side Profile
I hold the bit up to the light. I look at it sideways.
The cutting edge (the front) must be the highest point. The metal behind it must slope down.
If the back is high, it will not cut. It will just skate on the metal.
3. The Fingernail Test
This is the best test. It is fast.
I take the bit. I gently place the cutting edge against my thumbnail. I try to slide it across my nail.
- Dull Bit: It slides smooth. It feels like a spoon.
- Sharp Bit: It catches. It digs in. It wants to cut my nail.
Troubleshooting My Failures
I did not get this right on the first try. Here are the problems I had. I put them in a table so they are easy to read.
| Problem | Why it Happened | How I Fixed It |
| Bit turned blue | Too much heat. | I pressed lighter. I used more water. |
| Bit rubs, no cut | No slope. The heel is high. | I did not “roll” enough. I ground it again. I lowered my hand more. |
| Hole is wobbly | The tip is off-center. | One side is longer. I measured them. I ground the long side down. |
| Bit chatters | The edge is too flat. | I made the tip too flat. I aimed for a sharper “V” shape. |
The Moment of Truth
I finished grinding. The tip looked shiny. The angles looked okay.
I put the bit back into my drill.
I walked back to the trailer hitch. I put a drop of oil on the steel. I placed the tip on the metal. I pulled the trigger.
Snap.
It bit in. It felt solid.
Before, I made fine dust. Now, long, curly chips of metal shot out. That is the sign of a healthy bit. Dust means you are grinding the hole. Chips mean you are cutting the hole.
I drilled the last three holes in two minutes. It was fast. It was easy.
Final Thoughts
Is an angle grinder perfect? No.
A drill doctor tool is more precise. A bench grinder is more stable.
But I was not in a shop. I was in a driveway. I had a job to finish. The angle grinder saved me.
My Makita is more than a cutter now. It is a sharpener.
You should try this. Do not use your best bit. Use an old, broken one. Practice the roll. Get the feel for it. Once you learn the motion, you will never have a dull bit again.
FAQs: How to Sharpen Drill Bits With Angle Grinder
Can I sharpen drill bits with an angle grinder?
Yes, you can sharpen drill bits with an angle grinder. It is a fast fix. Clamp the tool tight for safety. Check the tip often. Keep it cool to save the bit and make it last.
What is the best disc to use for sharpening?
A 120-grit flap disc is the best pick. It runs cool and smooth. A stone wheel cuts too fast. The flap disc gives you control. It leaves a nice, sharp edge on the metal.
Why is the tip of my drill bit turning blue?
The bit is too hot. Blue steel is soft and weak. Dip the tip in water often to cool it. Grind for a short time. Do not press hard on the grinding wheel to keep it safe.
What is the right angle for the drill bit tip?
Aim for a V shape at the tip. The best angle is 118 degrees. Look at the old tip and copy it. Make sure both sides are the same length for a straight hole.
Is it safe to hold the grinder in my hand?
No, do not hold the angle grinder in your hand. Clamp it in a vise. You need two hands to hold the bit. This keeps you safe. It helps you get the best sharp edge.