I still remember the first time I had to cut a piece of thick steel angle iron. I stood in my garage, holding my DeWalt DWE402 angle grinder. My palms were sweaty. It wasn’t hot outside; I was just nervous.
The tool is loud. It spins at 11,000 RPM. And when it touches metal, it throws a stream of hot sparks. It can feel intimidating.
If you feel a bit scared, that is actually good. Fear keeps you safe. It makes you respect the tool. But you don’t want to be too scared to do the job.

I have made a lot of mistakes over the years. I have broken discs. I have had the tool kick back at me. I want to save you from those scary moments.
Here is exactly how I cut steel now. This method keeps my nerves calm and my cuts straight.
The Problem: Why Cutting Steel Feels Risky
The main issue isn’t the steel itself. The issue is how the tool reacts to the steel.
When I started, I didn’t understand the physics. I would just dive in. I pushed too hard. I let the metal wobble.
Here is the reality: If the spinning disc gets pinched by the metal, it stops instantly. But the motor wants to keep going. That energy has to go somewhere. So, the whole tool jerks violently. This is called “kickback.”
It happens fast. You cannot react in time. The only way to win is to stop it from happening in the first place.
The Solution Part 1: The Right Gear
You cannot just grab any disc and start cutting. I learned this the hard way.
The Grinder
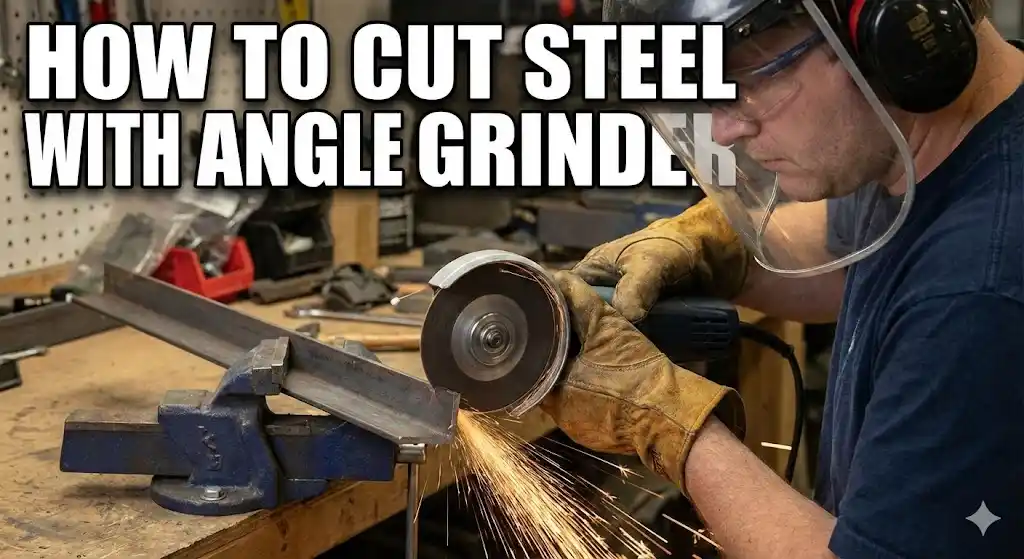
I use a 4.5-inch angle grinder. My DeWalt DWE402 is a workhorse. It has a paddle switch. I like the paddle switch because if I drop the tool, it turns off. That is a big safety feature for me.
The Disc (Crucial!)
You must use a Cut-Off Wheel.
Do not use a Grinding Wheel.
- Cut-Off Wheels are very thin. They are usually about 1/16 of an inch thick (or 1mm). They slice through metal like a knife.
- Grinding Wheels are thick (1/4 inch). They are for smoothing welds, not cutting. If you try to cut with one, you will generate too much heat. The cut will be messy. You will waste a lot of time.
I check the label. It must say “Type 1” (flat) or “Type 27” (depressed center) and explicitly say “Metal Cutting.”
The Safety Gear (PPE)
I never skip this. Ever.
- Face Shield: Safety glasses are not enough. Sparks bounce. I have had hot metal bounce off my chest and fly up under my glasses. Now, I wear a full clear face shield over my glasses.
- Ear Plugs: The sound of grinding steel is high-pitched and damaging.
- Gloves: I wear leather gloves. Synthetic gloves can melt into your skin if they get hot. Leather just gets hard.
- No Loose Clothes: I tuck in my shirt. I tie back long hair. You do not want the grinder to grab your clothes.
The Solution Part 2: Setting Up the Work
This is where 90% of mistakes happen.
The “Bridge” Mistake
Imagine you put a piece of steel across two saw horses. You start cutting in the middle.
As you cut deep, the steel gets weak. Gravity pulls it down. The cut closes up like a mouth.
It bites the disc. The disc shatters or kicks back.
The Fix:
I always let the “waste” piece fall freely.
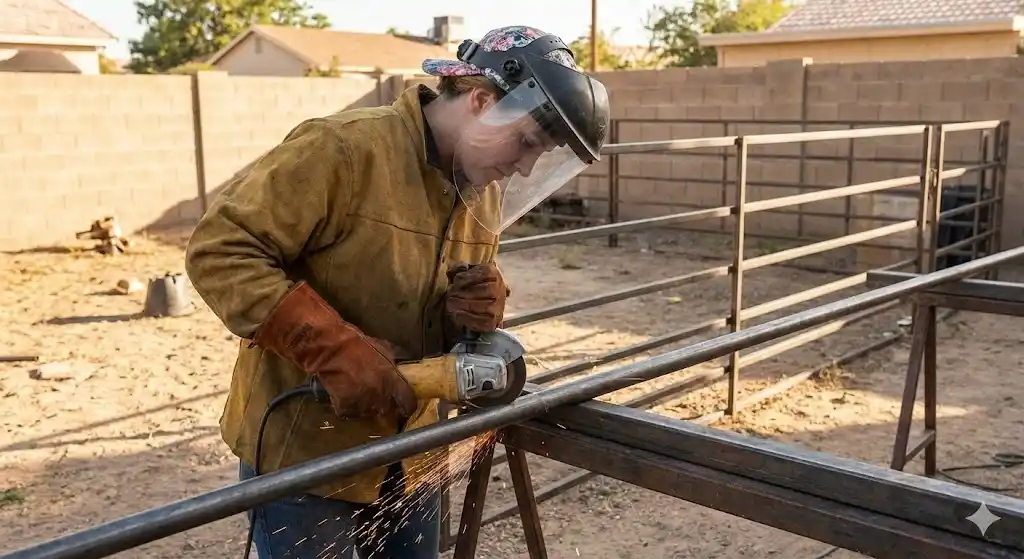
I clamp the main piece to my workbench. I let the piece I am cutting off hang over the edge.
When the cut is done, the waste piece falls down. The cut opens up instead of closing. This is much safer.
Securing the Metal
I use a heavy vise or C-clamps. I never hold the metal with my hand.
Why? Because I need both hands on the grinder.
Two hands give me control. One hand is just asking for trouble.
The Solution Part 3: Making the Cut
Here is my step-by-step process.
1. Mark the Line
I use a fine-tip marker or a scribe. A thin line helps me aim.
If I am cutting a square tube, I use a speed square to mark all four sides. This helps me keep the cut straight.
2. Body Position
I stand with my feet shoulder-width apart. I feel stable.
I do not stand directly behind the wheel. If the wheel explodes (it happens), the pieces fly in the line of rotation.
I step slightly to the side. I keep my head out of the “line of fire.”
3. Spark Direction
This is a hot topic.
Some people want sparks to fly away from them.
I prefer sparks to fly towards me (but past my legs).
Why?
If the tool catches, it will pull away from me.
If I have sparks flying away (forward), and the tool catches, it might kick back into my face.
I wear a leather apron so the sparks don’t burn my pants.
4. The Start
I grip the DeWalt firmly.
I turn it on.
I wait.
I let the motor reach full speed. It has a specific whine when it is ready.
Only then do I touch the metal.
5. The Motion
I lower the disc gently. I do not slam it.
I let the weight of the tool do the work. I apply very little pressure.
I see the sparks fly. I smell the ozone and hot metal. It is a distinct shop smell.
Technique Tip:
I don’t just hold it in one spot. I move the grinder back and forth a tiny bit.
It’s like sawing.
This clears the metal dust out of the cut. It keeps the heat down.
If I push too hard, the motor sound changes. It gets deeper. That means “ease up!”
6. The Finish
As I get to the bottom of the cut, the sound changes again.
I know the piece is about to drop.
I stop pushing. I hold the tool steady.
The waste piece falls with a clang.
I lift the grinder up.
Crucial: I wait for the wheel to stop spinning completely before I put it down.
Common Mistakes and How to Avoid Them
I put together this table to help you spot errors I see all the time.
| The Issue | Why It Happens | How I Fix It |
| Disc Shatters | The tool was twisted or the disc was old. | I keep the tool straight in the cut. I check discs for cracks. |
| Kickback | The cut pinched the blade. | I ensure the waste piece can fall away freely. |
| Slow Cutting | Using a thick grinding wheel. | I switch to a thin 1/16″ cut-off wheel. |
| Blue/Black Metal | Pushing too hard (Overheating). | I lighten my pressure and keep the tool moving. |
| Wandering Cut | Looking at the wheel, not the line. | I watch the leading edge of the cut line. |
After the Cut: Cleaning Up
When you finish, the edge will be razor sharp. It will have “burrs”—nasty little jagged bits of steel.
Do not touch it with your bare hand. You will get cut.
I take the cut-off wheel off.
I put on a Flap Disc.
A flap disc is like sandpaper layers on a wheel. It is much gentler.
I run the flap disc lightly over the cut edge.
It takes about 10 seconds.
It makes the steel smooth and safe to handle.
Troubleshooting: What If It Goes Wrong?
“The disc is stuck!”
If the disc binds and stops, release the trigger immediately.
Do not try to pull it out while the motor is humming.
Unplug the tool. Then wiggle the disc out.
Check your clamps. The metal probably shifted.
“I can’t see my line!”
Sparks cover everything with gray dust.
I stop. I wipe the dust away.
Sometimes I use a piece of tape instead of a marker. Tape is easier to see through the sparks.
Final Thoughts: How to Cut Steel With an Angle Grinder
Cutting steel with an angle grinder is a powerful skill. It opens up so many projects. You can build tables, fix fences, or make custom brackets.
My DeWalt is one of the most used tools in my shop. But I respect it every time I pick it up.
Take your time.
Check your gear.
Listen to the tool.
If you rush, you get hurt. If you focus, you get a clean cut.