It was a warm day in my Florida shop. I was making a wood chest for my niece. The smell of fresh pine filled the air. I reached for my Craftsman table saw. I flipped the big red power switch.
Nothing happened at all. I heard no hum. I heard no click. It was just dead silence in the room. I felt a knot in my gut.
I needed to finish this wood box today. But I had a dead tool on my hands. I test tools for a living. So, I knew I could fix it. Let me show you how to find the fix.
Why Do Table Saws Stop Working Fast?
Shop tools take a lot of hard use. We push big, thick wood through them all day. Saw dust gets in every small crack. It coats every gear and wire. Soon, parts wear down and break.
Sometimes the fix takes just a few seconds. Other times, you have to dig deep inside. I put down my wood piece right away. I grabbed my basic hand tools. I started checking the saw step by step.
Check the Quick Simple Fixes First
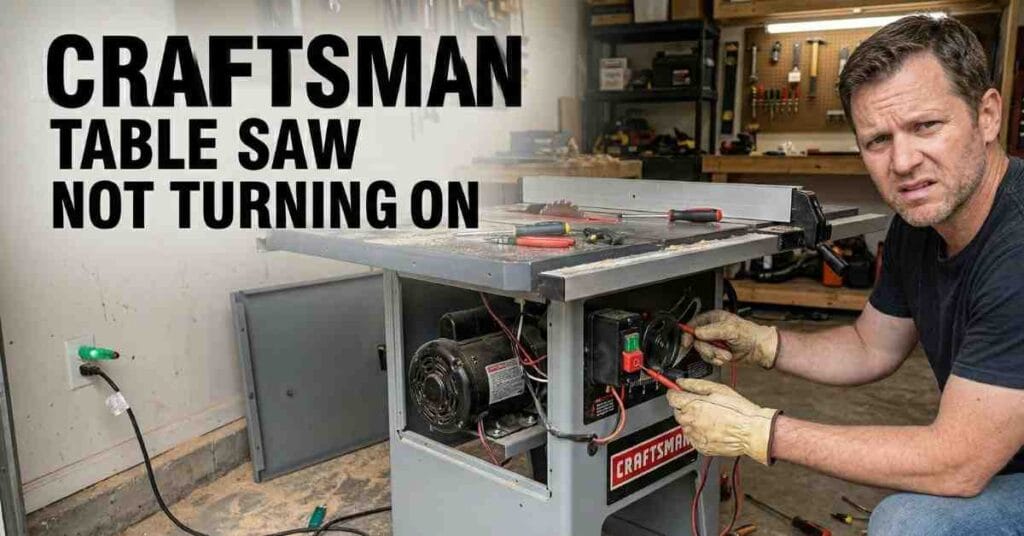
I always check the fast things first. This smart move saves a lot of time. It saves you a big headache, too. Do not take the motor apart right away. Look at the basic power path first.
Test the Power Cord and Wall Plug
First, I went straight to the wall plug. I plugged in a bright shop light. The bulb lit up the room fast. This told me the wall plug was good. Power was in the wall.
Next, I checked the long saw cord. I ran my hands down the thick black wire. I looked for bad cuts or bends. A bad cord stops power to the tool. My cord looked great to me.
Reset the Overload Safety Button
Tool motors get very hot when they work. Craftsman saws have a nice safety part. It is a thermal reset switch. It pops out to save the hot motor. This keeps the tool from burning up.
I felt the back of the metal motor case. I looked for a small black button there. I pushed it deep in with my thumb. I did not hear a click sound. The motor was not too hot.
Look Inside the Main Power Switch
Tool switches fail a whole lot. Fine wood dust is the bad guy here. It gets deep inside the plastic switch box. It covers the small metal parts inside. Then, power can not flow through them.
I used my screw driver right away. I took the front switch box off. A big pile of dust fell on the floor. I blew it clean with fast air. Now, I needed to check the wires.
Use a Meter to Check Wire Flow
I grabbed my trusty test meter. I set it to the beep sound mode. This mode checks if power can flow. I put the probes on the switch tabs. I flipped the saw switch to ON.
I heard a very loud beep sound. This meant the switch was quite good. If I heard no beep, the switch was dead. A dead switch is a cheap part to buy. You just swap it out fast.
Find Deep Motor Fixes and Faults
The power plug was fine. The small reset button was fine. The main switch was fine too. I had to look at the big motor next. This part takes a bit more slow work.
Do not worry too much about this part. You can do this with simple shop tools. Just take your time with it. Take phone photos as you work. The photos show where all wires go later.
Check the Small Carbon Brushes
Many small saws use basic motors. These motors have small blocks called brushes. They send power to the spinning parts. Soon, these carbon blocks wear down flat. Then the saw will just not run.
I took off the black motor caps. I pulled out the springs and old blocks. They were still quite long and thick. They looked just fine to me. I put them back in very tight.
Look at the Motor Start Capacitor
Big shop saws have a start capacitor. Think of it like a quick battery jump. It gives the motor a strong kick to spin. If this part dies, the saw just hums loud. Sometimes it stays dead quiet.
I took off the side motor cover. I looked at the black round tube part. It looked fat and bad on one end. A fat tube means it is dead. It has blown up deep inside.
Common Parts That Break on Saws
Here is a good chart for you. I made this list from my shop notes. It shows what breaks the most on saws. It tells you what signs to look for. This chart makes your next fix fast.
| Bad Part Name | Break Chance | Main Bad Sign | How to Fix It Fast |
| Main Switch | Very High | Tool is dead silent | Clean dust or change part |
| Reset Button | High | Pops out on hard cut | Let cool and push in |
| Small Brushes | Fair | Sparks fly, tool stops | Put in new carbon blocks |
| Start Capacitor | Low | Loud hum, no blade spin | Swap out the dead tube |
| Wall Plug Cord | Low | Power cuts in and out | Fix the cut wire spot |
My Simple Motor Part Fix Steps
I knew my start part was dead. It looked like a burnt soda can. I had to change it right then. Here is what I did to fix it fast. It was a very easy shop job.
You just need a standard screw driver. You also need the new correct part. This took me ten minutes total. You can do this job yourself. Just stay safe and go slow.
Remove the Old Bad Part Safely
First, I unplugged the tool from the wall. This is the main step to stay safe. These parts hold a big shock charge inside. They can hurt you if left plugged in. I took an old hand tool.
I touched the metal tool across both part tabs. I saw a very small blue spark flash. Now the part was safe to hold bare handed. I pulled the old wires off fast. The bad part was out.
Put in the Brand New Motor Part
I read the numbers on the dead tube. I went on the web and bought a match. The new part came in two short days. I slid the new tube in the steel band. It fit in very snug.
I pushed the two wire clips back on. They slid right on tight and secure. I put the steel side cover back in place. I turned the two small screws tight. The fix was all done now.
The Best Part is the Test Spin
It was time to test my shop work. I plugged the thick cord in the wall. I took a very deep, slow breath. I hit the big red power switch hard. The saw roared to life at once.
The sharp steel blade spun fast and smooth. I smiled big in my empty shop. It felt great to fix it by myself. I grabbed my clear eye safety gear. I went back to cutting nice wood.
Read More: Ryobi Miter Saw Brake Stopped Working
Tips to Keep Your Saw Running Great
You can stop tool faults before they start. Good care goes a long way in your shop. Let me share a few easy tips here. These tips keep your gear running long. They save you time and cash.
Keep Your Shop Tools Very Clean
Wood dust ruins great tools very fast. Use an air hose a whole lot. Blow out the switch box every single month. Blow dust out of the motor air vents too. This keeps the big motor quite cool.
Cool air stops the parts from burning up. It stops the switches from getting stuck open. Clean tools are safe tools for you. Dust is your worst foe in the shop. Keep things clean to work well.
Do Not Push Your Wood Too Hard
Let the sharp saw blade do the hard work. Do not shove thick wood through the tool fast. Pushing too hard makes the big motor run hot. It pops the small safety breaker fast. It can melt the tool wires.
Feed the wood nice and slow and straight. Listen to the loud motor noise closely. If the sound drops, slow your hands down. Let the tool catch back up to speed. This saves the internal motor parts.
My Last Thoughts on Tool Repair Work
Fixing a broken saw feels so very good. It keeps cash right in your pocket. It teaches you how fine parts work together. My Craftsman table saw is old and gray. But it cuts true for me every time.
A bad switch is not the end of the world. Take your time to check each small step. Unplug the big machine from the wall first. Follow the clear test steps I showed you. You can fix your saw easily.