Can I Use a Heat Gun on Resin? My Honest Experience and What You Should Know
The first time I worked with resin, I had so many questions. One of the biggest was: Can I use a heat gun on resin? I read many blogs and watched videos, but the advice was often confusing. So I decided to try it myself. Over the years, I have made jewelry, art panels, coasters, and even small tabletops with resin. I want to share what I learned—what worked, what didn’t, and what I wish I knew from the start.
Why People Use Heat Guns On Resin
When I poured my first resin piece, I was surprised by all the tiny bubbles trapped inside. These bubbles can ruin a clear finish and make the final piece look cloudy. That’s when I learned why many people use a heat gun on resin:
- To remove air bubbles after pouring
- To help resin flow smoothly over surfaces
- To create special effects (like waves or marble patterns)
- To speed up the curing process (sometimes)
I soon realized that using a heat gun is almost standard in resin art. But there’s a right way and a wrong way to do it.
How A Heat Gun Works With Resin
A heat gun blows hot air over the resin surface. The heat makes bubbles rise and pop. It also thins the resin a little, which helps it self-level and spread out evenly. Unlike a hairdryer, a heat gun produces higher heat but less wind, so it doesn’t blow the resin around too much.
I found that a heat gun is especially good for large pieces. For small jewelry molds, sometimes a simple flame (like a lighter or torch) works better. But for bigger art panels, a heat gun is my go-to tool.
Step-by-step: Using A Heat Gun On Resin
I want to walk you through how I use a heat gun with resin projects. These steps come from trial and error, and they help me avoid problems.
- Pour the resin into your mold or onto your surface. Try to pour slowly to reduce bubbles.
- Wait 2-3 minutes for most bubbles to rise to the top.
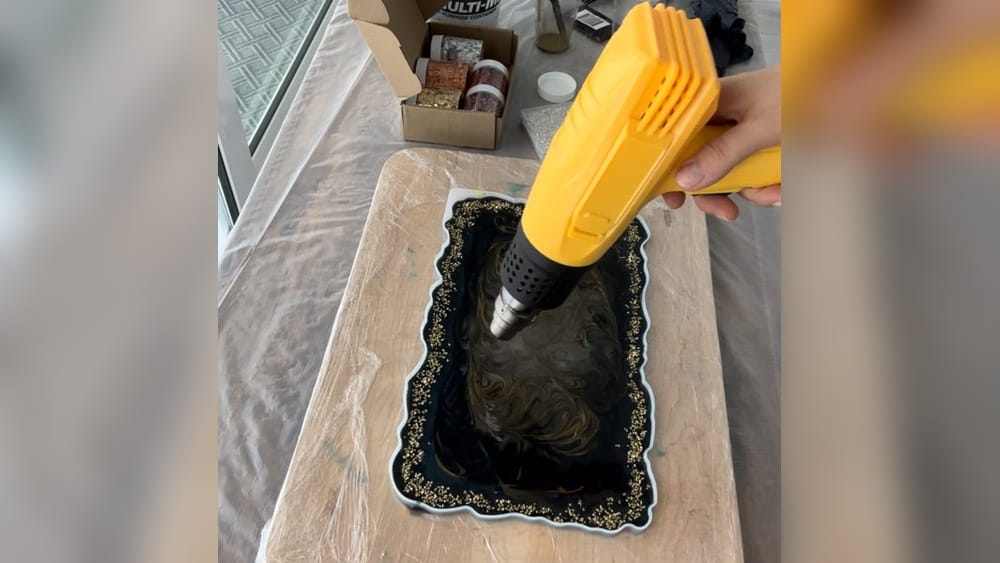
- Turn on the heat gun to a low or medium setting. (High can burn or scorch the resin.)
- Hold the gun 4-6 inches above the resin. Move it quickly in circles or sweeping lines. Don’t stay in one spot for more than 1–2 seconds.
- Watch the bubbles pop! The surface becomes clearer almost instantly.
- Repeat if needed after 5–10 minutes. Sometimes more bubbles appear as the resin settles.
If you use colorants or powders, the heat gun can also help blend and swirl them. But don’t overdo it—too much heat can cause ripples or dents.
Comparing Heat Gun Vs. Other Tools
I tried several tools for popping bubbles in resin. Here’s a quick comparison:
| Tool | Effectiveness | Risk Level | Best Use |
|---|---|---|---|
| Heat Gun | Very Good | Medium | Large surfaces, art panels |
| Butane Torch | Excellent | High (can burn resin) | Small to medium pieces |
| Hair Dryer | Poor | Low | Rarely used, may blow resin |
| Straw (blowing air) | Fair | Low | Small bubbles, tiny molds |
From my experience, a heat gun is the safest and most flexible for most resin art. But it’s not the only option.
Heat Gun Settings: Temperature And Speed
Not all heat guns are the same. I made mistakes with temperature settings in the beginning. Here’s what I learned:
- Low (100°C–150°C / 210°F–300°F): Good for thin layers and delicate molds.
- Medium (150°C–300°C / 300°F–570°F): Good for bigger, thicker pieces.
- High (above 300°C / 570°F): Too risky! Can scorch or yellow the resin.
I always start with the lowest setting and increase only if needed. Remember, resin is sensitive to heat, so slow and gentle is best.
Common Mistakes And How To Avoid Them
I made plenty of mistakes when I started. Here are the most common ones, and how you can avoid them:
1. Holding The Gun Too Close
This can burn the resin, causing yellow spots or dimples. Always keep a distance of at least 4 inches.
2. Overheating One Spot
If you keep the gun in one place, you can warp the resin or the mold. Move in smooth, quick motions.
3. Using High Heat On Colored Resin
Too much heat can make colors blend into mud or create unwanted waves.
4. Blowing Dust Onto The Resin
If your workspace is dusty, the air from the gun can blow particles into your piece. Clean your area well before starting.
5. Touching Hot Resin
Resin can get soft and sticky when heated. Let it cool before touching or moving the piece.
Safety Tips When Using A Heat Gun On Resin
Safety is important. I learned to respect both the heat gun and the resin chemicals. Here’s what I do every time:
- Wear nitrile gloves to protect my skin from sticky resin.
- Work in a well-ventilated room or use a mask, as resin fumes can be harmful.
- Keep a fire extinguisher nearby. Some resins can catch fire if overheated.
- Never leave the heat gun turned on and unattended.
- Place your piece on a heat-resistant surface (like a silicone mat).
One thing I discovered: sometimes the heat gun tip gets very hot. I once burned my hand by accident. Always let it cool down before putting it away.
When You Should Not Use A Heat Gun On Resin
There are times when using a heat gun is not a good idea. I learned these lessons the hard way:
- If your mold is made of thin plastic, the heat can warp or melt it.
- Some resins, especially UV resin or quick-set types, don’t respond well to heat and can cure too fast or bubble.
- If your project has delicate details or small parts, the airflow can disturb them.
- If you have glitter or lightweight powders on top, the air can blow them away.
In these cases, I use a butane torch (carefully) or let the bubbles settle on their own.

Heat Gun Vs. Torch: Which Is Better For Resin?
Many people ask me if a torch or heat gun is better for resin. Here’s what I found:
| Feature | Heat Gun | Torch |
|---|---|---|
| Control | High | Medium |
| Heat Output | Moderate | Very High |
| Safety | Safer (no open flame) | Risky (open flame) |
| Surface Area | Large pieces | Small areas |
| Burn/Scorch Risk | Lower | Higher |
I use a heat gun for most projects. For tiny molds or details, a torch sometimes works better but requires a very steady hand.
Extra Tips For Best Results
These are small things that made a big difference for me:
- Warm the resin bottles before mixing. Place them in warm (not hot) water. This makes the resin thinner and reduces bubbles from the start.
- Don’t over-mix. Mixing too fast adds more bubbles. Stir slowly for 2–3 minutes.
- Let the resin sit after mixing for 2–5 minutes. Many bubbles rise on their own.
- Use multiple passes with the heat gun. One quick pass, let it rest, then another if needed.
- Check from different angles. Sometimes bubbles are hard to see in certain lights.
Real-life Example: My Resin Coaster Disaster
I once tried to make a set of resin coasters with dried flowers inside. I used a heat gun, but I got too close and melted the edge of the mold. The flower petals also shifted because the air was too strong.
I learned that for delicate work, a torch or even a toothpick is better for popping bubbles.
The lesson: not every project needs a heat gun. Choose your tool based on the size, shape, and details of your piece.
Frequently Asked Questions
What’s The Difference Between A Heat Gun And A Torch For Resin?
A heat gun blows hot air, while a torch uses a direct flame. Heat guns are safer for large surfaces and have less risk of burning the resin. Torches work well for small pieces but can scorch or even ignite resin if used carelessly.
Can I Use A Hair Dryer Instead Of A Heat Gun On Resin?
A hair dryer is usually not hot enough and produces too much wind. This can blow dust into your resin and push the resin around. I tried it once, and it made a mess. Heat guns are much better for this purpose.
Will A Heat Gun Speed Up Resin Curing?
A heat gun can make the surface cure a little faster, but it’s not designed for this. Too much heat can cause uneven curing or cracks. It’s better to let the resin cure at room temperature as the instructions say.
Is It Safe To Use A Heat Gun On Resin Indoors?
It’s safe if you follow basic rules: work in a well-ventilated space, wear gloves and a mask, and never leave the heat gun unattended. Make sure your workspace is clean to avoid blowing dust into your project.
What Kind Of Heat Gun Should I Buy For Resin Art?
Look for a heat gun with adjustable temperature and a low fan setting. This gives you more control. I use a simple model from a hardware store, and it works great for all my resin art.
If you want more technical details about how heat guns work, you can find helpful info at Wikipedia.
Using a heat gun on resin can make your projects much smoother and more professional. It took me some practice to get it right, but now I can’t imagine working without it. Just start slow, be safe, and don’t worry if things go wrong at first—every mistake is a lesson for next time.