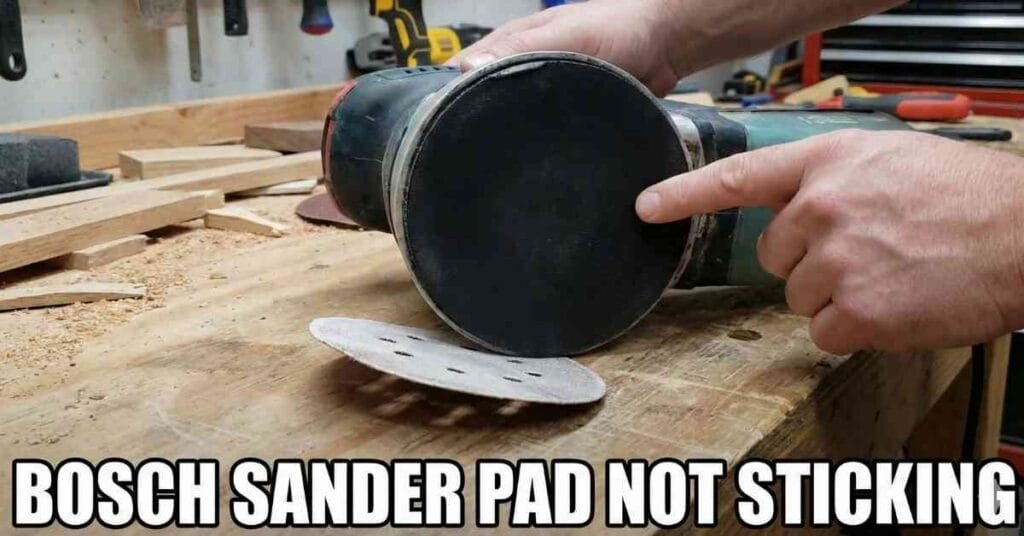
It was a sunny Tuesday in my garage when my project hit a wall. I was smoothing out a tabletop for a friend, feeling good about the progress. The radio was playing, and sawdust was in the air. Then, out of nowhere, my sander made a strange zip sound.
The sanding disc flew off the bottom of the tool and shot across the room. It landed in a pile of wood shavings near the door. I stared at it for a moment, confused and annoyed. I picked it up, dusted it off, and slapped it back on.

I turned the power on, ready to get back to work. But two seconds later, it happened again. The disc would not stay on. It was like the grip had completely vanished. If you are reading this, you know exactly how frustrating this moment feels.
My Bosch sander is my favorite tool, but that day it let me down. I had to stop everything to figure out why the pads were not sticking. I learned a lot about how these tools work and how to fix them. Here is exactly what I found and how I solved it.
The Real Reason Your Pad Won’t Stick
My first thought was that I had bought bad sandpaper. I was using a bulk pack I ordered online to save a few dollars. I assumed the fabric on the back was just cheap and weak.
So, I drove to the hardware store and bought a premium brand. I spent three times as much money, thinking this would solve the issue. I got back to the shop and put the new disc on. It flew off in less than a minute.
That is when I realized the problem was not the paper at all. The problem was the actual “hook and loop” system on the sander itself. It is the same technology as Velcro, but it works hard.
The rubber pad on the bottom of your sander is covered in tiny plastic hooks. These hooks grab the fuzzy loops on the back of the sandpaper. It is a simple mechanical bond that holds everything in place.
But sanding creates a lot of friction, and friction creates heat. Over time, that heat builds up between the paper and the rubber pad. The tiny plastic hooks get too hot and start to melt.
When they melt, they bend over and flatten out. Instead of sharp hooks, they become smooth little bumps. Bumps cannot grab the loops on the paper, so the disc just falls off.
The Simple “Thumb Test”
You can check if this is your problem in about ten seconds. You do not need any special tools for this test. Just unplug your sander and flip it over so the bottom is facing you.
Take your thumb and rub it across the black sanding pad. Move your thumb back and forth over the surface. You need to pay attention to how it feels on your skin.
On a new pad, the surface feels rough and scratchy. It should feel like a cat’s tongue or a stiff beard. It should catch on your fingerprint ridges a little bit.
When I tested mine, it felt completely smooth. It felt like rubbing a worn-out tire. The hooks were totally gone. I had sanded them down to nothing without even realizing it.
Why Glue Is Not The Answer
I have to admit something embarrassing. When my project stalled, I tried to cheat. I was desperate to finish, so I grabbed a can of spray adhesive.
I sprayed the glue on the back of the sandpaper and stuck it to the pad. It seemed to work for a few minutes. But as soon as the sander got hot, the glue turned into a slimy mess.
The paper slid off anyway, leaving a sticky residue all over the tool. It took me an hour to clean it off with harsh chemicals. It was a waste of time and made things worse.
Please learn from my mistake and do not use glue or tape. The backing pad is a replaceable part, just like tires on a car. When it wears out, you have to swap it out for a new one.
Finding The Right Replacement Part
I went inside to find a new backing pad online. This part can be tricky because Bosch makes many different models. Some have three screws, while others have four.
I looked at the label on the side of my sander to get the model number. Mine was the ROS20VSC, which is a very common five-inch random orbit sander.
I searched for “Bosch ROS20VSC replacement backing pad.” I found two options: a generic knock-off for ten dollars and the official Bosch part for twenty.
I read the reviews for the cheaper one. People said the rubber was too hard and the hooks were weak. They said it vibrated too much and made their hands numb.
I decided to spend the extra money on the official part. I wanted my tool to feel like new again. I did not want to be fixing this again next month.
Diagnosing Your Sanding Issue
I created this simple table to help you figure out exactly what is wrong. It breaks down the symptoms so you can fix the right thing.
Why Your Sander Is Failing
| What You See | What It Means | How To Fix It |
| Pad feels smooth | Heat melted the hooks | Replace the backing pad |
| Pad is white/dusty | Sawdust is clogging hooks | Clean with a stiff brush |
| Paper back is fuzzy | Cheap sandpaper quality | Buy better sanding discs |
| Pad edges are torn | You hit a wall or corner | Replace the backing pad |
| Paper falls instantly | Wrong type of disc | Check for “Hook and Loop” |
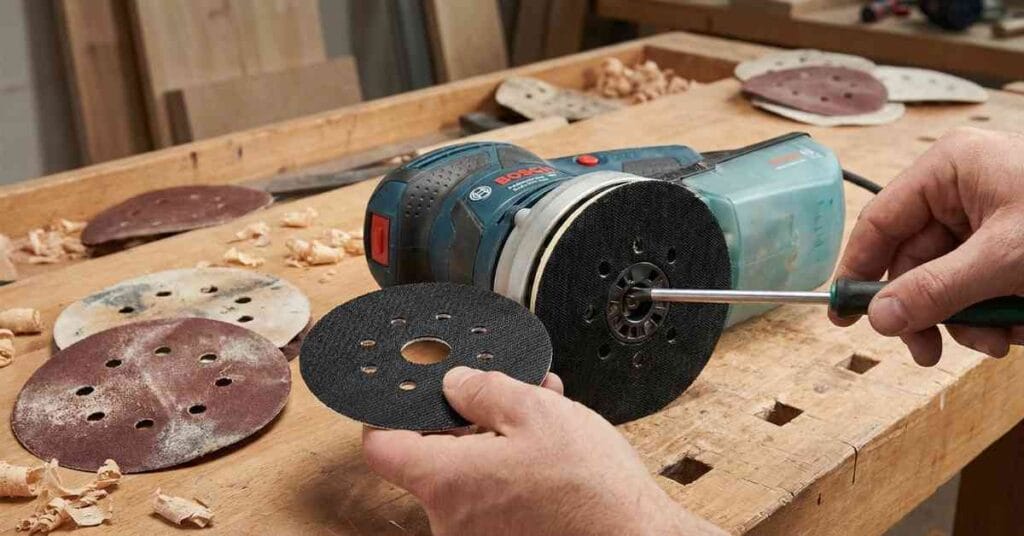
How To Replace The Pad
The new part arrived in two days. It came in a small box and looked fresh and black. The hooks felt sharp and scratchy, just like they should.
Replacing the pad was easier than I expected. But you do have to be careful not to strip the screws. I cleared off my workbench and got my tools ready.
First, I used my air compressor to blow all the dust out of the screw holes. If you try to turn a screw that is packed with sawdust, the driver can slip and ruin the head.
My model has four screws holding the pad on. They are deep inside the rubber holes. I needed a specific Torx driver to get them out. Mine was a T-20 size.
I turned the screws slowly and firmly. They had some thread-locker glue on them from the factory, so they were tight. I kept the pressure down to ensure the tool did not slip.
Once the screws were out, the old pad just fell off. I wiped the dust off the metal fan underneath. Then I lined up the holes on the new pad and screwed it back on.
The Moment of Truth
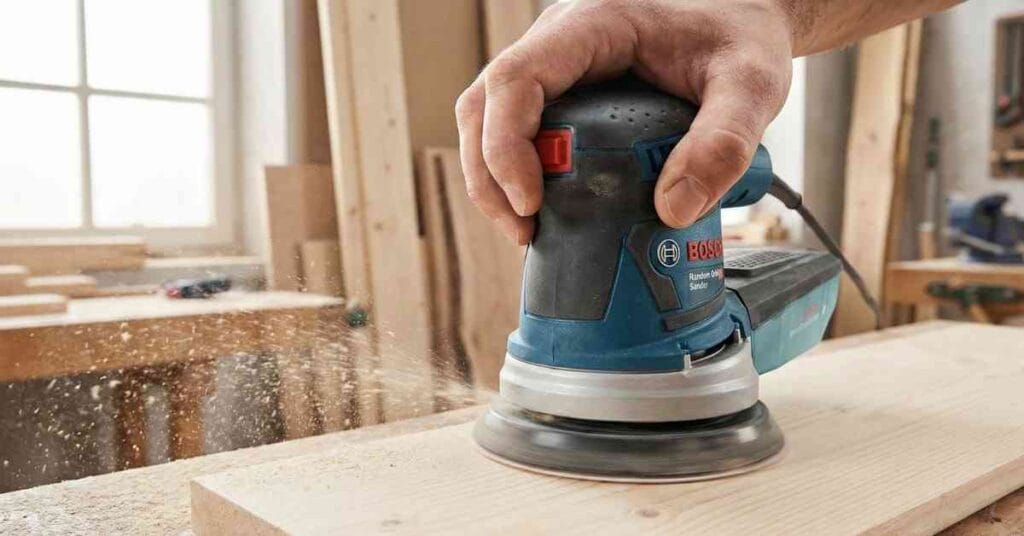
I went back to the garage with my fixed sander. The dining table leg was still waiting for me. I was a little nervous to test it out.
I took a fresh sanding disc and pressed it onto the new pad. It made a loud crunching sound as the hooks grabbed the loops. It felt very secure.
I tried to peel the paper off with my fingers. It resisted hard. I had to pull with some force to get it to lift. That was a good sign.
I turned the sander on and touched it to the wood. The paper stayed perfectly still. It did not wobble or slide. It just sanded the wood smoothly.
I finished the table that afternoon. It felt great to have my tool working properly again. It was worth every penny and every minute of effort.
How To Prevent This From Happening Again
I did not want to buy another twenty-dollar pad next year. So, I did some research on how to make them last longer. I learned a few key tricks.
The biggest enemy of your sanding pad is heat. And the biggest cause of heat is pressing down too hard. I used to lean on my sander to make it cut faster.
That was a bad habit. The weight of the sander is enough. You should just guide it with your hand. Pressing down creates friction that melts the hooks.
Now, I let the tool do the work. It is easier on my arms and easier on the machine. My pads stay cooler and last much longer.
The Secret Weapon: Interface Pads
I also found a cheap accessory that saves me money. It is called an “interface pad” or a “protection pad.” It is a thin piece of foam.
This foam pad has loops on one side and hooks on the other. You stick it between your sander and the sandpaper. It acts like a shield for your tool.
If heat builds up, it melts the hooks on the cheap foam pad, not your expensive Bosch pad. The protection pad only costs about five dollars.
I bought a pack of two and I keep one on my sander all the time. It also helps when sanding curved surfaces because the foam is soft and flexible.
Why Dust Collection Matters
Another thing that kills the grip is sawdust. When you sand, you make fine dust that gets everywhere. It packs into the tiny hooks on the pad.
If the hooks are full of dust, they cannot grab the loops. It is like trying to tie a knot while wearing thick mittens. The connection is just too weak.
I used to be lazy about hooking up my vacuum. I would just let the dust fly into the air. That was bad for my lungs and bad for my tool.
Now, I always connect my shop vac to the sander. The suction pulls the dust through the holes in the paper. It keeps the hooks clean and open.
The airflow also helps cool down the pad. Cooler pads do not melt. So, the vacuum actually helps your sander last longer.
Choosing Better Sandpaper
I also learned that not all sandpaper is created equal. Cheap paper often has cheap loops on the back. They look like fuzzy cotton.
After a few minutes of sanding, those cheap loops turn into a fuzz ball. They lose their shape and cannot hold onto the hooks.
Quality sandpaper uses strong, synthetic loops. They hold their shape even when they get warm. They grip the hooks firmly until the grit is worn out.
I did a test with a cheap disc and a quality one. The cheap one fell off in five minutes. The quality one stayed on for the whole job.
Spending a few extra cents on a disc saves you dollars on backing pads. It is a smart investment for anyone who does woodwork.
When To replace The Whole Tool
Sometimes, a new pad is not enough. I have an old sander in the corner that I retired years ago. It vibrates like crazy and smells like burning plastic.
If your sander is making grinding noises, the bearings might be shot. If it sparks when you run it, the motor is dying.
In those cases, a new pad will not fix the problem. You might need to buy a whole new tool. But if your Bosch runs smooth and just drops paper, fix it.
A new backing pad is a simple repair. It keeps a good tool out of the landfill. It saves you money. And it gets you back to building.
My Final Thoughts
It feels good to fix things yourself. We live in a world where we throw everything away too easily. But a good tool is worth saving.
My Bosch sander is five years old now. It looks beat up. It has paint splatters and scratches all over it. But it runs perfectly.
If your sander pads are not sticking, do not get mad. Do not throw the tool across the room. Just take a deep breath and check the hooks.
Do the thumb test. Order the part. It is a five-minute fix that will save your sanity.
Take it from me. I learned the hard way so you do not have to. Get back in the shop. Fix your tool. Make something beautiful.
Just remember one thing for next time. Stop pressing so hard. Let the sander do the work. Your backing pad will thank you for it.
FAQs – Bosch Sander Pads Not Sticking
Why won’t my sandpaper stick to my Bosch sander?
Your backing pad hooks likely melted from heat, so they cannot grab the paper. Rub the pad with your thumb; if it feels smooth, you must replace the Bosch part.
How do I stop my sanding pad from melting?
Avoid pressing down hard and let the sander’s weight do the work for you. Using a shop vac also pulls hot dust away, which keeps your Bosch pad cool and safe.
Can I use spray glue to fix my sanding pad?
No, glue creates a sticky mess that will melt once the tool heats up. It is cleaner and safer to just remove the old screws and replace the worn backing pad.
What is a protection pad for a sander?
This is a soft foam layer that sits between your sander and the sandpaper. It takes the heat and wear, which saves your expensive Bosch backing pad from damage.
Does sawdust make the sanding disc fall off?
Yes, fine sawdust packs into the hooks and stops them from gripping the paper loops. Use a stiff brush to clean the pad or run a vacuum to keep the dust out.