Keeping garden tools clean was something I ignored for years. At first, I didn’t see the point. After all, I thought, a bit of dirt never hurt a shovel. But over time, I learned my mistake the hard way. Rusty pruners, dull hoes, and even plant diseases spread from tool to tool.
Cleaning garden tools has now become a habit for me—a simple task that saves money, time, and even my plants’ health. Today, I’ll walk you through everything I know about how to clean garden tools. I’ll share what worked, what didn’t, and a few tricks I wish I’d known sooner.
Why Clean Garden Tools?
When I first started gardening, I had no idea dirty tools could cause so many problems. My shovel would get caked with soil, my pruners sticky with sap, and I just tossed them in the shed at the end of the day. After a few weeks, things started going wrong. My tomato plants got sick. My tools became hard to use. I finally understood: clean tools matter.
Dirty tools can:
- Spread fungus and bacteria from plant to plant
- Cause rust and dullness, making tools harder to use
- Shorten a tool’s lifespan
- Attract pests and insects to your shed
Once I made cleaning tools a routine, my garden was healthier, and my tools lasted much longer.
The Main Enemies Of Garden Tools
Let’s talk about what harms garden tools. Knowing this helped me focus on what to remove during cleaning.
- Soil: Sticks to metal, holds moisture, causes rust.
- Sap: Sticky, hardens over time, can jam moving parts.
- Plant debris: Seeds, leaves, and roots get stuck in joints and blades.
- Rust: Eats away at metal, makes tools weak and rough.
- Diseases: Fungi, bacteria, and viruses stick to blades, then spread to new plants.
When you see a dirty shovel or sticky pruners, remember: you’re not just dealing with dirt. You might be spreading problems to the next plant you touch.
Essential Supplies For Cleaning Garden Tools
Over the years, I’ve tried fancy products and simple home items. Here’s what I keep in my cleaning kit now:
- A stiff brush (an old dish brush works)
- A bucket or hose for water
- Mild dish soap
- Steel wool or sandpaper (for rust)
- Rags or old towels
- Rubbing alcohol or a bleach solution (for disinfecting)
- WD-40 or light machine oil (for protecting metal)
- A flat file or sharpening stone (for edges)
- Rubber gloves (if you have sensitive skin)
I keep most of these in a small box by my shed. That way, I don’t have an excuse not to clean up after I garden.
Step-by-step: How I Clean My Garden Tools
I used to think cleaning tools would take ages. But with the right routine, it’s quick and easy. Here’s my step-by-step process for most tools.
1. Knock Off Loose Dirt
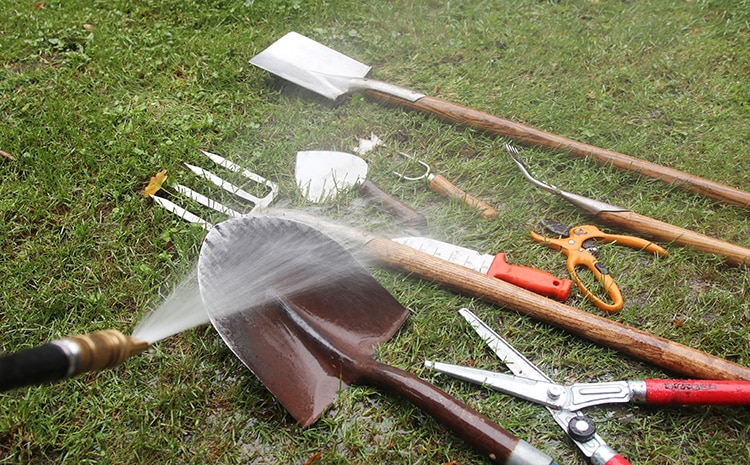
Right after I finish gardening, I tap tools together or against the ground. This gets rid of most of the loose dirt.
2. Wash With Soap And Water
I fill a bucket with water and add a squirt of dish soap. I dip tools in and use my brush to scrub away soil and sap. For long-handled tools, I use a hose and scrub the metal parts.
If sap is really stubborn (like on pruners), I sometimes use a bit of vegetable oil to loosen it first.
3. Remove Rust
If I see rust spots, I use steel wool or sandpaper to rub them away. For heavy rust, I might soak the metal part in a vinegar solution for a few hours first. This softens the rust, making it easier to scrub off.
4. Rinse And Dry
I rinse tools with clean water to remove soap and dirt. The most important part is drying them well. I use a towel to wipe them dry and sometimes leave them in the sun for a bit.
Leaving tools wet is the fastest way to get rust.
5. Disinfect
This is the step I used to skip—and regretted. If I’ve pruned diseased plants, I dip the blades in a 10% bleach solution (1 part bleach to 9 parts water) for a minute. Then I rinse and dry again. For quick jobs, rubbing alcohol on a rag works too.
6. Sharpen (as Needed)
Dull tools are much harder to use. I run a flat file along the edges of my pruners or hoes, following the original angle. It only takes a few strokes if I clean tools regularly.
7. Oil Moving Parts And Metal
To prevent rust, I spray a little WD-40 or wipe on some machine oil. I also add a drop of oil to pruner pivots and moving joints. This keeps everything working smoothly.
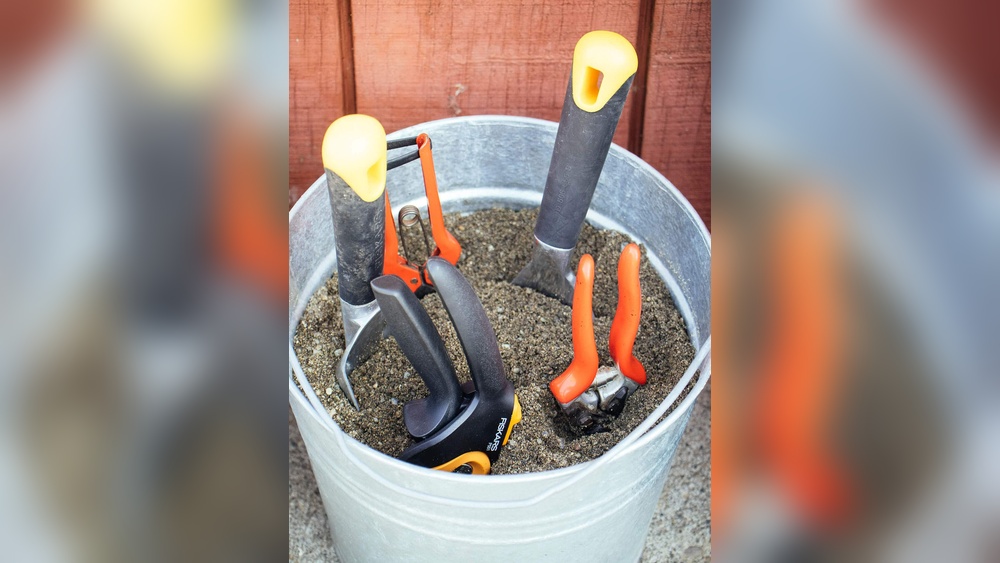
8. Store Properly
Clean, dry tools last longer if you store them right. I hang most of my tools on hooks or keep them in a dry bucket of sand mixed with oil. This old trick coats the metal and stops rust.
Special Care For Different Tools
Not every tool needs the same cleaning. Some have special parts or problems.
Pruners, Shears, And Scissors
These tools touch plant sap and disease more than most. I clean them after every use, even if I’m tired. If I cut a diseased branch, I disinfect right away. A sticky blade is hard to use and can spread trouble.
Shovels, Spades, And Hoes
These are my workhorses. They get muddy fast. A stiff brush and water do the trick. If the edge gets dull, a quick file helps. I always dry the metal and check for rust.
Rakes And Forks
The tines can trap dirt and roots. I use a hose to wash between the tines and a brush for tough bits. Wooden handles need a wipe with oil once a month to stop splinters and cracks.
Watering Cans And Sprayers
Algae and mineral deposits build up inside. I fill them with a vinegar solution (about 1 part vinegar to 3 parts water), let it sit for an hour, then rinse well. This also stops blockages in sprayer heads.
Power Tools (hedge Trimmers, Electric Shears)
I unplug these first. Then I wipe off dirt and clean the blades as above. Never get the motor area wet. A little oil on the blades and moving parts keeps them smooth.
How Often Should You Clean Garden Tools?
If you’re like me, you want to do the minimum that works. Here’s what I found works best:
- After every use: Remove soil, wipe down, dry. Disinfect if used on sick plants.
- Once a month: Deep clean, remove rust, sharpen, oil.
- End of season: Full clean, sharpen, oil, and store for winter.
Skipping these steps is tempting, but every time I did, I paid for it later.

The Real Costs Of Not Cleaning Tools
I once left my favorite pruners in the garden overnight. The next morning, they were rusty and hard to open. I tried to fix them, but they never worked the same. That mistake cost me $30 for a new pair.
Dirty tools also spread disease. One year, I pruned a tomato plant with wilt and then used the same pruners on my peppers. Both got sick. I lost half my harvest.
Here’s a quick comparison I made after a few years of gardening:
| Practice | Result | Cost Over 1 Year |
|---|---|---|
| Clean after each use | Longer tool life, healthy plants | Minimal (oil, soap) |
| Rarely clean tools | Rust, disease, dull blades | $50+ (new tools, lost crops) |
It’s clear to me now: a few minutes of cleaning is much cheaper than buying new tools or losing plants.
Best Ways To Remove Rust
Rust is the enemy of every gardener. I’ve tried everything from baking soda to commercial rust removers. Here’s what worked best for me:
- Light rust: Use steel wool or a wire brush. Scrub until shiny.
- Heavy rust: Soak in white vinegar for a few hours. The rust softens, and you can scrub it off.
- For tough spots: Make a paste with baking soda and water, apply, let sit, then scrub.
After removing rust, I always oil the tool. This stops new rust from forming.
How I Keep Tools Sharp
A sharp tool is safer and easier to use. I once tried to cut a thick stem with dull pruners and ended up hurting my wrist. Since then, I sharpen my tools every few weeks.
For pruners and shears, I use a flat file or a sharpening stone. I follow the original edge, moving the file in one direction. Three or four strokes is usually enough. For hoes and shovels, I do the same.
Here’s a quick look at how sharpness affects your work:
| Tool Sharpness | Effort Needed | Quality of Cut |
|---|---|---|
| Sharp | Low | Clean, smooth |
| Dull | High | Jagged, crushes plant |
A few minutes of sharpening makes a huge difference.
Caring For Wooden Handles
I used to ignore the wooden handles on my tools. Then one winter, my shovel handle cracked. Now, I care for wood as much as metal.
Once a month, I wipe down handles with a rag and a bit of linseed oil. This keeps the wood from drying out and splitting. If I see splinters, I sand them smooth first.
If your handles are loose, you can often tighten the metal collar with a gentle tap from a hammer.
Safe And Natural Cleaning Solutions
I get a lot of questions about using harsh chemicals. I try to keep things safe and simple. Here are my favorite natural options:
- White vinegar: Great for rust and mineral deposits
- Baking soda: Gentle scrubbing for sticky sap or residue
- Dish soap: Cuts grease and dirt without harm
- Lemon juice: Mild acid for cleaning and shining
If you use bleach to disinfect, rinse tools well. Bleach can weaken metal if left on too long.
Common Mistakes I’ve Made (and How To Avoid Them)
I’ve learned most of these lessons by making mistakes. Here are some you can skip:
- Leaving tools wet: Always dry them. Water is rust’s best friend.
- Skipping disinfection: Even if a plant looks healthy, disease can spread.
- Forgetting to oil: Dry metal rusts quickly, especially after removing rust.
- Not sharpening: Dull blades make everything harder.
- Storing in damp places: Keep tools in a dry shed or hang them up.
Sometimes, it’s the small things—like a quick wipe or a few drops of oil—that make the biggest difference.
How To Store Clean Tools
Storage matters as much as cleaning. I learned the hard way that a damp shed equals rusty tools.
Here’s what works for me:
- Hang tools on hooks to keep them off the ground.
- Store smaller tools in a bucket filled with sand and a bit of oil.
- Keep the shed dry and well-ventilated.
- Cover power tools or keep them in cases.
If you don’t have a shed, even a covered porch is better than leaving tools outside.
A Few Extra Tips For Busy Gardeners
I know life gets busy. Some weeks, I barely have time to water, let alone deep clean. Here are a few shortcuts that help:
- Keep a rag and spray bottle of soapy water near your garden. A quick wipe is better than nothing.
- Use a bucket of sand mixed with oil for cleaning and storing small tools. Just stab your tool in and out a few times to clean and coat.
- If you forget to clean for a few weeks, don’t panic. Just do a deep clean when you remember.
Consistency, not perfection, is the key. Even small efforts add up.
Tool Cleaning Myths I Believed
When I started, I fell for a few myths. Here are two big ones:
- “Dirt protects metal from rust.” I thought leaving a bit of soil was harmless. In truth, wet dirt holds moisture and speeds up rust.
- “Only fancy cleaners work.” Simple dish soap and vinegar do the job just as well as expensive brands.
If you hear advice that sounds too good to be true, it probably is.
The Science Behind Clean Tools
It surprised me to learn how much science is behind this simple task. Plant diseases, like bacterial wilt or fungal blight, can live on your tools for days or weeks. A dirty pruner blade can infect dozens of plants in one afternoon.
Studies show that cleaning tools with soap and water removes about 90% of pathogens. Adding a disinfectant, like bleach or rubbing alcohol, raises that to nearly 99%. This is why regular cleaning is so important for a healthy garden.
If you want to dig deeper, the University of Minnesota Extension has great resources on tool hygiene.
My Simple Weekly Cleaning Routine
To make cleaning easy, I set aside 10 minutes every Sunday. Here’s my quick routine:
- Gather all tools used that week.
- Brush off dirt and rinse with water.
- Scrub with soapy water, focusing on sticky or dirty parts.
- Rinse, dry, and inspect for rust.
- Oil metal parts and moving joints.
- Sharpen blades if needed.
- Hang up or store tools.
It’s become almost like a meditation for me—time to slow down and care for the things that help my garden grow.
How Clean Tools Help My Garden
Since I made cleaning a habit, I’ve noticed:
- Fewer plant diseases
- Easier digging and cutting
- Tools last much longer
- Less money spent replacing broken or rusty gear
It’s one of those small tasks that pays off in big ways.
Comparing Tool Cleaning Methods
I tried a few different ways to clean my tools. Here’s what I found works best for me:
| Method | Pros | Cons |
|---|---|---|
| Soap and Water | Simple, cheap, effective | Needs drying to prevent rust |
| Bleach Solution | Kills most pathogens | Can damage metal if not rinsed |
| Rubbing Alcohol | Quick to use, dries fast | Less effective on dirt and sap |
| Commercial Cleaners | Convenient, often multi-purpose | Expensive, not always needed |
| Vinegar Soak | Great for rust and deposits | Needs time, can dull metal |
For most jobs, a brush, soapy water, and a little oil are all I need.
Frequently Asked Questions
How Often Should I Clean My Garden Tools?
I recommend cleaning tools after every use, even if it’s just a quick rinse and dry. A deep clean once a month helps remove rust and sap. Always disinfect after cutting diseased plants.
Can I Use Household Cleaners On My Tools?
Yes, mild dish soap and water are safe for most tools. Avoid harsh chemicals like ammonia or strong acids, which can damage metal and wood. Natural cleaners like vinegar and baking soda work well for rust and sap.
What’s The Best Way To Disinfect Garden Tools?
I use a 10% bleach solution (1 part bleach to 9 parts water) for one minute, then rinse and dry. Rubbing alcohol also works for quick disinfection, especially on blades.
How Do I Prevent Rust On My Tools?
Always dry tools after washing. Wipe metal parts with a little oil or spray with WD-40. Store tools in a dry place, and avoid leaving them outside or in damp sheds.
Why Do Wooden Handles Crack, And How Can I Stop It?
Wood dries out and cracks when not cared for. Wipe handles with linseed oil once a month. Sand rough spots smooth to prevent splinters. Store tools indoors during winter if possible.
Cleaning garden tools might seem like a chore at first, but it quickly becomes a habit that saves time, money, and effort. My tools and my garden are so much better for it. If you haven’t started yet, give it a try—you’ll be glad you did.

As an Amazon Associate, We earn from qualifying purchases