When I first started using my Dremel tool, I was both excited and a bit nervous. I had seen videos of people making precise cuts in wood, metal, and even plastic. But, honestly, I was worried about changing the cutting wheel safely and getting it installed the right way.
If you’re reading this, you might be feeling the same way. Let me walk you through the steps, just like I wish someone had done for me. I’ll share tips, mistakes to avoid, and what I learned from using different Dremel models and wheels.
Why The Right Dremel Cutting Wheel Matters
Choosing the correct Dremel cutting wheel is important. The wrong wheel can break or wear out fast. I learned this when I used a thin wheel on a thick metal pipe; it snapped after a few seconds! The right wheel will cut smoothly and last longer. Dremel makes cutting wheels for different jobs—like metal, wood, plastic, and ceramic. Before you begin, check your material and pick the wheel that matches.
Tools And Materials You Need
Before you start, gather all the things you need. Missing even one can slow you down or make the process unsafe. Here’s a quick checklist:
- Your Dremel rotary tool
- The right cutting wheel (check the number—like 409, EZ456, etc.)
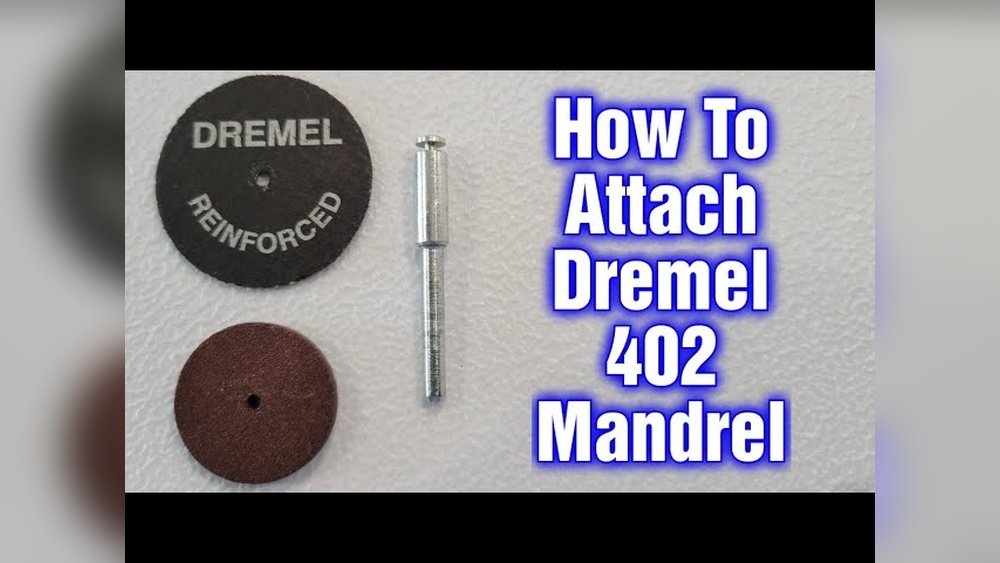
- Mandrel (this is what holds the wheel)
- Wrench (comes with the Dremel)
- Safety glasses
- Dust mask (for cutting metal or plastic)
- Clean rag
If you have everything ready, you won’t have to stop halfway. I always lay out my tools on a towel so nothing rolls away.
Understanding Cutting Wheel Types
Not all cutting wheels are the same. Here’s a simple table that compares three common types I’ve used:
| Cutting Wheel | Best For | Durability | Ease of Use |
|---|---|---|---|
| 409 Fiberglass | Metal, Thin Wood | Medium | Easy |
| EZ456 (EZ Lock) | Metal, Plastic | High | Very Easy |
| SC456 (SpeedClic) | Metal | High | Very Easy |
If you’re new, try the EZ Lock wheels. They’re easier and safer to install, especially if you don’t want to deal with tiny screws.
My First Time: What Surprised Me
I remember my hands shaking the first time I installed a wheel. I was sure I’d miss a step. But after doing it a few times, it became second nature. One thing I didn’t expect: small parts like the mandrel screw are easy to drop. If you’re working over a rug, you may never find it again! Now, I always work on a bare floor or table.
Step-by-step: How To Install A Dremel Cutting Wheel
Let’s get to the heart of it. I’ll break down the steps, and share the little things that helped me along the way.
1. Unplug Your Dremel Or Remove The Battery
Safety first. I always make sure my Dremel is unplugged or the battery is out. It’s easy to forget, but you don’t want it to start spinning while you’re working.
2. Find The Right Mandrel
The mandrel is the small metal shaft that holds the cutting wheel. There are a few types, but the most common are:
- 402 Mandrel: For standard wheels (uses a tiny screw)
- EZ402 Mandrel: For EZ Lock wheels (tool-free)
When I started, I used the 402. It works well but you need a screwdriver or the Dremel wrench.
3. Insert The Mandrel Into The Dremel
Hold down the shaft lock button on your Dremel. You’ll find it near the tip. When the shaft is locked, unscrew the collet nut (the silver part at the tip) with your wrench. Slide the mandrel in and tighten it.
Make sure it’s snug, but don’t overtighten.
4. Attach The Cutting Wheel
Here’s where things change, depending on your wheel type.
Standard Wheels (like 409):
- Remove the small screw from the end of the mandrel.
- Place the cutting wheel onto the screw.
- Put the screw (with the wheel) back into the mandrel.
- Tighten with the wrench.
Ez Lock Wheels:
- Pull back the spring-loaded part of the mandrel.
- Insert the wheel and twist until it clicks.
- Release the spring; the wheel locks in place.
I love the EZ Lock because it’s fast and there’s no tiny screw to lose.
5. Double-check Everything
Before you plug in your tool, spin the wheel by hand. It should not wobble or be loose. If it moves, take it off and try again. One time, my wheel wobbled and made a strange noise—it turned out the screw wasn’t tight.
Catching this early can prevent accidents.
6. Put On Safety Gear
I always wear safety glasses. Cutting wheels can break if used wrong, and pieces can fly. A dust mask is smart too—cutting plastic or metal creates fine dust that’s not good to breathe.
7. Plug In And Test
Plug your Dremel back in (or insert the battery). Run the tool at a low speed first. Watch the wheel—if it spins true, you’re good to go. If it looks off, stop and check your work.
Common Mistakes And How To Avoid Them
I’ve made plenty of mistakes, and I’ve seen friends make them too. Here are a few to watch out for:
- Using the wrong mandrel: Not all wheels fit all mandrels. Check the packaging.
- Forgetting the shaft lock: If you don’t lock the shaft, the mandrel won’t tighten right.
- Overtightening: If you crank the screw too hard, you can crack the wheel.
- Not wearing glasses: I once had a wheel chip and hit my cheek. I was lucky. Wear protection.
- Starting at high speed: Start slow. Some wheels can break if spun up too fast.

How Different Dremel Models Handle Wheels
Not all Dremel tools are the same. I’ve used corded and cordless versions. Here’s a simple comparison:
| Model | Power | Wheel Compatibility | Best For |
|---|---|---|---|
| Dremel 3000 | High | Standard & EZ Lock | Home & DIY |
| Dremel 8220 (Cordless) | Medium-High | Standard & EZ Lock | Portability |
| Dremel Lite | Low-Medium | Standard Only | Light Work |
If you want to switch wheels often, the 3000 or 8220 is a good choice. They make the process easy.
Troubleshooting: If Things Go Wrong
Sometimes, even when you follow the steps, things don’t work. Here’s what I’ve learned to check:
- Wheel won’t tighten: See if there’s dirt in the mandrel threads.
- Wheel wobbles: The screw or mandrel is loose. Take it off and try again.
- Wheel keeps breaking: Maybe you’re using the wrong wheel for the material. Use a thicker or reinforced wheel for metal.
If the Dremel sounds rough or vibrates a lot, stop and check everything. Don’t force it.
Cleaning And Caring For Your Cutting Wheel
After you finish, take off the wheel if you won’t use it soon. Wipe dust off with a dry rag. If it’s a metal wheel and you see rust, replace it. Keep extra wheels and mandrels in a small box or bag.
I learned this after losing wheels in my messy tool drawer.
When To Replace The Wheel
You’ll know it’s time for a new wheel if:
- It’s worn down to half its size
- It’s cracked or chipped
- It cuts slower or sparks more
Don’t push your luck with old wheels. They can break and cause injury.
Extra Tips From My Experience
- Label your wheels: I write “wood” or “metal” on small bags. It saves time.
- Keep the wrench handy: I tie mine to the tool’s cord with a string so I never lose it.
- Practice on scrap: Before cutting your main piece, test on a scrap. It helps get the feel.
- Store wheels safely: I use a pill organizer for small wheels and screws.
- Read the manual: Dremel’s manual has diagrams that helped me when I was unsure.
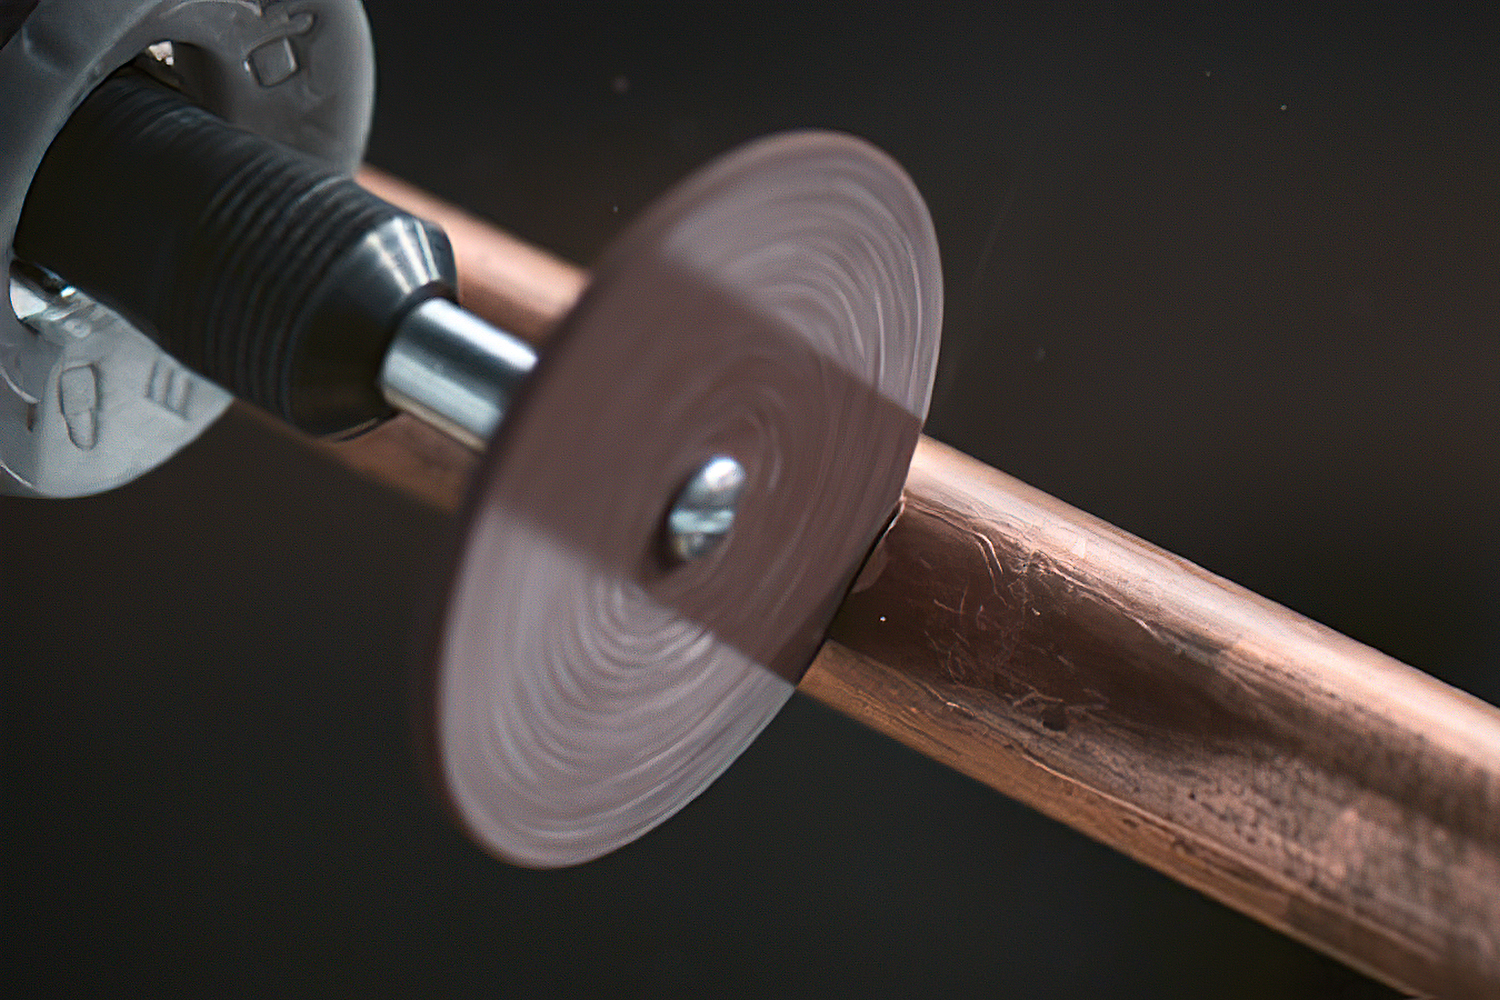
Real-world Example: Cutting Metal Pipe
Last year, I needed to cut a metal shower rod. I installed a reinforced wheel, wore my glasses, and started slow. I let the tool do the work—no force needed. The cut was smooth, and the wheel lasted. A friend tried the same job with a thin wheel and pushed hard.
His wheel broke, and the cut was rough. The lesson? Use the right wheel and be patient.

Safety Reminders
I can’t stress safety enough. A Dremel is powerful, and the wheels can spin over 20,000 RPM. Always:
- Wear eye protection
- Keep your fingers away from the wheel
- Start slow and speed up only if needed
- Unplug the tool before changing wheels
For more on rotary tool safety, the official OSHA PPE guide is a helpful resource.
Comparing Dremel Cutting Wheels
Here’s a quick look at how some wheels compare for common jobs:
| Wheel | Material | Cut Quality | Breakage Risk |
|---|---|---|---|
| 409 | Metal, Wood | Good | Medium |
| EZ456 | Metal, Plastic | Very Good | Low |
| SC456 | Metal | Excellent | Low |
I prefer the EZ456 for most jobs—it’s strong, lasts long, and is easy to swap.
Frequently Asked Questions
How Do I Know Which Dremel Cutting Wheel To Use?
Check your material first. For metal, use reinforced wheels like EZ456 or SC456. For wood or plastic, standard wheels work fine. If you’re unsure, start with a reinforced wheel—it’s safer.
Can I Reuse A Cutting Wheel?
Yes, as long as it’s not worn down, cracked, or chipped. I often use the same wheel for several projects. Just check for damage before each use.
What Should I Do If The Cutting Wheel Breaks?
Stop right away. Unplug the tool, remove the broken pieces, and check the mandrel for damage. Never try to keep using a broken wheel.
Is It Safe To Use Third-party Cutting Wheels?
I’ve tried some, but I trust Dremel-branded wheels more. They fit better and last longer. Cheap wheels can break and may not fit the mandrel properly.
Why Does My Wheel Wear Out So Fast?
You might be using too much force, the wrong speed, or the wrong wheel for the job. Let the tool do the work. If cutting metal, use a reinforced wheel and don’t push hard.
Installing a Dremel cutting wheel felt tricky at first, but now it’s quick and safe. Take your time, double-check your steps, and always put safety first. With practice, you’ll be swapping wheels like a pro and tackling all kinds of DIY projects with confidence.
As an Amazon Associate, We earn from qualifying purchases