If you’ve ever tried to fix a leaky pipe or change a faucet, you probably know how important the right tool can be. For me, learning how to use a pipe wrench was a game changer. At first, I thought it was just another tool in my box.
But after a few mistakes and sore knuckles, I realized a pipe wrench isn’t just about brute strength. It’s about control, knowing the parts, and using the right technique. Let me walk you through everything I’ve learned about using a pipe wrench.
I’ll share tips, common mistakes, and even a few stories from my own DIY adventures.
What Is A Pipe Wrench?
A pipe wrench is a heavy tool you use to grip and turn pipes. Unlike regular wrenches, it has serrated jaws that can bite into round metal pipes. This makes it perfect for plumbing jobs, where pipes often get stuck or need extra force to loosen. My first pipe wrench felt awkward in my hand, but once I understood its parts and how to adjust it, things got easier.
There are a few main parts you should know:
- Handle: The long part you hold. It gives you leverage.
- Hook Jaw: The top jaw that moves when you turn the adjustment nut.
- Heel Jaw: The bottom, fixed jaw.
- Adjustment Nut: Lets you open or close the jaws to fit different pipe sizes.
Most pipe wrenches are made of steel or aluminum. Steel is heavier but stronger, while aluminum is easier to carry around. I started with steel, but now I prefer aluminum for small jobs.
Types Of Pipe Wrenches
You might be surprised, like I was, to learn there’s more than one kind of pipe wrench. Here’s a quick look at the most common types I’ve used:
| Type | Best For | My Experience |
|---|---|---|
| Stillson (Straight) Wrench | General pipe work | Strong grip, great for most jobs |
| Offset Pipe Wrench | Hard-to-reach places | Saved me under sinks more than once |
| End Pipe Wrench | Close-to-wall pipes | Handy for tight spaces |
| Compound Leverage Wrench | Stubborn, frozen joints | Needed when pipes just won’t move |
If you’re starting out, a basic Stillson wrench is enough. But as you run into tricky jobs, you’ll find yourself picking up the others.

Choosing The Right Pipe Wrench
I remember buying my first pipe wrench. I just grabbed the cheapest one. It worked—sort of. But later, I learned that the right wrench size and type matter a lot. Here’s what I look for now:
- Size: Wrenches come in many lengths, usually from 10 to 36 inches. Shorter wrenches are lighter but have less grip. Long wrenches give more leverage but can be hard to use in tight spots. I keep a 14-inch and a 24-inch in my toolbox.
- Jaw Opening: Make sure the jaws open wide enough for your pipes. If it’s too small, you’ll struggle.
- Weight: For long jobs, lighter aluminum wrenches save your arms.
- Teeth Condition: Always check the jaw teeth. If they’re worn down, the wrench will slip and damage the pipe.
Here’s a simple comparison I wish I had seen early on:
| Wrench Length | Pipe Size Range | Best Use |
|---|---|---|
| 10 inch | 1/8″ to 1″ | Small repairs, tight spaces |
| 14 inch | 1/2″ to 2″ | General plumbing |
| 24 inch | 2″ to 3″ | Larger pipes, more force needed |
How To Hold And Position A Pipe Wrench
This is where I made my first big mistake. I used to just clamp the wrench anywhere on the pipe and yank. Sometimes it worked, but often it slipped, and I scraped my knuckles. Here’s what I learned:
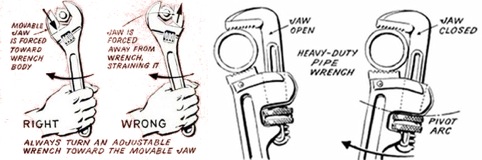
- Always place the top jaw on the side of the pipe you want to turn towards. The handle should point in the direction you want to rotate.
- The pipe should sit deep in the wrench’s jaws, not just at the tips.
- The adjustment nut should let the jaws clamp snugly—not too tight, or you’ll dent the pipe; not too loose, or it will slip.
It’s a small thing, but using two hands—one on the handle and one near the head—gives you better control and power. I started doing this after I lost grip and almost broke a pipe.
Step-by-step: How To Use A Pipe Wrench
Let’s walk through the actual process. I’ll keep it simple and add tips I wish someone had told me.
1. Inspect Your Wrench
Before you do anything, check the wrench. Make sure the teeth are sharp and clean. If there’s oil or dirt, wipe it off. A dirty wrench can slip, which is dangerous.
2. Adjust The Jaw Opening
Turn the adjustment nut to open the jaws. Fit the wrench on the pipe so the teeth bite into the metal. Then, close the jaws until they’re snug but not crushing the pipe. I used to overtighten, thinking it would grip better, but it only damaged the pipe.
3. Position The Wrench Correctly
Face the wrench so the handle is on the side you want to turn. The top jaw should always lead. If you put it on backwards, the wrench just slides and chews up the pipe.
4. Apply Steady Pressure
Pull the handle with smooth, even pressure. Jerking the wrench can damage the pipe or hurt your hand. I’ve found that slow, steady force works best, especially on old pipes.
5. Release And Reposition
After a turn, open the jaws, move the wrench back, and repeat. Don’t keep twisting without repositioning—it wears out both the tool and the pipe.
6. After Use: Clean Your Wrench
Wipe off any grime or water. I spray a little oil on the jaws to keep them from rusting. A good pipe wrench can last for years if you take care of it.
Safety Tips I Learned The Hard Way
I’ve had my share of smashed fingers and chipped pipes. Here’s how I avoid those problems now:
- Wear Gloves: They protect your hands from sharp pipe edges and slipping tools.
- Stand Firm: Keep your balance. Pull, don’t push, so if the wrench slips, you don’t fall forward.
- Use the Right Size: Don’t force a small wrench on a big pipe. It will slip every time.
- Watch Out for Old Pipes: Some pipes are rusty or thin. Too much force can break them.
- Never Use a Cheater Bar: I once tried to extend my wrench with a pipe for more torque. It worked until the wrench snapped and nearly hit my face.
Common Mistakes Beginners Make
If you’re new, you might run into these problems. I know I did.
- Using the wrong side: The wrench should always bite in the direction you turn.
- Oiling the jaws: It sounds like a good idea, but oil makes them slip.
- Overtightening: This crushes soft pipes or strips threads.
- Wrong wrench size: Too big or too small, and you lose grip.
- Not checking teeth: Worn teeth are useless. Replace the jaws if needed.
A surprising tip: I learned that wrapping a rag around chrome pipes can help protect them from teeth marks. But for really nice pipes, I use a strap wrench instead.
Advanced Pipe Wrench Techniques
Once you’re comfortable with the basics, there are a few tricks that can make tough jobs easier.
Double Wrenching
Sometimes, a pipe is really stuck. I use two pipe wrenches—one to hold the pipe steady, and the other to turn the fitting. This keeps the pipe from twisting out of place.
Using Extensions
If you need extra leverage, go for a longer wrench. But remember, more force means more risk. Check the pipe’s condition before you go all out.
Removing Stuck Fittings
For old, stuck fittings, heat can help. I use a hair dryer or heat gun to warm the metal. This makes it expand a bit and can loosen years of rust. Always be careful with heat—keep away from anything flammable.
Pipe Wrench Maintenance
A pipe wrench doesn’t need much care, but ignoring it can ruin the tool. Here’s my routine:
- Clean After Use: Wipe down the jaws and adjustment nut.
- Oil the Moving Parts: A little machine oil keeps the nut turning smoothly.
- Check Jaw Teeth: Replace if they’re worn or chipped.
- Store Dry: Don’t leave it in a damp spot, or it will rust.
I once left a wet wrench in my truck overnight. The next day, it was rusty and stiff. A quick clean and oil saved it, but I learned to always dry my tools.
When Not To Use A Pipe Wrench
Not every job is right for a pipe wrench. I’ve seen people try to use it on nuts or bolts, and it just chews them up. Here’s when to skip it:
- On hex nuts or valve stems—use an adjustable or box wrench instead.
- On plastic pipes—the teeth can crush or cut them.
- On decorative fixtures—unless you want scratch marks.
For fragile pipes, I use a strap wrench or a pair of channel locks with a rag.
Real-life Example: Fixing A Leaky Pipe
Let me share a quick story. Last winter, I found a slow leak under my kitchen sink. The pipe was old and tight. I grabbed my 14-inch pipe wrench and followed my usual steps—inspected the jaws, adjusted the fit, and positioned it carefully.
I used smooth, steady pressure and, after a few tries, the fitting loosened. I replaced the washer, tightened everything back up, and checked for leaks. This simple job would have been much harder without the right wrench and technique.
Essential Accessories
Sometimes, a pipe wrench isn’t enough on its own. Here are a few extras I always keep handy:
- Rags: To protect shiny pipes from teeth marks.
- Penetrating oil: Helps loosen rusty threads.
- Strap wrench: For delicate or plastic pipes.
- Flashlight: Many pipe jobs are in dark spaces.
- Gloves: Save your hands from blisters and cuts.
How Pipe Wrenches Compare To Other Wrenches
When I started, I wondered why not just use a regular adjustable wrench. Here’s what I’ve learned:
| Feature | Pipe Wrench | Adjustable Wrench |
|---|---|---|
| Teeth | Yes, for grip | No, smooth jaws |
| Best for | Round pipes | Hex nuts/bolts |
| Can damage | Soft pipes, chrome | Painted or soft nuts |
| Slipping risk | Low (if used right) | High on pipes |
In short, use a pipe wrench for pipes, and an adjustable wrench for nuts and bolts.
Two Non-obvious Tips Most People Miss
- Reverse Leverage: If you’re having trouble getting enough force, try switching sides. Sometimes, attacking the fitting from the other direction gives you better leverage and more room to pull.
- Temporary Jaw Padding: For special pipes you don’t want to scratch, cut a strip from an old bicycle inner tube and wrap it around the pipe. It gives protection but still lets the teeth grip.
These little tricks have saved me time and money more than once.
Final Thoughts
Using a pipe wrench well is about more than just muscle. It’s about choosing the right size, getting a good grip, and using smooth, steady force. I’ve made mistakes, and I’ve learned from each one. Now, I can handle most pipe jobs without fear.
If you take the time to learn the right way, your hands—and your pipes—will thank you.
For more on pipe wrench types and history, you can check out this Wikipedia guide.
Frequently Asked Questions
What Size Pipe Wrench Should I Buy First?
If you’re just starting, a 14-inch pipe wrench is a good all-around choice. It handles most home plumbing jobs and isn’t too heavy or bulky.
Can I Use A Pipe Wrench On Plastic Pipes?
No, you shouldn’t. The teeth will damage plastic pipes. Use a strap wrench or channel locks with a cloth for plastic or delicate pipes.
How Do I Avoid Leaving Marks On Pipes?
Wrap a rag or rubber strip around the pipe before using the wrench. For very nice pipes, use a strap wrench instead.
Why Does My Pipe Wrench Keep Slipping?
Check if the teeth are worn or the jaws are oily. Also, make sure you’re positioning the wrench so the top jaw bites in the turning direction.
How Do I Clean And Maintain My Pipe Wrench?
After each use, wipe it clean and add a drop of oil to the moving parts. Store it in a dry place to prevent rust. Replace the jaw if the teeth are worn down.
If you follow these steps, your pipe wrench will be a reliable tool for years—just like mine.

As an Amazon Associate, We earn from qualifying purchases