Fixing leaks under my kitchen sink always felt like a mystery. I used to stare at the pipes, confused and a bit annoyed, wondering how anyone reached those nuts way up behind the sink. Then I found the basin wrench. That tool changed everything for me. If you’ve ever struggled with tight spaces and stubborn nuts, I know exactly how you feel. Today, I’ll walk you through how to use a basin wrench on a kitchen sink, step by step, with all the things I wish someone had told me from the start.
What Is A Basin Wrench And Why You Need One
A basin wrench is a funny-looking tool. It has a long handle and a jaw at the end that swivels. At first, I thought it looked more like a robot arm than a wrench. But it’s made for a purpose: reaching the nuts that hold your kitchen faucet in place. These nuts are usually in a very tight spot, behind the sink and up close to the wall. Regular wrenches just can’t reach them. The basin wrench’s long arm and rotating head make this job possible.
Before I got one, I tried using pliers and even my hands. I scraped my knuckles and nearly gave up. The basin wrench made the job so much easier, and I didn’t have to crawl under the sink for hours.
If you want to change a faucet or fix a leak, this tool is your best friend.
When Should You Use A Basin Wrench?
I learned the hard way that you only need a basin wrench for a few jobs. Here’s when I reach for mine:
- Replacing a kitchen faucet: Most kitchen faucets are held by nuts under the sink. A basin wrench can grab these nuts even when you can’t see them.
- Fixing a leaky faucet: Sometimes, you need to tighten or loosen connections behind the sink.
- Installing new supply lines: If you’re adding or swapping out water lines, the nuts are usually in a tight spot.
If the nuts are easy to reach, you can use other tools. But for anything behind the sink basin, this wrench is the answer.
:max_bytes(150000):strip_icc()/SPR-how-to-use-a-basin-wrench-2718720-hero-A-6ba9e7b86b5c4c978b68a58c483237a9.jpg)
Tools And Materials You’ll Need
Before you start, gather everything you might need. Here’s what I always have ready:
- Basin wrench (of course!)
- Flashlight – Sinks are dark places.
- Bucket – To catch any water drips.
- Towel – To keep things dry and clean.
- Adjustable wrench or pliers – Sometimes you need these for other parts.
- Penetrating oil – For stubborn, rusty nuts.
- Work gloves – To protect your hands.
Having everything nearby saves you from crawling out again and again.
Getting Ready: My Preparation Steps
Preparation is half the battle. I always start by clearing out everything under the sink. Trust me, it’s no fun working around cleaning bottles and old sponges. I lay down an old towel to catch drips and protect my back from the cold cabinet floor.
The next step is to turn off the water supply. The shut-off valves are usually just under the sink. Turn them clockwise until tight. If they’re stuck, use a little muscle, but don’t force them too hard. Once the water is off, I open the faucet to let out any pressure left in the lines.
Then I put the bucket under the pipes, just in case.
Step-by-step: How I Use A Basin Wrench On A Kitchen Sink
Now, let’s get into the real action. Here’s the process I follow, every single time.
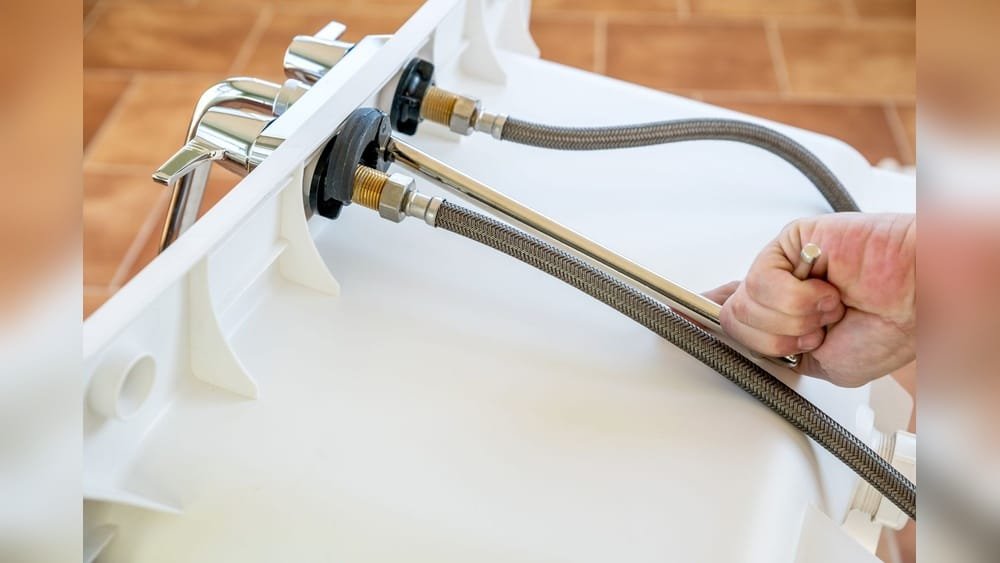
1. Locate The Mounting Nuts
I grab my flashlight and look up behind the sink. The mounting nuts are usually right at the base of the faucet, holding it tight to the sink. Sometimes, they’re plastic, other times metal. If you see a lot of grime, a quick wipe helps.
2. Position The Basin Wrench
I slide the jaw of the basin wrench onto the nut. The wrench’s head swivels, so I adjust it until it grips the nut firmly. If you’re loosening, make sure the jaw is set to turn counterclockwise (lefty-loosey). For tightening, set it for clockwise.
The first time I did this, I found the wrench head kept falling off the nut. I learned to use my other hand to steady it until it bit onto the nut.
3. Use The Long Handle
This is where the basin wrench shines. The long handle gives you leverage. I turn the handle slowly, letting the jaw grip and turn the nut. Sometimes, the nut is stuck from years of grime. That’s when I spray a little penetrating oil and wait a few minutes. This almost always does the trick.
If the nut still won’t move, I tap the handle gently with a rubber mallet. This has helped me loosen even very old nuts.
4. Remove Or Tighten The Nut
Once the nut starts to turn, I keep steady pressure. I’ve learned not to rush—going slow avoids damaging the pipes or the sink. If I’m removing the faucet, I take the nut all the way off. If I’m installing a new faucet, I use the wrench to tighten the nut, but not too much.
Over-tightening can crack plastic parts.
5. Double-check Everything
Before I finish, I always check that everything is snug but not overtight. I wipe up any drips and make sure the faucet is straight and secure. Then, I turn the water back on and test for leaks.
Comparing Basin Wrenches With Other Tools
When I first started, I wondered if I could use regular wrenches or pliers instead. Here’s a quick comparison that shows why the basin wrench wins for this job.
| Tool | Reach | Best For | Limitations |
|---|---|---|---|
| Basin Wrench | Very long, flexible | Tight spaces under sinks | Specialized, not for all nuts |
| Adjustable Wrench | Short | Open areas | Can’t reach behind sink |
| Pliers | Short | Exposed nuts | Limited grip, can slip |
Common Problems And How I Solve Them
Let me share some issues I’ve run into, and what I do about them.
Stuck Or Rusty Nuts
This is very common, especially in older sinks. I spray the nut with penetrating oil and wait about 10 minutes. If it still won’t budge, I tap the wrench handle lightly with a rubber mallet. I never use too much force, since that can break pipes.
Awkward Working Position
It’s not fun to squeeze under a sink. I use a small cushion or folded towel to protect my back. A headlamp leaves my hands free to work.
Hard-to-see Area
A bright flashlight makes a big difference. I sometimes use my phone camera to take a picture first, so I know exactly what I’m dealing with.
Worn Or Stripped Nuts
If the nut is too damaged for the wrench to grip, I use a pair of locking pliers to get it started. Once it’s loose, I switch back to the basin wrench.
Tips I Wish I Knew Earlier
Here are a few things I learned the hard way:
- Practice the wrench outside the cabinet. Before you crawl under the sink, try gripping a nut with the basin wrench in open space. It helps you get a feel for the tool.
- Protect your eyes. Old sinks can drop rust or grime right into your face. Safety glasses are a good idea.
- Don’t overtighten. I once cracked a plastic nut by using too much force. Just snug is enough.
- Replace old supply lines. If you’re already under the sink, check the hoses. If they’re more than 10 years old, swap them out.
- Have patience. Working upside down is awkward. Take breaks if you need to.
Maintenance And Storage
After the job, I always clean off the basin wrench. A quick wipe with a rag keeps it free from grease and grime. I store it with my other plumbing tools, so I can find it easily next time.
Basin wrenches don’t need much care, but a drop of oil on the swivel head keeps it moving smoothly. I check for rust once a year, especially if I’ve used it on wet jobs.
Safety Advice From My Experience
I learned to always wear gloves and eye protection. Even a small slip can scrape your skin, and bits of metal or old grime can fall in your eyes. If you need to use force, make sure your hand isn’t near anything sharp or hard.
Also, double-check that the water is off before you start. You don’t want a surprise spray in your face.

Real-life Example: Replacing My Kitchen Faucet
One weekend, my kitchen faucet started leaking. The drip became a small flood, so I decided to tackle it myself. I turned off the water, cleared out the cabinet, and put down a towel. I grabbed my basin wrench, and after a bit of struggling, I got the old nuts loose.
The new faucet went in much faster, and everything was tight and leak-free. The best part? I saved about $150 by doing it myself.
If I hadn’t had the basin wrench, I would have needed to call a plumber. With the right tool, the job took under an hour.
Different Types Of Basin Wrenches
I’ve tried a few types of basin wrenches. Here’s a quick look at what’s out there.
| Type | Features | Best Use |
|---|---|---|
| Standard Basin Wrench | Fixed handle, swiveling jaw | Most kitchen sinks |
| Telescoping Basin Wrench | Adjustable length handle | Deep or hard-to-reach sinks |
| Spring-Loaded Jaw | Automatic grip | Faster jobs, less slipping |
I prefer the telescoping type for deeper sinks. It’s saved my back more than once.

How Much Time And Money Does Using A Basin Wrench Save?
Most faucet replacements take less than an hour with a basin wrench. If you hire a plumber, it can cost anywhere from $100 to $300 for a simple faucet change. Doing it yourself with a $15-$30 basin wrench pays for itself in one use.
Plus, you get the satisfaction of fixing something on your own.
Environmental Impact: Fixing Instead Of Replacing
By using a basin wrench, I fix leaks before they get worse. This saves water and reduces waste. A leaky faucet can waste over 3,000 gallons of water per year. Small repairs make a big difference for your water bill and for the environment. For more about water conservation, I found helpful info at EPA WaterSense.
Frequently Asked Questions
How Do I Know If I Need A Basin Wrench?
If the nuts holding your faucet are in a hard-to-reach spot under the sink, you need a basin wrench. If you can easily reach the nuts with your hand or a regular wrench, you may not need one.
Can I Use A Basin Wrench For Bathroom Sinks?
Yes, if the nuts are in a tight spot. Bathroom sinks are usually smaller, but the same tool can help.
What Size Nuts Does A Basin Wrench Fit?
Most basin wrenches fit nuts from 3/8 inch to 1 1/4 inches. The jaw is designed to grip a range of sizes.
What If The Nut Won’t Budge?
Try penetrating oil and wait a few minutes. If it’s still stuck, tap the wrench handle gently with a mallet. Never use too much force, or you could break the pipes.
Is A Basin Wrench Hard To Use?
It takes a little practice. I found it tricky at first, but after a few tries, it became much easier. Practicing in open space before you start under the sink helps a lot.
Fixing things in your kitchen doesn’t have to be scary. With a basin wrench, a little patience, and the tips I’ve shared, you can tackle faucet leaks and replacements with confidence. If I can do it, so can you.
As an Amazon Associate, We earn from qualifying purchases