If you’ve ever made a big batch of pulled pork, you know how great it is to have leftovers. I love cooking pulled pork in advance, vacuum sealing it, and saving it for later. But the big question always comes up—how do you reheat vacuum sealed pulled pork without drying it out or losing all that smoky flavor? I’ve tried just about every method over the years, and I want to share exactly what works, what doesn’t, and a few tips I wish I knew when I started.
Why I Vacuum Seal Pulled Pork
Vacuum sealing changed my leftovers game. When I first started making barbecue at home, I would store pulled pork in regular containers. It dried out so fast. Then I learned that vacuum sealing locks in the moisture, keeps the flavor strong, and helps the pork last much longer. In fact, I’ve kept vacuum-sealed pulled pork in my fridge for a week and in the freezer for months. It always tastes as good as the day I made it.
When you vacuum seal, you remove air, which slows down bacteria and keeps the meat from getting freezer burn. So if you love meal prepping or just want to make your barbecue last, vacuum sealing is the way to go.
The Main Reheating Methods I’ve Tried
Over the years, I’ve tested a bunch of ways to reheat pulled pork—some good, some not so good. The key is to heat the pork gently, so it stays juicy and flavorful. Let me walk you through the main methods.
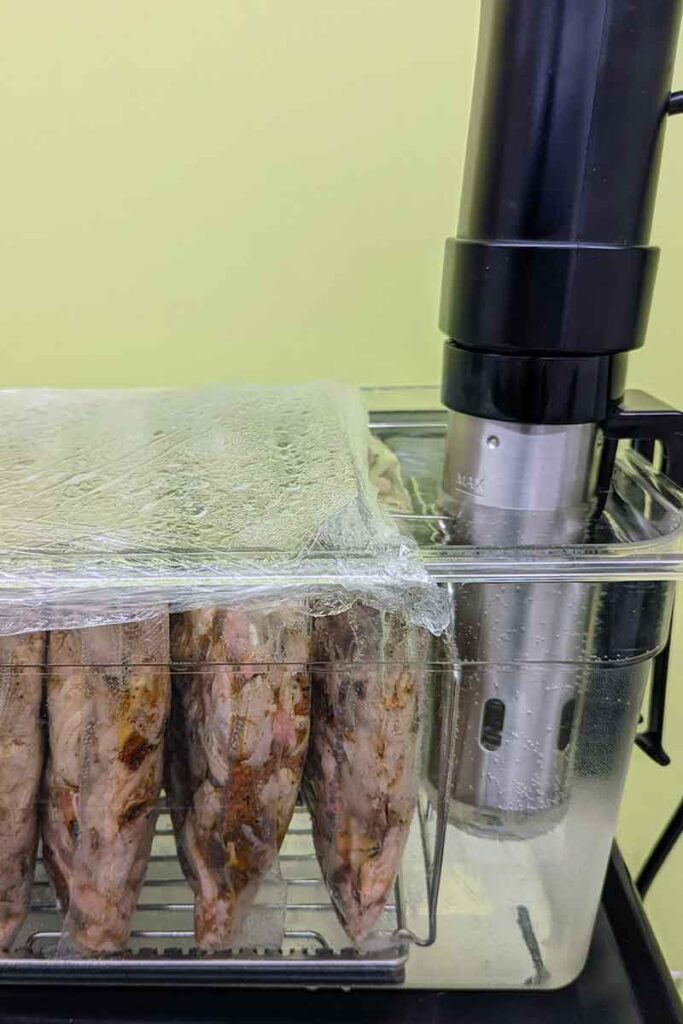
1. Sous Vide (my Favorite)
The sous vide method is hands-down the best if you have the equipment. I got a sous vide machine for Christmas a few years ago, and it’s made reheating pulled pork so easy.
- Fill a large pot with water.
- Set your sous vide to 165°F (74°C).
- Drop the vacuum-sealed bag of pulled pork in.
- Heat for about 45 minutes to 1 hour for a typical 1-2 pound bag.
- Remove, open, and serve.
The pulled pork tastes just like it did when I first cooked it. It stays tender, juicy, and full of flavor. The best part? You don’t need to open the bag, so there’s no mess.
2. Simmering In Water (no Fancy Tools Needed)
If you don’t have a sous vide, you can still use hot water. This is what I did before I got the machine.
- Bring a large pot of water to a gentle simmer (not boiling).
- Place the sealed bag in the water.
- Heat for 20-40 minutes, depending on the size of the bag.
- Rotate the bag halfway through for even heating.
This method works well, but you have to be careful. If the water boils, the bag might burst. Also, some vacuum bags aren’t made for high heat, so always check the label.
3. Oven Method
Sometimes I want to reheat a lot of pulled pork at once. The oven works well, but you need to remove the pork from the bag.
- Preheat your oven to 250°F (120°C).
- Place the pulled pork in a baking dish and add a splash of broth, apple juice, or barbecue sauce.
- Cover tightly with foil.
- Heat for 30-45 minutes, stirring halfway.
The low temperature keeps the pork moist. I always add a little liquid to help lock in moisture.
4. Slow Cooker
The slow cooker is great for parties. I use it when I want the pork to stay warm for hours.
- Remove pork from the bag.
- Add to the slow cooker with a bit of liquid.
- Heat on “Low” for 2-3 hours.
It’s almost impossible to overcook pulled pork in a slow cooker. It stays warm and juicy, so people can help themselves all day.
5. Microwave (quick But Risky)
I only use the microwave if I’m in a hurry and just want a quick sandwich.
- Remove pork from the bag.
- Place in a microwave-safe dish.
- Cover with a damp paper towel.
- Heat in 30-second bursts, stirring each time.
It’s fast, but the pork can dry out if you’re not careful. Always use low power and keep an eye on it.
A Side-by-side Look At Each Method
To help you see the differences, here’s a simple comparison based on my experience:
| Method | Flavor | Moisture | Time Needed | Best For |
|---|---|---|---|---|
| Sous Vide | Excellent | Excellent | 45–60 min | Best overall |
| Simmering | Very Good | Very Good | 20–40 min | No special tools |
| Oven | Good | Good | 30–45 min | Large batches |
| Slow Cooker | Good | Very Good | 2–3 hrs | Parties |
| Microwave | Okay | Okay | 2–3 min | Speed |
Step-by-step: How I Reheat Vacuum Sealed Pulled Pork (sous Vide)
Let me walk you through my favorite method, step by step. I find this gives the best results.
1. Thaw The Pork
If your pulled pork is frozen, thaw it in the fridge overnight. If you’re in a rush, place the bag in cold water for 30-45 minutes.
2. Prep Your Equipment
Fill a large pot or container with water. Attach your sous vide machine and set it to 165°F (74°C).
3. Submerge The Bag
Drop the sealed bag into the water. Make sure it’s fully covered. If it floats, weigh it down with a plate.
4. Heat And Wait
Set a timer for 45 minutes to 1 hour. For bigger bags, give it up to 90 minutes.
5. Check And Serve
Remove the bag with tongs. Be careful—it’s hot! Open the bag, pour the pork into a bowl, and stir.
I always taste the pork before serving. Sometimes I add a little barbecue sauce or extra seasoning if it needs a kick.
Tips For Keeping Pulled Pork Juicy
I’ve had a few disasters with dry pork, and I want to help you avoid them. Here are some tips I wish I knew earlier:
- Never overheat. Pulled pork is already cooked. You just need to warm it up. High heat dries out the meat.
- Add moisture. If you reheat outside the bag (oven, slow cooker, or microwave), add a splash of broth, apple juice, or water.
- Keep the bag sealed as long as possible. This locks in juices.
- Let the pork rest for a few minutes after reheating. This helps the juices spread through the meat.
How Long Does Reheated Pulled Pork Last?
I often get asked how long you can keep pulled pork after reheating. I usually try to only reheat what I’ll eat in one sitting. But if you have leftovers, here’s what I do:
- In the fridge: Eat within 2 days after reheating.
- In the freezer: Only freeze once. If you reheat, don’t refreeze.
Pulled pork is safest and tastiest when you only reheat it once.
Mistakes I’ve Made (so You Don’t Have To)
Here’s the honest truth: I’ve ruined pulled pork before. Here are some mistakes I learned the hard way:
- Boiling the bag. If you boil the water, the bag can split, and you lose all the juices. Keep the water just below boiling—about 180°F (82°C).
- Using the wrong bag. Not all vacuum bags can handle heat. Make sure your bags are rated for sous vide or simmering.
- Microwaving for too long. The pork dries out super fast. Always use short bursts.
Learning from these little mistakes has saved me a lot of frustration.
The Science Behind Vacuum Sealing
I didn’t always know why vacuum sealing worked so well. Now, I understand that removing air helps in two big ways:
- Reduces oxidation—the process that makes meat taste stale.
- Stops freezer burn—which dries out meat in the freezer.
Sealing in juices and flavor means the pork reheats almost as good as new. It’s also safer, since bacteria need air to grow.
Real-life Example: Family Bbq Night
Last summer, I hosted a big family barbecue. I made a giant batch of pulled pork two days before. I vacuum sealed it and stored it in the fridge. On BBQ day, I reheated it sous vide, and honestly, everyone thought it was fresh off the smoker.
My uncle, who is a barbecue snob, asked for the recipe. He couldn’t believe it was reheated. That’s when I knew the method worked!
Is Vacuum Sealed Reheating Safe?
I get this question a lot. Yes, it’s safe, as long as you:
- Use food-safe vacuum bags.
- Heat the pork to at least 165°F (74°C).
- Don’t leave reheated pork sitting out too long.
If you’re not sure about your vacuum bags, check the manufacturer’s website or packaging.

How I Choose The Right Vacuum Bags
Early on, I bought cheap vacuum bags online. Big mistake—some melted in hot water! Now I always look for bags labeled as “sous vide safe” or “boil safe.”
Here’s a quick comparison of vacuum bag types:
| Bag Type | Heat Safe? | Best For |
|---|---|---|
| Standard storage bags | No | Freezer/fridge only |
| Sous vide/boil-safe bags | Yes | Hot water reheating |
| Zip-top bags | Some, check label | Quick storage, not long-term |
Always check before you reheat. Melting bags are a mess you don’t want.
How To Add Extra Flavor When Reheating
Sometimes I like to mix things up. Here are a few tricks I’ve learned:
- Splash in some apple juice for a sweet tang.
- Add a little chipotle powder for heat.
- Mix with barbecue sauce just before serving for a saucy finish.
- Squeeze in a bit of lime juice for freshness.
Experiment a bit—you might find your new favorite twist on pulled pork.
Reheating For Sandwiches, Tacos, And More
Pulled pork is great in sandwiches, tacos, nachos, and even pizza. When I reheat, I think about how I want to serve it.
- For sandwiches, I keep it simple—just pork and a soft bun.
- For tacos, I mix in some salsa and fresh cilantro.
- For nachos, I reheat with a bit of cheese and serve with jalapeños.
The reheating method doesn’t change, but the sides and toppings make each meal special.
Useful Resources
If you want to dive deeper into food safety and vacuum sealing, check out this Sous Vide Guide from Serious Eats. It covers everything from bag safety to reheating times.

Frequently Asked Questions
How Long Can I Store Vacuum Sealed Pulled Pork Before Reheating?
If kept in the fridge, vacuum sealed pulled pork lasts up to a week. In the freezer, it’s good for 2–3 months or even longer, as long as the seal stays tight.
Can I Reheat Pulled Pork Straight From The Freezer?
Yes, but it takes longer. With sous vide, add 30–45 minutes to the reheating time. For simmering, thaw in cold water first for best results.
What If I Don’t Have A Vacuum Sealer Or Bags?
You can use a zip-top bag and remove as much air as possible. It’s not as airtight, but it works for short-term storage. For hot water reheating, make sure the bag is heat-safe.
How Do I Know If My Reheated Pork Is Safe To Eat?
Use a food thermometer. The pork should reach at least 165°F (74°C). If it smells off or looks slimy, don’t eat it.
Can I Add Sauce Before Vacuum Sealing?
Yes! Sometimes I add a little sauce or broth before sealing. It helps keep the pork moist and flavorful during storage and reheating.
Pulled pork is one of my favorite make-ahead meals, and reheating it right makes all the difference. If you follow these tips, you’ll never have dry or bland leftovers again. Enjoy your next barbecue, and save me a sandwich!
As an Amazon Associate, We earn from qualifying purchases