If you’ve ever worked on cars, trucks, or heavy machinery, you know that small things can cause big headaches. For me, learning how to use a seal puller was a game-changer. I remember the first time I needed to get an oil seal out of a stubborn wheel hub. I tried everything—screwdrivers, pliers, even a butter knife (don’t ask). The seal wouldn’t budge, and I ended up making a mess. That’s when a friend handed me a seal puller. Suddenly, what felt impossible became simple.
Prime Day Pick
Limited-time Prime Day price. Check current discount on Amazon.
In this article, I’ll walk you through everything you need to know about using a seal puller. I’ll share my own experiences, tips, and even mistakes I made. If you’re a beginner or just want to get better, you’ll find this guide helpful.
Let’s dive in and make seal removal easy and stress-free.
Prime Day Pick
Limited-time Prime Day price. Check current discount on Amazon.
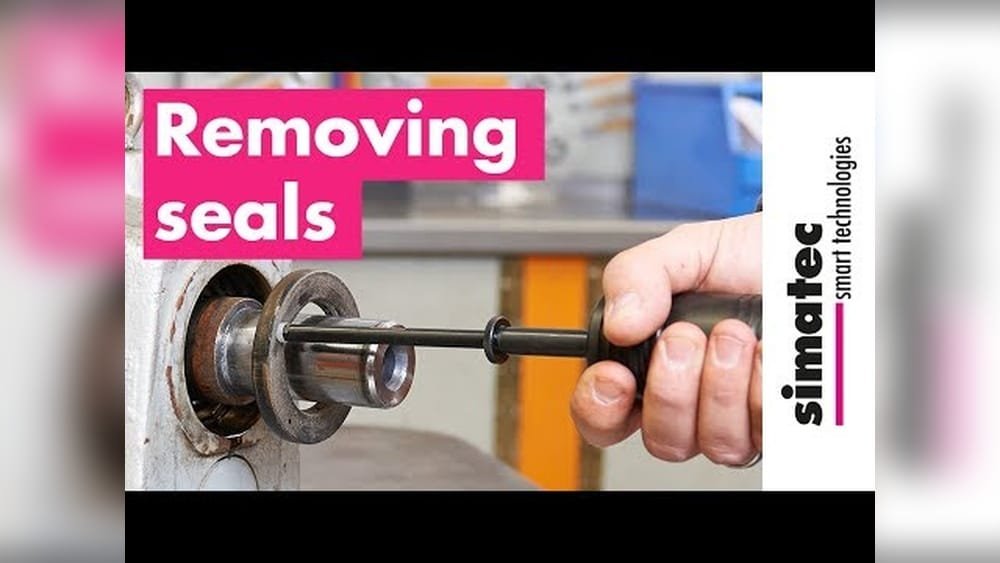
What Is A Seal Puller?
Before I got my first seal puller, I thought it was just another tool in the box. But it’s much more. A seal puller is a tool designed to remove oil seals, grease seals, and other press-fit seals from machinery. These seals stop leaks in engines, transmissions, axles, and pumps. They look like thin metal rings with rubber edges. When they wear out, they can leak oil or grease.
Prime Day Pick
Limited-time Prime Day price. Check current discount on Amazon.
Trying to remove a seal without the right tool can damage the part or the seal seat. I learned this the hard way with a damaged axle housing that cost me more than I want to admit. A seal puller makes the job quick, safe, and clean.
Types Of Seal Pullers
Not all seal pullers are the same. Over the years, I’ve used several kinds, and each has its strong points. Here’s a quick look at the most common types:
| Type | Best For | Notes |
|---|---|---|
| Hook Seal Puller | Automotive and light machinery | Most common, easy to use |
| Slide Hammer Puller | Large or stuck seals | More force, less risk of bending |
| Pliers-style Puller | Small, delicate seals | Better control, less slip |
| Adjustable/Universal Puller | Multiple seal sizes | Flexible, good for mixed jobs |
I started with a basic hook-style puller. It worked for 80% of my needs. When I started working on bigger trucks, the slide hammer was a lifesaver.
When Do You Need A Seal Puller?
There are a few signs that you need to use a seal puller:
- Oil or grease leaks near a spinning shaft or wheel
- Routine maintenance (changing axle or transmission seals)
- Noisy bearings (a damaged seal can let dirt in)
I once ignored a small leak in my car’s differential. A month later, the bearing failed, and I had to pay for a tow. Don’t wait—if you see a leak, it’s time to check the seal.
Choosing The Right Seal Puller
Not sure which puller to use? Here’s what I consider before picking one:
- Size of the seal – Big seals need heavier tools.
- Space to work – Tight spots need compact pullers.
- Seal material – Some seals are harder or tougher than others.
- Frequency of use – If you do this a lot, invest in a quality puller.
Here’s a quick comparison of two popular pullers I use most:
| Feature | Hook Seal Puller | Slide Hammer Puller |
|---|---|---|
| Best for | Most car seals | Heavy-duty or stuck seals |
| Ease of Use | Very easy | Moderate |
| Cost | Low | Medium to high |
| Skill Needed | Beginner | Intermediate |
If you work on your own car, a hook puller is enough. For bigger projects, get a slide hammer.

Tools And Safety Gear You’ll Need
I learned quickly that having the right gear makes seal pulling easy and safe. Here’s what I keep handy:
- Seal puller (the right type for your job)
- Gloves (for grip and safety)
- Safety glasses (bits of metal or oil can fly)
- Shop rags (to wipe oil and keep things clean)
- Replacement seal (always buy the right size)
- Light hammer (sometimes needed to tap the puller)
- Pry bar or screwdriver (as backup, but use with care)
- Parts cleaner (to remove old grease or oil)
I once tried to skip the gloves. Big mistake—slippery oil and sharp edges don’t mix. Always protect your hands and eyes.
Step-by-step: How To Use A Seal Puller
I’ll walk you through the process, just like I do it in my own garage. Each step matters—skip one, and you might damage something or make a mess.
1. Prepare The Work Area
Clean the area around the seal. Dirt can fall into the part when you remove the seal. I use a rag and some parts cleaner. Good lighting helps, too. If you’re working under a car, use jack stands for safety.
2. Remove Any Covers Or Retainers
Some seals are behind covers, dust shields, or bolts. Take these off first. Put small parts in a tray so you don’t lose them.
3. Select The Right Puller
Choose a puller that fits the space and the seal size. If it’s your first time, try the hook-style puller.
4. Insert The Puller
Slide the hook or tip of the puller behind the seal’s metal edge. You may need to tap it gently with a hammer. Be careful—don’t scratch the shaft or housing.
5. Apply Steady Pressure
Pull back on the handle, using slow, even force. The seal should start to pop out. If it’s stuck, try the other side or switch to a slide hammer.
Pro tip: Don’t twist or pry too hard. The first time I did, I bent the seal seat. That led to leaks after the new seal went in.
6. Remove The Seal
Once the seal is loose, pull it out by hand. Check the seat for old rubber or dirt. Clean everything before putting in the new seal.
7. Inspect And Clean
Look at the old seal. If it’s worn or torn, that’s your cause for leaks. Clean the seat with a rag and parts cleaner. Never install a new seal on a dirty or scratched surface.
8. Install The New Seal
Grease the edge of the new seal. This helps it slide in and prevents leaks. Tap it in evenly—never hammer just one side.
9. Reassemble Everything
Put back any covers, bolts, or dust shields. Double-check your work before adding oil or grease.

Common Mistakes And How To Avoid Them
I’ve made most of these mistakes myself at some point. Here’s what I wish I’d known early on:
- Using the wrong puller: If the tool doesn’t fit, it can slip and cause damage.
- Prying too hard: This can bend the housing. Always use even force.
- Not cleaning the area: Dirt can ruin a new seal in days.
- Forgetting to grease the new seal: Dry seals can burn out fast.
- Rushing the job: Take your time and check your work. Quick jobs often cause more work later.
One time, I skipped cleaning the seat. The new seal leaked within a week. I had to do the job all over again.
Practical Tips From Experience
Here are a few things I picked up over the years:
- Test fit your puller before you start. If it wobbles, try a different size or style.
- Keep spare seals on hand. Sometimes the new one gets damaged during install.
- Mark the depth of the old seal before pulling it. I use a piece of tape or a marker.
- Warm up stubborn seals with a hairdryer or heat gun. This softens old rubber and makes removal easier.
- Keep a parts tray for bolts and small pieces. Losing a bolt in the garage is no fun.
Myth Vs. Reality: What You Really Need
When I started, I thought I needed a huge set of expensive tools. In reality, you can do most seal jobs with just a few basics. Many online guides suggest using screwdrivers or picks. These can work, but they often cause damage.
A real seal puller is safer and faster.
Here’s a simple breakdown:
| Method | Success Rate | Risk of Damage |
|---|---|---|
| Seal Puller | 98% | Very low |
| Screwdriver/Pick | 60% | High |
| Hammer & Punch | 70% | Medium |
From my experience, using the right tool saves time and money. I keep my seal puller in my toolbox and reach for it anytime I see a leak.
Safety Reminders
Working with tools always carries some risk. Here are a few things I always remind myself:
- Wear safety glasses. Even a small chip of metal can cause a big injury.
- Use gloves for grip and protection.
- Work on a stable surface. If you’re under a car, use jack stands.
- Don’t rush. Most accidents happen when people hurry.
I once got a small cut from skipping gloves. It wasn’t serious, but it taught me a lesson.

When To Call A Professional
Sometimes, a seal just won’t come out. Or the area is too tight, rusty, or damaged. In these cases, it’s smart to call a mechanic. For example, on a heavy-duty diesel axle, I couldn’t get the old seal out without special tools.
I took it to a shop, and they got it done in minutes.
If you try and the seal won’t budge, or you see cracks in the housing, stop. It’s better to get help than to break something expensive.
For more technical details, you can check the Wikipedia entry on seal pullers.
Frequently Asked Questions
How Do I Know If My Seal Is Bad?
Look for oil or grease leaks around the shaft. Other signs include noise from bearings or loss of fluid. If you see these, check the seal.
Can I Reuse An Old Seal?
No, it’s best to use a new seal each time. Old seals can leak and cause bigger problems.
What If The Seal Won’t Come Out?
Try warming it with a heat gun and using a stronger puller. If it still won’t move, call a mechanic before using too much force.
Do I Need To Grease The New Seal?
Yes, always apply a light coat of grease or oil to the edge. This helps with installation and prevents damage.
Can I Use A Screwdriver Instead Of A Seal Puller?
You can try, but it’s risky. Screwdrivers can scratch the housing or shaft. A seal puller is safer and makes the job much easier.
Using a seal puller changed the way I work on cars and machinery. With the right tool and a bit of patience, even tough seals come out cleanly. I hope my experience helps you tackle your next project with confidence.
If you follow these steps, you’ll save time, money, and avoid the mistakes I made early on. Happy wrenching!
As an Amazon Associate, We earn from qualifying purchases