Using A Ridgid Pipe Threader: My Hands-on Guide
I remember the first time I used a Ridgid pipe threader. It was a chilly morning. The job site was loud, and pipes were everywhere. I looked at the tool in my hand and felt a bit nervous. But after a few hours and some mistakes, I got the hang of it. Now, I want to share what I learned with you. If you’re new to threading pipes or just want to get better, this guide will help.
Prime Day Pick
Limited-time Prime Day price. Check current discount on Amazon.
Why Use A Ridgid Pipe Threader?
Let’s start with why you need this tool. When you work with steel or iron pipes, you must cut threads at the ends. These threads let you connect pipes with fittings. If you don’t do it right, your pipes might leak or not fit together. The Ridgid pipe threader makes this job easy and reliable. It’s trusted by plumbers, construction workers, and DIY fans.
I’ve used manual threaders and powered ones. Ridgid is my favorite because it feels tough and lasts a long time. The threads come out smooth, which means fewer leaks.
Prime Day Pick
Limited-time Prime Day price. Check current discount on Amazon.
Getting Ready: What You Need
Before you start, you need a few things:
Prime Day Pick
Limited-time Prime Day price. Check current discount on Amazon.
- Ridgid pipe threader (manual or electric)
- Pipe cutter or saw
- Pipe vise or clamp
- Cutting oil
- Measuring tape
- Safety gear (gloves, goggles)
- Clean rags
I always lay everything out before starting. It saves time and keeps the workspace safe.
Choosing The Right Ridgid Threader
There are two main types:
- Manual threader: Great for small jobs and tight spaces. You turn it by hand.
- Electric threader: Faster and easier for big projects. It needs power.
Here’s a quick comparison I made for myself once:
| Type | Best For | Speed | Effort |
|---|---|---|---|
| Manual | Small jobs, repairs | Slow | High |
| Electric | Large jobs, frequent use | Fast | Low |
I use manual for home repairs. On big sites, electric saves my back and time.

Step-by-step: How I Use A Ridgid Pipe Threader
I’ll walk you through the steps I follow every time. Don’t rush. Taking your time means fewer mistakes.
1. Measure And Cut The Pipe
First, I measure the length I need. I mark the pipe with a marker or chalk. Then I cut it using a pipe cutter or saw. Always cut straight; crooked cuts cause threading problems.
A tip I learned: Use a pipe cutter for cleaner edges. Sawing is faster but leaves rough ends.
2. Secure The Pipe
I clamp the pipe tightly in a pipe vise. If the pipe moves, threading becomes hard, and the threads won’t be smooth.
When I first started, I didn’t tighten the vise enough. The pipe spun, and I had to redo the thread. Now, I always double-check.
3. Apply Cutting Oil
I pour cutting oil on the area where I’ll cut threads. This oil keeps the threader cool and makes threading easier. It also helps the tool last longer.
Don’t skip this step. Without oil, the tool can jam, and threads get damaged.
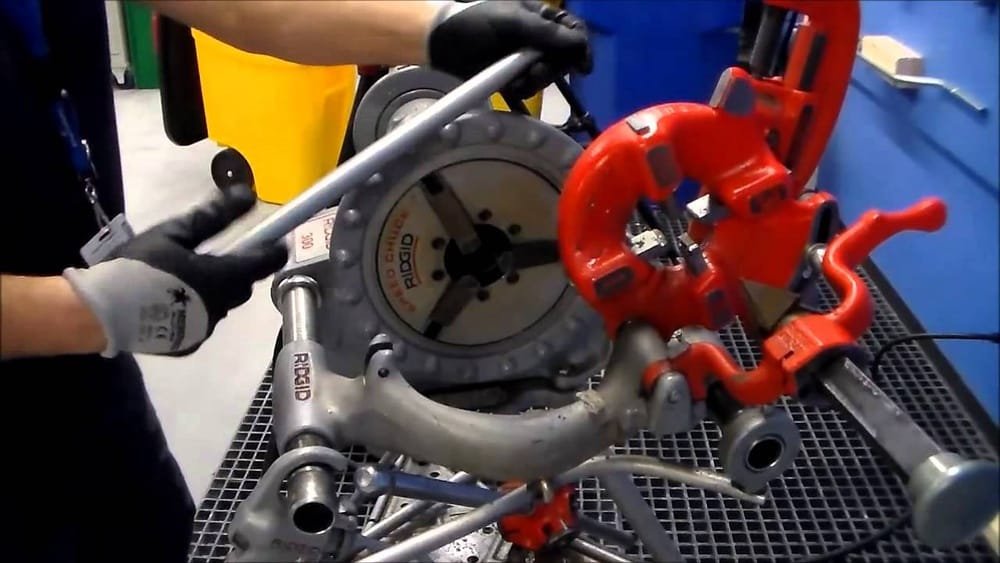
4. Attach The Die Head
The die head is the part that cuts threads. Ridgid has different die heads for different pipe sizes. I make sure I pick the right size.
Here’s a comparison chart I made for pipe sizes and die heads:
| Pipe Size | Die Head Size | Uses |
|---|---|---|
| 1/2 inch | 1/2 inch die | Home water pipes |
| 3/4 inch | 3/4 inch die | Commercial |
| 1 inch | 1 inch die | Industrial |
If you use the wrong die head, the threads won’t match the fittings.
5. Start Threading
Now comes the main part. I place the die head on the end of the pipe. If it’s a manual threader, I turn the handle slowly and firmly. For electric, I press the trigger and let the machine do the work.
I make sure to keep the threader straight. If it’s tilted, the threads will be crooked. Every few turns, I add more cutting oil.
One thing I learned: Don’t force the tool. If it gets stuck, back it off, add oil, and try again. Forcing it can break the die or damage the pipe.
6. Check Your Threads
When I finish threading, I wipe the pipe with a rag. I check the threads with a fitting. If the fitting goes on smoothly, the threads are good.
If the fitting doesn’t fit, I check for burrs or rough spots. Sometimes, I use a wire brush to clean the threads.
I always test with a fitting before installing the pipe. This saves trouble later.
7. Clean And Store Your Tools
After threading, I clean the die head and threader. Cutting oil attracts dirt, so wiping everything down keeps tools working longer.
I store my Ridgid threader in a dry place. Moisture can cause rust, and rust ruins tools.
Safety Tips I Learned The Hard Way
When I was new, I made some mistakes. Here are things I wish someone had told me:
- Wear gloves: Pipes are sharp, and threading can cut your hands.
- Use goggles: Metal shavings can fly off and hurt your eyes.
- Secure the pipe: If the pipe moves, you can get injured.
- Don’t rush: Threading takes patience. Fast work leads to mistakes.
I once tried to thread without gloves. My hand slipped, and I got a deep cut. Now, gloves are always on.

Common Mistakes And How To Avoid Them
I’ve made plenty of mistakes. Here are a few common ones:
- Wrong die head size: Always check before starting.
- Skipping cutting oil: This damages threads and tools.
- Crooked pipe cuts: Threader won’t work well on uneven ends.
- Not testing threads: Always use a fitting to check.
- Dirty tools: Clean tools last longer and work better.
If you avoid these mistakes, threading will be much easier.
Maintaining Your Ridgid Pipe Threader
Taking care of your tools is important. I learned this after my threader jammed because I never cleaned it. Here’s how I keep it in good shape:
- Clean after every use: Wipe off oil and dirt.
- Check for wear: Look at the die head for dull blades.
- Oil moving parts: Keeps everything running smooth.
- Store dry: Prevents rust.
A well-maintained threader can last for years. Mine has been working for over five years now.
When To Use Manual Vs. Electric Threaders
Some jobs need a manual threader. Others need electric. Here’s how I decide:
| Situation | Manual | Electric |
|---|---|---|
| Small repairs | Yes | No |
| Big projects | No | Yes |
| No power supply | Yes | No |
| Time pressure | No | Yes |
I once had to thread pipes in a basement with no outlets. Manual was the only way.
Real-life Example: My First Big Project
I want to share a story. My first big project was installing water pipes in an old house. I had to cut and thread over 20 pipes. At first, I used a manual threader. It was slow, and my arms got tired.
Then, I rented an electric Ridgid threader. The work went much faster, and the threads were perfect.
The lesson? Use the right tool for the job. Manual is fine for small tasks, but electric saves time and energy on bigger jobs.
Advanced Tips: Things Beginners Miss
Here are two things I learned from experience that most beginners don’t know:
- Keep extra cutting oil nearby. If you run out mid-job, threads will suffer. I always have a spare bottle.
- Mark pipe ends before threading. This helps you see if the die head slips or moves. I use a permanent marker.
These small steps make threading easier and more accurate.
Thread Quality: Why It Matters
Good threads mean tight connections. Loose or rough threads cause leaks. I always check for:
- Even spacing
- No metal shavings
- Smooth finish
If threads look rough, I start over. It’s better to redo than to have leaks.
According to Wikipedia, pipe threading is critical for plumbing and gas lines. Quality threads prevent accidents and costly repairs.

Frequently Asked Questions
What Size Pipes Can I Thread With A Ridgid Pipe Threader?
Ridgid threaders work with many sizes. I’ve threaded pipes from 1/2 inch to 2 inches. Always check your threader and die head for size limits.
How Often Should I Oil The Die Head?
I add cutting oil every few turns. If you see metal shavings or feel resistance, add more oil. It keeps threads smooth and protects the tool.
Can I Use A Ridgid Threader On Plastic Pipes?
No, Ridgid threaders are made for metal pipes like steel or iron. Plastic needs a different tool. Threading plastic with a metal die can crack the pipe.
What Should I Do If The Threader Jams?
Stop and back off the tool. Add more oil and clean the die head. Don’t force it. If it keeps jamming, check for dirt or a dull die.
Is It Worth Buying An Electric Threader For Home Use?
If you do a lot of pipe threading, electric is faster. For small repairs, manual is cheaper. I use manual at home and electric for big jobs.
Final Thoughts
Using a Ridgid pipe threader may seem hard at first. But once you practice, it becomes easy. I learned by doing, making mistakes, and asking for help. Whether you’re fixing pipes at home or working on a big site, the right steps make the job smoother and safer.
If you follow my guide, you’ll get strong, leak-free threads every time. Remember to choose the right tool, use cutting oil, and check your work. Take care of your tools, and they’ll take care of you. Good luck, and happy threading!
As an Amazon Associate, We earn from qualifying purchases