If you’ve ever used a string trimmer—also called a weed eater or weed whacker—you know how satisfying it feels to clean up a messy yard in just minutes. But nothing stops the work faster than a broken or empty trimmer line. I’ll never forget the first time my string ran out. I was standing in the heat, holding a noisy machine, with weeds everywhere, and no clue how to get going again. I fumbled, got frustrated, and wished someone had just shown me step by step. If that sounds familiar, you’re in the right place. I’ve restrung many trimmers over the years, and I’m going to walk you through it, sharing all the little tricks I wish I’d known sooner.
Why Restringing A String Trimmer Matters
A string trimmer works by spinning a strong nylon line at high speed. Over time, this line breaks or wears down. If you don’t replace it, your trimmer becomes useless. Worse, trying to cut with a short or tangled line can strain your motor or even damage the tool. Proper restringing is more than just maintenance—it keeps your tool working safely and saves you money. I’ve seen trimmers die early because people ignored this simple task.
What You Need Before You Start
Before you begin, gather these basics:
- Your string trimmer (make sure it’s turned OFF and unplugged, or battery removed)
- The right type and size of trimmer line
- A clean towel or rag
- Scissors or a sharp knife
- Gloves (optional, but helpful)
Every trimmer is a bit different. Check your owner’s manual or look for a sticker on the trimmer head. It will usually tell you the right line size—something like “. 065 inch” or “. 080 inch. ” Using the wrong size can cause feeding problems or damage.

Understanding Different String Trimmer Heads
Not all trimmers are built the same. I learned this the hard way when I bought a new trimmer and realized the spool worked completely differently than my old one. Here are the three main types you’ll find:
| Trimmer Head Type | Main Feature | Common Brands |
|---|---|---|
| Single-line, manual feed | One string; feed by hand | Black+Decker, Homelite |
| Dual-line, bump feed | Two strings; tap to advance | Ryobi, Husqvarna |
| Fixed-line head | Pre-cut lines, no winding | Stihl, Echo |
Single-line heads are simple and good for small yards. Dual-line types cut faster and cleaner but can be trickier to restring. Fixed-line heads use short pieces you just insert—no winding at all. Knowing your type helps you follow the right steps.
Step-by-step: How I Restring A String Trimmer
I’ll break down the process for the most common type: the bump-feed, dual-line trimmer. If yours is different, I’ll note where the steps change. Let’s get started.
1. Turn Off And Unplug The Trimmer
Safety first—always. I once forgot this step and almost got a nasty surprise. Unplug the power cord, remove the battery, or disconnect the spark plug wire if you use gas. Wait for the head to stop spinning.
2. Remove The Spool Cap
Most trimmer heads have a cap you twist or pop off. Hold the head steady with one hand. Press the tabs or turn the cap counterclockwise. The spool and any spring inside will come out. Set these aside on your towel so they don’t roll away.
3. Take Out The Old Trimmer Line
Pull out any leftover pieces. If it’s a mess of tangled line, don’t worry. I find it helps to wipe out the spool with a rag so the new line feeds smoothly. This is a good time to check for cracks or damage.
4. Measure And Cut The New Line
Every trimmer is a little different, but most need about 10 to 25 feet of line for a dual-line head. Your manual will say the exact length. For mine, I usually cut two pieces, each about 12 feet long. Too long, and the line won’t fit. Too short, and you’ll have to refill sooner.
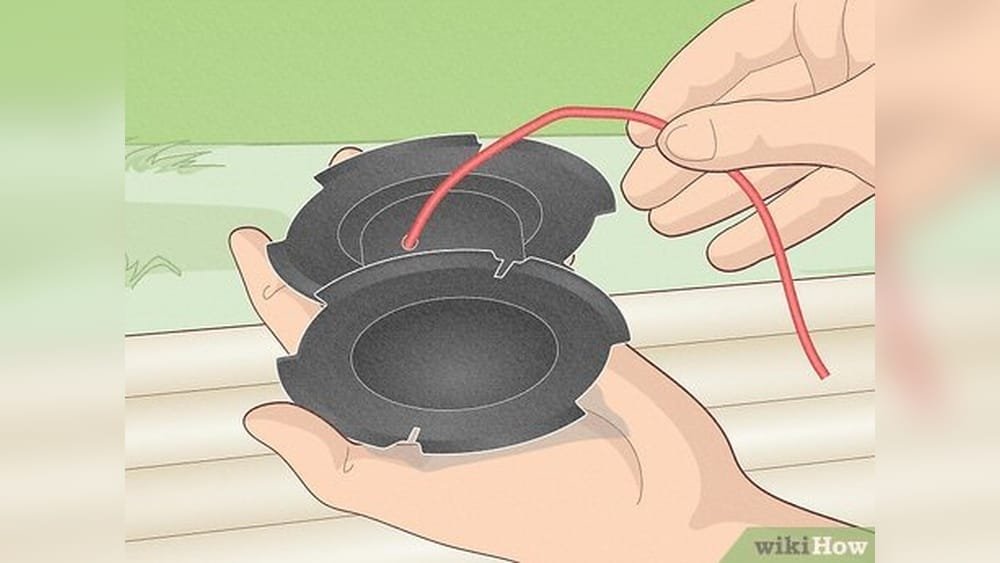
5. Find The Starter Holes In The Spool
On the spool, you’ll see one or two small holes or notches. These are where you anchor the end of the line before winding. For dual-line heads, use both holes—one for each line.
6. Anchor And Wind The Line
Push about half an inch of line into the starter hole. Wind the line in the direction of the arrow on the spool. This is important—the wrong direction means the line won’t feed out! Keep the wraps neat, side by side, not crossing over each other.
If you rush and the line overlaps, it’ll jam.
For dual-line heads, repeat with the second hole and line. Wind both lines at the same time, or one after the other, keeping them on their own side of the spool.
7. Lock The Line In Place
Most spools have little notches at the edge. When you finish winding, tuck the ends of the lines into these notches. This stops them from unwinding while you put the spool back in.
8. Reinstall The Spool
Thread the ends of the lines through the eyelets in the trimmer head. Hold the spool in place and line up everything. Release the line from the notches so it feeds through the holes. Replace the cap and snap or twist it on until it’s secure.
9. Test The Feed
Reconnect power or the battery, and gently tap the bump head on the ground (if yours is bump feed). The line should advance smoothly. If it jams or doesn’t feed, double-check your winding direction and that the lines are seated properly.
Common Mistakes (and How I Learned To Avoid Them)
Over the years, I’ve made almost every mistake possible. Here’s what to watch out for:
- Winding the line backward – The trimmer won’t feed. Always check the arrow.
- Overfilling the spool – Too much line jams the head. Stick to the recommended length.
- Crossing the lines – Neat, side-by-side wraps are key. Take your time.
- Using the wrong line thickness – Too thick? The spool jams. Too thin? The line breaks fast.
- Forgetting to lock the line – If you skip the notches, the line springs loose and tangles.
If you get stuck, don’t force things. I once tried to jam a spool in and broke a plastic tab. Take a breath and start over—it’s usually something simple.
Fixed-line And Single-line Heads: What’s Different?
Some trimmers are much simpler. Here’s how they compare:
| Feature | Fixed-Line | Single-Line |
|---|---|---|
| Line Replacement | Insert pre-cut line into holes | Wind one line around spool |
| Ease of Use | Very easy; no winding | Easy; less chance of tangles |
| Speed | Fastest | Fast |
| Common Problem | Line falls out if not inserted fully | Line jams if wound messy |
With a fixed-line head, you just slide pre-cut line pieces into the holes. No winding. It’s great if you hate fiddly work. With single-line heads, you only wind one piece, making life easier for beginners.
Tips For Longer-lasting Trimmer Line
I used to go through line quickly until I learned these tricks:
- Soak new line in water overnight before using. This keeps it flexible and less likely to snap.
- Trim only at full throttle. Cutting at low speed makes the line fray faster.
- Avoid hitting hard surfaces like concrete or rocks. These eat up line quickly.
- Store your line in a cool, dry place. Sun and heat can make it brittle.
Here’s something most people miss: Your trimmer line wears down faster if you cut thick, wet grass or weeds. If possible, let wet grass dry before trimming. I’ve doubled my line life by following this.
When To Replace The Trimmer Head
Sometimes, restringing isn’t enough. If your trimmer head is cracked, the eyelets are worn out, or the spring is missing, it’s time to get a new head. I replaced mine last year when the line kept breaking inside. A new head made feeding smooth again and saved me a ton of hassle.
Safety Reminders
It’s easy to forget safety when you’re in a rush, but string trimmers can throw rocks and debris fast. I always:
- Wear safety glasses and closed-toe shoes.
- Keep kids and pets away from the work area.
- Turn off and unplug before touching the line or head.
Trust me, even a small pebble can hurt. Once, I got a cut on my shin from a flying stick. It’s just not worth the risk.
Troubleshooting: What To Do If The Line Won’t Feed
If your line jams, melts, or refuses to come out, try these fixes:
- Check for dirt or grass stuck in the head.
- Make sure you’re using the right size line.
- Try rewinding the spool, keeping the wraps neat and even.
- Make sure both lines are through the eyelets and not tangled inside.
If all else fails, some trimmer heads are cheap and easy to replace. I bought a universal head online, and it fit right on my old trimmer.
How Often Should You Restring?
How often you need to restring depends on how much you use your trimmer. For a small yard, I might only restring every few months. If I’m tackling heavy weeds or edging a large area, I sometimes run out of line in one session.
I always keep spare line handy—nothing’s worse than running out in the middle of a job.
A Quick Comparison: Bump Feed Vs. Automatic Feed
When I bought my last trimmer, I had to choose between bump feed and automatic feed. Here’s what I found after using both:
| Feature | Bump Feed | Automatic Feed |
|---|---|---|
| How Line Advances | Tap head on ground | Feeds line automatically |
| Control | Manual | Hands-free |
| Common Issue | Forgetting to tap; jams | Uses line faster; sometimes feeds too much |
| Best For | People who want control | People who want convenience |
Personally, I like bump feed because I control how much line comes out. But if you want less hassle, automatic feed is great—just know it can use up more line.

Extra Insights Most People Miss
- Cutting edges: When you wind the line, don’t pull it too tight. A little slack stops the line from welding to itself inside the spool (yes, this happens on hot days! ).
- Universal heads: If your trimmer is old or you hate winding, buy a universal head. They fit most brands and make restringing much faster. I switched to one and cut my restringing time in half.
Where To Learn More
If you want even more details or need a manual for your exact model, check the manufacturer’s website or visit Wikipedia’s string trimmer page for background info. It’s helped me a few times when I got stuck.

Frequently Asked Questions
How Do I Know What Size Trimmer Line To Use?
Look for a sticker on the trimmer head or check your manual. Most residential trimmers use .065″, .080″, or .095″ line. Using the right size helps the feed work smoothly.
My Trimmer Line Keeps Breaking. Why?
This usually means you’re hitting hard objects like rocks or fences. Also, old or sun-damaged line breaks more easily. Try soaking new line in water to keep it flexible.
Can I Use Any Brand Of Trimmer Line?
Usually, yes—as long as the diameter matches your trimmer’s specs. Some trimmers (like battery-powered ones) work better with lighter line. Always check your manual first.
How Do I Stop The Line From Tangling In The Spool?
Wind the line slowly and evenly. Don’t cross the wraps or overfill the spool. Use the line notches to lock the ends in place before reinstalling the spool.
What’s The Easiest Type Of Trimmer Head For Beginners?
Fixed-line heads are the simplest—just push in pre-cut pieces. If you don’t want to wind, look for this type. Dual-line bump feed is a bit harder, but you’ll get used to it with practice.
Restringing a string trimmer takes a little patience, but once you’ve done it a few times, it feels easy. I used to dread it, but now I can do it in under five minutes. If you follow these steps and tips, you’ll spend less time fixing and more time enjoying a clean, tidy yard.
As an Amazon Associate, We earn from qualifying purchases