If you’ve ever battled with tall grass or tricky weeds, you know how helpful a grass trimmer can be. But, like me, you may have struggled the first time you tried to string one. I remember staring at my trimmer, sweating under the sun, feeling clueless about where to start. I’ve learned a lot since then. Today, I want to walk you through every step, share tips, and help you avoid the mistakes I made. You’ll finish this article knowing exactly how to string a grass trimmer—and maybe even feel a bit proud of yourself after.
What You Need Before You Start
Before you even touch your trimmer, it’s good to gather everything you need. It’s frustrating to get halfway and realize you’re missing something.
- Replacement Trimmer Line – Always check your manual for the right size and shape. Most home trimmers use 0.065″–0.095″ round line, but some heavy-duty ones need thicker or twisted line.
- Clean Rag – Grass and dirt love to stick to the trimmer head.
- Gloves – Protects your hands from sharp edges and dirt.
- Scissors or Line Cutter – For trimming the line to the right length.
- Owner’s Manual – If you have it, keep it nearby. Each trimmer is a little different.
I once bought the wrong line size and spent 20 minutes wondering why it wouldn’t fit. Don’t make my mistake—double-check!
Safety First
Stringing a trimmer is simple, but safety matters. Before I start, I always:
- Unplug the spark plug wire if it’s gas-powered.
- Remove the battery if it’s cordless.
- Unplug it if it’s electric.
- Let the motor cool down if I just used it.
I once skipped this step, and the trimmer head spun as I fiddled with it. Lesson learned! A few seconds of caution can prevent painful accidents.
How A Grass Trimmer Head Works
Understanding how your trimmer head works makes stringing easier. Most heads have a round spool inside that holds the string. When you bump the head on the ground, new line feeds out. There are two main types:
- Single-line heads – Use one long piece of string.
- Dual-line heads – Use two strings, wound in opposite directions.
Some newer trimmers have “easy feed” or “speed feed” heads that don’t require opening the head at all. If you’re lucky enough to have one, stringing gets even easier.
Step-by-step: How To String A Grass Trimmer
Let’s get our hands dirty (not literally, if you have gloves). Here’s my personal process, learned through years of sweaty weekends.
1. Remove The Trimmer Head Cover
Most heads have tabs you press, or you twist the cover off. I press both sides until the cover pops off. If it’s stuck, a little wiggle helps. Keep an eye out for springs or small parts.
2. Take Out The Spool
Gently pull the spool out. Some have a spring underneath. I like to set the parts in order on the ground, so I remember how to put them back.
3. Clean The Housing
Grass, dirt, and even bugs like to hide here. I wipe everything with a rag. A clean housing helps the new line feed smoothly. Once, I skipped this and my line jammed after five minutes.
4. Measure And Cut The Replacement Line
Check your manual for the right length. Most trimmers need about 10–25 feet of line. If you’re unsure, start with 15 feet. Too much line won’t fit; too little means you’ll restring sooner.
- For single-line heads: One piece.
- For dual-line heads: Two equal pieces.
I use a tape measure, but you can also stretch your arms wide—one arm span is about 5–6 feet for most adults.
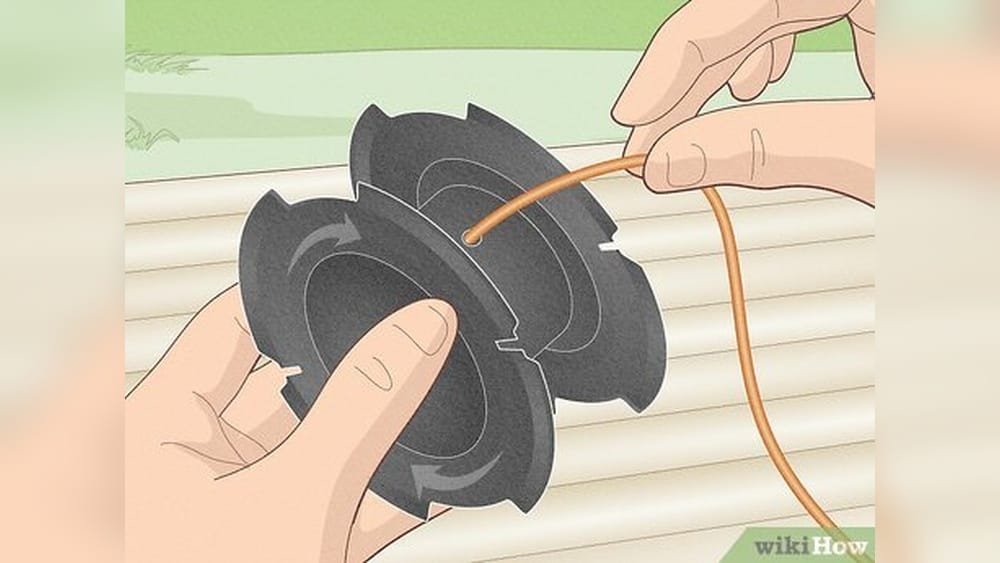
5. Find The Starter Hole On The Spool
Look for a small hole or notch. This is where you anchor the line to start winding. Thread ½ inch of the line into the hole, then bend it to hold it in place.
6. Wind The Line Correctly
This step confused me at first. There’s usually an arrow on the spool. Always wind in the arrow’s direction. Keep the line tight and even, but not so tight it overlaps or tangles.
- For single-line heads: Wind the whole line in one groove.
- For dual-line heads: Each line has its own channel. Wind both at the same time, in opposite directions if needed.
Keep the line flat and untwisted. If you overlap, it might jam when feeding.
7. Secure The Line
Most spools have small notches on the edge. Hook the end of your line into the notch to hold it while you assemble the head. This keeps things neat and prevents unraveling.
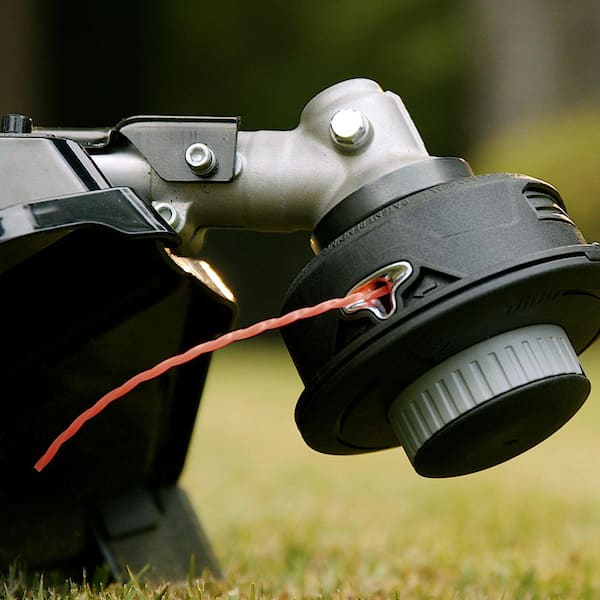
8. Thread The Line Through The Eyelets
Feed the free end of the line through the hole in the trimmer head (called an “eyelet”). For dual-line heads, you’ll do this for both lines.
9. Reinstall The Spool
Gently set the spool back into the housing, making sure the spring (if there is one) is in place. Pull the lines tight, so they stick out a few inches. This helps with the first feed.
10. Snap The Cover Back On
Line up the cover and press or twist it until it clicks. I give it a gentle tug to make sure it’s secure.
11. Test The Feed
Reconnect the battery, plug, or spark plug wire. Tap the trimmer head on the ground to see if it feeds. If it doesn’t, check for jams or tangles.
When you hear that satisfying “whir” and see the line cut through grass, you’ll know you did it right.
Types Of Trimmer Line And What To Choose
Choosing the right line makes a big difference. I once tried a thicker line than my trimmer could handle, and it kept breaking. Here’s what I’ve learned:
| Line Shape | Best For | Pros | Cons |
|---|---|---|---|
| Round | Regular grass | Durable, easy to wind | Less cutting power on thick weeds |
| Twisted | Thicker grass, weeds | Quieter, stronger | Harder to wind |
| Serrated/Star | Heavy weeds | Sharp, cuts thick stems | Wears down faster |
Pro tip: If you have a small yard, round line is fine. For lots of weeds or brush, go for twisted or serrated.
Common Mistakes (and How To Avoid Them)
I’ve made almost every mistake possible. Here are a few you can skip:
- Winding the line in the wrong direction – Always check the arrow!
- Too much line on the spool – It’ll jam or won’t feed.
- Uneven winding – Overlapping line causes tangles and jams.
- Wrong line size – Too thick or thin can damage the trimmer or break quickly.
- Forgetting to clean the head – Dirt causes poor feeding.
I once wrapped 30 feet of line thinking “more is better.” Spoiler alert: it wasn’t.

Dual-line Vs. Single-line Heads
Not sure which you have? Here’s a quick side-by-side:
| Feature | Single-Line | Dual-Line |
|---|---|---|
| Number of lines | One | Two |
| Winding process | Simpler | More steps |
| Cutting power | Good for grass | Better for weeds |
| Common on | Light trimmers | Medium/heavy trimmers |
If you have a lot of tough weeds, dual-line heads are worth the extra effort.
Quick Reference: Stringing “easy Feed” Trimmers
Some newer models make stringing simple. My neighbor’s trimmer lets you just feed the line through the holes, then twist a knob to wind it. If you have one, read the instructions—some brands call this “speed feed” or “bump feed.
”
Even with these, always use the right line size, and keep the line ends even.
Practical Tips For Success
Here are tricks I’ve picked up that make the job smoother every time:
- Store your line indoors. Sunlight dries it out, making it brittle.
- Pre-cut extra lengths. Saves time for future restringing.
- Wear long sleeves. The head can flick dirt and grass at your arms.
- Keep your manual. I keep mine in a zip bag in the shed.
One tip beginners miss: If your line keeps breaking, try soaking it in water for a few hours before stringing. It sounds odd, but moist line is less brittle and lasts longer.
When To Replace The Trimmer Line
If your trimmer starts cutting poorly, or you hear a slapping sound instead of a clean cut, check the line. If it’s worn down to a few inches or frayed, it’s time to restring.
Also, if you notice the line feeds out unevenly, or you need to bump the head too often, it’s probably time for fresh line.
Troubleshooting: What If It’s Still Not Working?
Sometimes, even after careful stringing, things go wrong. Here’s what to check:
| Problem | Possible Cause | Fix |
|---|---|---|
| Line won’t feed | Tangled line, wrong winding | Rewind spool, check direction |
| Line breaks quickly | Old/brittle line, wrong size | Replace with new, right size |
| Trimmer vibrates | Uneven line lengths | Make both sides equal |
| Head won’t close | Too much line | Remove some line |
If you need more help, many manufacturers have videos or guides on their websites. I once found a perfect video for my model on Stihl’s official site.
Frequently Asked Questions
How Often Should I Restring My Grass Trimmer?
I usually restring once every few weeks during the mowing season. If you trim large areas or thick weeds, you’ll need to restring more often. When the line gets short or frayed, it’s time.
Can I Use Any Type Of Line In My Trimmer?
No. Always use the line size and shape recommended by your trimmer’s manual. Using the wrong line can cause jams or damage. I’ve tried “universal” lines, but the best results come from the right match.
Why Does My Trimmer Line Keep Breaking?
Old, brittle line or hitting hard surfaces (like fences or rocks) can snap the line. Store your line indoors and avoid hitting concrete or metal. If breaking continues, check if the line is too thin for your trimmer.
What’s The Best Way To Store Extra Trimmer Line?
I keep extra line in a sealed bag inside my shed, away from sunlight and moisture. This keeps it flexible and ready to use. Moisture and sun make line weak over time.
Is It Hard To Switch From Single-line To Dual-line Heads?
It’s a bit more complex, but not hard once you try it. You’ll need to wind two lines instead of one. If you follow the arrows and keep things neat, it’s very doable.
Stringing a grass trimmer used to frustrate me, but now it’s almost routine. With the right line, some patience, and a little practice, you’ll be back to clean, sharp edges in no time. The satisfaction of a well-trimmed yard is worth it—I promise.
As an Amazon Associate, We earn from qualifying purchases