It was a quiet Saturday afternoon in my garage. I was finally working on that old oak coffee table I promised to fix months ago. The sun was shining through the dusty window, and I had my favorite playlist on. I felt ready to make some real progress.
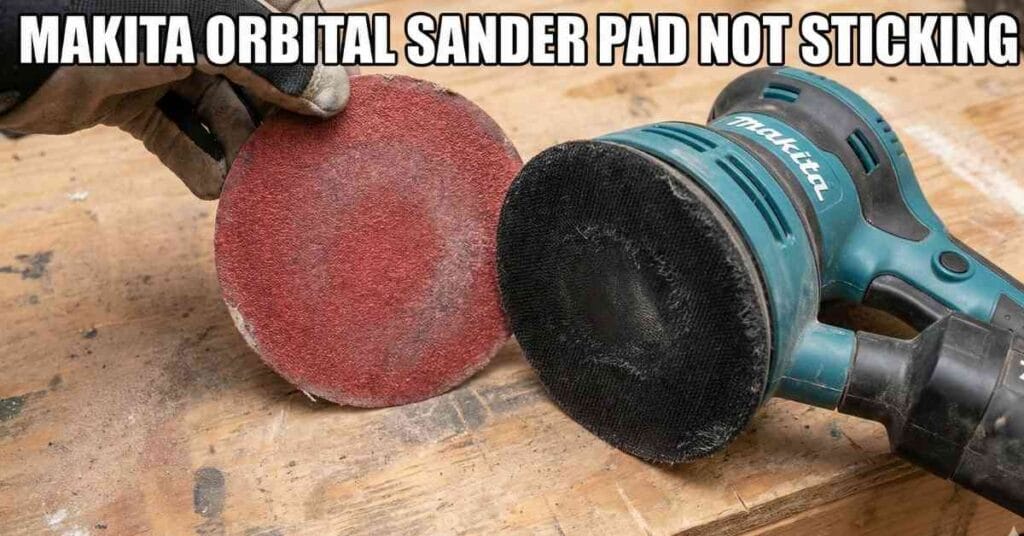
I grabbed my Makita orbital sander and slapped on a fresh 80-grit disc. I turned the tool on, and it hummed to life perfectly. I lowered it onto the wood to start stripping the old varnish. But as soon as I lifted the sander to move to a new spot, the sandpaper disc flew off and landed in the sawdust.

I stared at the bare black pad spinning on the tool. I was confused because the sandpaper was brand new. I picked up the disc, brushed it off, and stuck it back on firmly. I pressed down hard to make sure it gripped. Five seconds later, it flew off again and hit my boot.
My Makita orbital sander pad was not sticking, and my patience was running out. I had a deadline to meet, and this simple tool failure was stopping me cold. I spent the next few hours figuring out exactly why this happens and how to fix it for good.
Why The Sandpaper Won’t Stay On
I learned pretty quickly that this is a very common problem for woodworkers. It is not just bad luck. Most random orbital sanders use a simple system called hook-and-loop. You likely know this system by the brand name Velcro.
The black rubber pad on the bottom of the sander is covered in hundreds of tiny plastic hooks. These little claws stand up straight and are designed to grab onto the material. The back of the sandpaper disc is covered in soft, fuzzy loops that mesh with the hooks.
When you push the two sides together, the hooks grab the loops to create a strong bond. It relies on friction and the shape of the hooks to hold the paper in place while it spins. But just like tires on a car, these parts wear down over time.
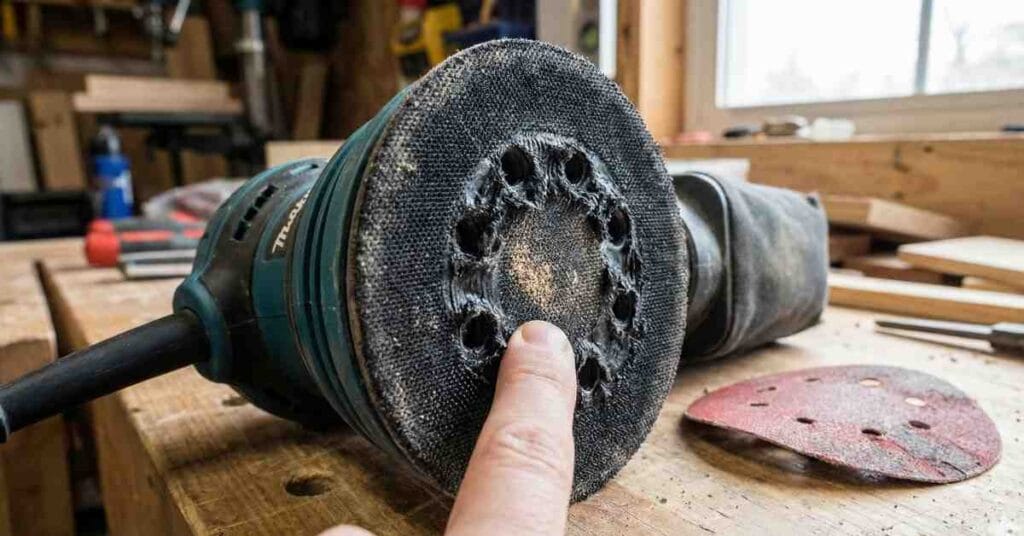
I looked closely at my sander pad under a bright light. I ran my thumb over the surface of the black rubber. This is the most important test you can do to check your tool.
If the pad feels rough and prickly, the hooks are still healthy and ready to work. If the pad feels smooth or soft to the touch, the hooks are gone. My pad felt as smooth as an old tire, meaning the hooks had melted or snapped off completely.
Comparison of Sander Pad Conditions
| What I Saw | What It Means | The Fix |
| Pad feels rough and prickly | Hooks are healthy | Check your sandpaper |
| Pad feels smooth or soft | Hooks are worn out | Replace the pad |
| Pad is white with dust | Hooks are clogged | Clean the pad |
| Edges are rounded off | Foam is damaged | Replace the pad |
My Bad Habit: Pressing Too Hard
I had to be honest with myself about why this happened. I caused the damage myself by rushing. I wanted to strip that tough varnish off the oak table as fast as possible.
I was leaning on the sander with my body weight to make it cut deeper. I thought I was helping the tool work faster, but I was actually killing it. When you press down on an orbital sander, you create a massive amount of friction.
Friction creates heat, and heat is the enemy of plastic. The hooks on the pad are made of very thin plastic that cannot handle high temperatures. When they get hot, they become soft and pliable.
If you press hard while the hooks are hot, you crush them flat. They bend over and cool down in that flattened shape. Once a hook is bent flat, it can never grab a loop again.
I looked at the center of my pad and noticed it was smoother than the edges. That is where the heat was the most intense during my work. I learned a big lesson that day about patience and technique.
You must let the sander do the work using only its own weight. If you need to remove material faster, you should switch to a coarser grit paper. Pushing harder only destroys your equipment and tires out your arms.
The Sandpaper Factor
I also took a hard look at the sandpaper I was using. I admit that I bought a cheap bulk pack from an online store. It seemed like a great deal at the time because I got fifty discs for ten dollars.
I picked up a disc from that cheap pack and inspected the back. The loops looked very thin and wispy. They were barely attached to the paper backing.
I compared it to a high-quality disc I had left over from a previous job. The brand name disc had thick, fluffy loops that looked durable. The cheap disc looked like worn-out felt in comparison.
Cheap sandpaper might save you money upfront, but it costs you time and frustration. The loops on cheap paper tear easily and detach from the paper backing. The grit might still be sharp, but the paper becomes useless if it won’t stick.
I tried the high-quality disc on my worn-out sander pad to see if it would help. It held on for a minute or so, but then it flew off just like the others. This confirmed that while the cheap paper was part of the issue, the main problem was definitely the sander pad.
Attempting to Clean the Hooks
I did not want to buy a new part if I could fix it for free. I saw some white dust packed into the pad and thought maybe the hooks were just clogged. I work with pine a lot, and pine sap can be very sticky.
Resin and sawdust can mix together to form a gummy paste. This paste packs tight between the hooks and fills up the gaps. If the hooks are buried in dust, they cannot stick up to grab the loops.
I grabbed my air compressor and blew high-pressure air right onto the pad. A huge cloud of dust puffed up into the air, making me cough. The pad looked much cleaner after the dust was gone.
I felt the surface again, hoping to feel the prickle of the hooks. It was still smooth and soft. I tried scrubbing it with a stiff nylon brush to lift the hooks back up.
It did not work because plastic does not have a memory like metal does. Once the hooks melt flat, they stay flat forever. Cleaning only helps if you just have dust, but it cannot fix heat damage.
Finding the Replacement Part
I finally accepted my fate and realized I needed to buy a new backing pad. I flipped my sander over to check the model number on the silver label. It was a Makita BO5030, which is a very common 5-inch orbital sander.
I went online and searched for a replacement pad for my specific model. I found two main options available for purchase. One was the official Makita part, and the other was a generic knock-off brand.
The official part cost about twenty dollars, while the generic one was only ten. I thought about buying the cheaper one to save money. But I read the reviews and saw complaints about the foam being too hard.
Some users said the generic pads caused the sander to wobble badly. I decided to buy the official Makita part to ensure it would run smoothly. I wanted my sander to feel like new again.
Replacement Part Data
| Part Type | Approx Cost | Pros | Cons |
| OEM (Original) | $18 – $25 | Fits perfectly, lasts long | Costs more |
| Generic / Copy | $8 – $12 | Cheap | Wears out fast, may wobble |
How I Changed the Pad
The new pad arrived in the mail two days later. It came in a simple plastic bag with the Makita logo on it. I was a little worried that the repair would be difficult or require special tools.
I am handy, but I hate dealing with tiny springs or hidden clips that break. The good news is that this repair was incredibly easy. It was much simpler than I expected.
First, I unplugged the sander from the wall outlet. You should never try to fix a power tool while it is plugged in. I flipped the sander upside down and rested it on my workbench.
I looked at the old pad and saw three screws deep in the rubber holes. I needed a Phillips head screwdriver to remove them. A size number two screwdriver fit perfectly into the screw heads.
I put the screwdriver into the first hole and turned it to the left. The screw was tight because it had some thread locker on it. I pushed down firmly and turned until it broke free.
I removed all three screws and set them aside in a magnetic bowl. The old pad lifted right off the metal base without any effort. There was a metal ring underneath that I made sure to leave in place.
I cleaned the metal surface with a rag to remove the fine dust. I took the new pad out of the bag and lined up the three holes. I put the screws back in and tightened them by hand.
I did not use a power drill because I did not want to strip the threads. I made sure they were snug but not overtightened. The whole process took me less than five minutes.
The Moment of Truth
I plugged the sander back into the wall outlet. I grabbed a fresh sanding disc and pressed it onto the new pad. It made a loud, satisfying crunch sound as the hooks grabbed the loops.
I tried to peel the paper off, and it was stuck tight. I actually had to pull hard to get it off. That sound was exactly what I wanted to hear.
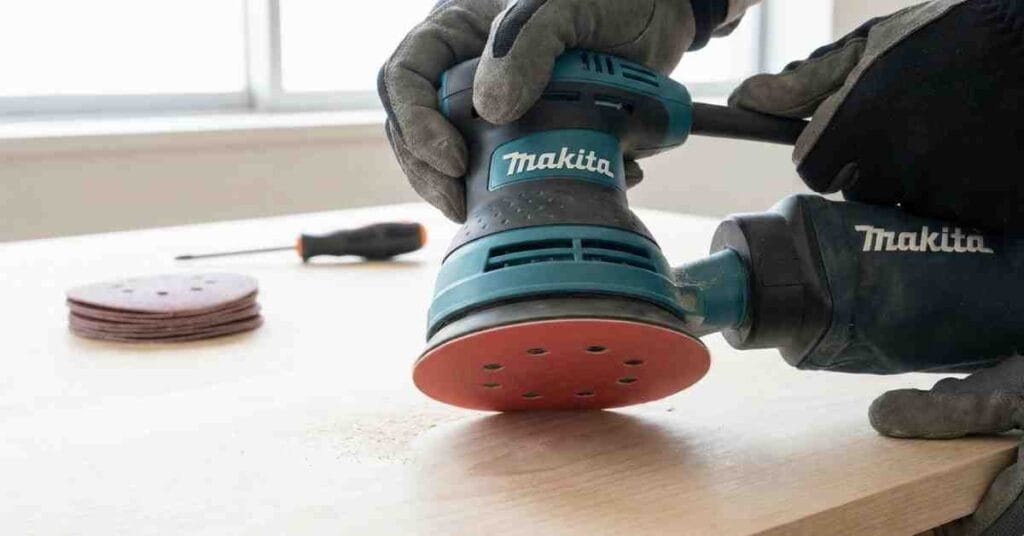
I went back to my oak table project with a smile on my face. I turned the sander on and started working. The disc stayed put perfectly.
The sander felt smooth and did not vibrate as much as before. The new foam was firm and flat, which made the sanding surface more even. I finished the table top in twenty minutes with zero issues.
How to Make Your Pad Last Longer
I do not want to buy another replacement pad next year. So, I decided to change how I work to protect my tools. I learned about a great accessory called a “pad saver.”
This is a thin interface pad that goes between your sander and the sandpaper. It has hooks on one side and loops on the other. It costs only a few dollars and is easy to use.
If you accidentally press too hard, the heat melts the pad saver instead of your expensive sander pad. It acts as a sacrificial layer that is cheap to replace. I bought a pack of two and installed one immediately.
I also stopped peeling the sandpaper off so aggressively. When you rip the paper off fast, you pull hard on the plastic hooks. If you do this while the pad is hot, you can stretch or break them.
Now, I peel the paper off gently and slowly. I also wait for the pad to cool down a bit if I have been sanding for a long time. These small changes make a big difference.
Most importantly, I stopped pressing down on the tool. I hold the sander lightly and just guide it over the wood. The motor does the hard work, and my hands feel much better at the end of the day.
Dealing with Dust Collection
Another thing I noticed was that my dust collection improved with the new pad. The holes in my old pad were ragged and slightly blocked. The new pad had clean, sharp holes that lined up perfectly.
I hooked up my shop vac to the dust port on the back of the sander. I noticed almost no sawdust escaping into the air. This was a nice bonus I did not expect.
Good dust collection also helps the pad last longer. It keeps the hooks clean and prevents heat buildup. Dust acts like an insulator, trapping heat against the pad.
Keeping the air flowing helps cool the pad down. So, using a vacuum not only keeps your lungs clean but also saves your tool. It is a win-win situation for any woodworker.
Conclusion
If your Makita orbital sander pad is not sticking, do not panic. Your tool is not broken and you do not need a new sander. It is just a worn-out part that needs to be swapped.
It is just like replacing worn-out brake pads on your car. It happens to everyone eventually. Check the hooks with your finger to confirm they are smooth.
Do not waste your time with glue or duct tape hacks. I tried those once and they just made a huge sticky mess. Spend the twenty dollars and get a proper replacement pad.
It takes five minutes to fix and makes your sander feel brand new. It makes sanding satisfying again instead of frustrating. Now, go check your sander and get back to making sawdust.
FAQs – Makita Orbital Sander Pad Not Sticking
Why is my Makita orbital sander pad not sticking?
The tiny plastic hooks on the pad are likely worn smooth or melted from heat. You must replace the rubber backing pad to restore the grip for your sanding discs.
Can I use spray adhesive to hold the sandpaper?
Glue creates a sticky mess and can ruin your nice wood surface. It is much easier and cleaner to just buy a replacement pad for your tool.
Why did the hooks on my sander pad melt?
Pressing down too hard creates high heat that melts the plastic hooks. Let the weight of the sander do the work to keep the pad cool and safe.
Should I buy a generic replacement pad?
Generic pads are cheaper but often wobble or wear out very fast. An official Makita part fits perfectly and will last much longer in your shop.
How can I make my sander pad last longer?
Use a pad saver to protect the hooks from high heat and daily wear. Also, peel off used sanding discs slowly to avoid ripping the plastic hooks.
As an Amazon Associate, We earn from qualifying purchases