I’ve used many tools in hard U.S. weather. I’ve worked in humid Florida shops, cold Midwest winters, and dry Arizona air. Each place feels different. The tool can feel different too. Torque, grip, and strength can change fast when the weather shifts.
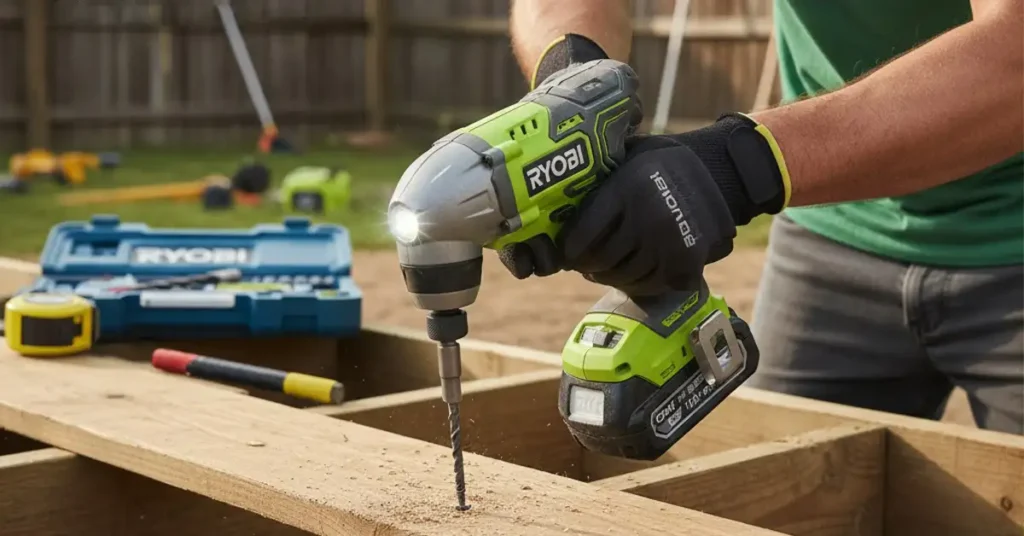
If you want to learn how to use a Ryobi impact driver, I can help. I’ve used it next to Milwaukee and DeWalt on real jobs. I kept notes on how each one feels and works. I’ll share what I learned so you can pick the one that fits your work and your day.
Table of Contents
What Is a Ryobi Impact Driver and Why Use It?
A Ryobi impact driver gives more torque than a drill. It does this with less strain on your hand. It uses a hammer-and-anvil system that adds power when a screw starts to fight back. This makes it great for decks, frames, and small auto work in U.S. garages. The key point is that a Ryobi impact driver gives strong power with simple control.

I learned fast that a drill and an impact driver feel very different. One cold day in a Midwest shop, my drill stalled on a long screw. I grabbed my Ryobi and tried again. The driver hit the screw in short bursts and drove it clean. The key point is that impacts help when dense wood or cold weather slows a drill.
How Does an Impact Driver Work?
The tool spins like a drill. But when the screw gets tight, the hammer hits the anvil inside. Each hit sends a burst of torque to the bit. This keeps the bit straight and cuts down wrist twist. The key point is that the hammer-and-anvil gives power only when you need it.
The torque feels strong but smooth. I notice this most in thick deck boards. A drill can twist my wrist at times. The Ryobi does not. It sends short pulses instead of one big kick. The key point is that high torque comes with less shock to your hand.
When Should You Use an Impact Driver Instead of a Drill?
I grab the Ryobi when I use long screws. It sinks 3” to 6” deck screws with little push. On old fences or rusted brackets, the impacts break the hold fast. The key point is that impacts beat hard screws, rust, and tough lumber.
It is not great for soft trim or thin drywall. I learned this while fixing a small cabinet. The power was too sharp. A drill with a clutch is safer for that kind of job. The key point is that light work still needs a soft touch.
Why Ryobi? (U.S. Homeowner Context)
Ryobi’s 18V ONE+ batteries fit many tools. I like this when I switch from a blower to the driver in one job. The packs last well in warm or cool states. The key point is that the ONE+ system keeps things simple at home.
Ryobi costs less than Milwaukee or DeWalt. It is not as strong as those pro tools. But it is fine for sheds, fences, and small builds. In my experience, it drives long screws in pressure-treated wood with no strain. The key point is that Ryobi gives good value for home work.
What You Need Before You Start
A Ryobi impact driver works best with the right bits, PPE, and battery. Good prep stops stripped screws and worn bits. The key point is that setup makes the job safe and smooth.
Required Tools and Accessories
I keep a small kit ready each time. I grab my Ryobi, a charged 18V pack, and fresh impact bits. I add eye and ear gear. A magnetic bit holder helps when I work on ladders. The key point is that a simple kit saves time.
Use a 2Ah pack for small jobs. Use 4Ah or more for long screws. Big packs stay cool when drives get hard. This helps in warm states where heat builds fast. The key point is that the right battery prevents slowdowns.
Impact-Rated vs. Standard Bits: What’s the Difference?
Impact bits flex at the center. This flex stops cracks. Standard bits are stiff and can snap. I broke many before I learned better. The key point is that impact bits take hits without breaking.
Impact bits also grip well. This helps with T25 star screws used in many decks. The key point is that strong bits give clean drives.
OSHA/ANSI Safety Notes (Clear and Simple)
I never start without eye gear. ANSI Z87.1 glasses block chips and dust. Impacts are loud, so ear gear helps too. This matters in small shops where sound can bounce. The key point is that simple gear keeps you safe.
Clamp your board before you drive screws. A loose board can move fast under torque. I learned this the hard way on a bench frame. The key point is that tight wood makes safe work.
How to Use a Ryobi Impact Driver Step by Step
These steps show how to load the bit, set the mode, and drive screws with ease. They help if you want to learn how to use a Ryobi impact driver at home. The key point is that small habits make clean work.
Step 1 — Insert the Battery and Check the LED Light
Slide the pack in until it clicks. Pull once to check the lock. Look at the charge level. Wipe the LED so the light hits the screw head. The key point is that a tight pack and clear light help you start right.
Step 2 — Load the Bit into the Quick-Connect Chuck
Pull the collar out. Push the bit in. Let go and wait for the click. If the bit shakes, try again. Dirt can jam the collar. The key point is that a firm click means the bit is safe.
Step 3 — Set the Speed Mode (Ryobi 2- or 3-Mode Impact Drivers)
Use low for softwood. Use medium for deck screws. Use high for lag screws or metal. I skip high when I work near trim. The key point is that mode choice controls the power.
Step 4 — Hold the Tool the Right Way
Keep your wrist straight. Place your second hand near the front for long screws. This keeps the bit in line. The key point is that a steady grip stops slips.
Step 5 — Drive the Screw Smoothly
Start slow. Let the screw bite. When the head seats, the impacts start. Stop when the screw sits flush. Pressure-treated wood dents fast, so watch for that. The key point is that slow starts and clean stops give neat work.
Step 6 — Remove or Back Out Screws
Switch to reverse. Use short pulses at first. The impacts break rust and old paint. This helps on old decks and metal parts. The key point is that short bursts free stuck screws fast.
What Common Mistakes Should You Avoid?
Small mistakes can waste time and money. I made many of these mistakes when I first started. They led to stripped screws, split boards, and hot packs. The key point is that small habits stop big problems.
Using Non-Impact Bits on an Impact Driver
I learned fast that non-impact bits do not last. My first bit snapped on a long deck screw. It twisted, slipped, and almost cut my hand. Impact drivers hit hard. Standard bits do not flex. The key point is that only impact bits can take the force.
A weak bit also slips fast. I saw this on T25 star screws. The bit jumped and chewed the head. I had to pull the screw out the slow way. The key point is that a loose grip ruins the screw and the job.
Starting Full Speed Immediately
I used to pull full speed right away. That was a mistake. The bit jumped out and scraped soft wood. This is worse on pressure-treated boards in warm states. The key point is that slow starts keep the bit straight.
Full speed can also cause cam-out. The bit spins and tears the screw head. Once that happens, the screw is done. The key point is that full speed too soon hurts both the bit and the screw.
Overdriving Screws in Decking or Drywall
It is easy to drive too far with an impact driver. I did this a lot when I built my first deck. Pressure-treated boards swell in hot and wet air. They grab the screw hard. One extra second and the head sinks too deep. The key point is that overdriving ruins clean work.
Drywall is even worse. Impact drivers have no clutch. They do not stop early. A drill is safer for that job. The key point is that some work still needs a drill with a clutch.
Using a Low-Capacity Battery for Heavy Tasks
A small 1.5Ah pack is not great for long screws. Mine got hot and dropped power fast. Heat builds even faster in warm shops or garages. A bigger pack stays cool and runs longer. The key point is that small packs struggle with big jobs.
You can also feel voltage drop. The screw slows even when you hold the trigger down. A 4Ah pack fixes this right away. The key point is that the right pack keeps the torque strong.
What Screws and Fasteners Work Best with a Ryobi Impact Driver?
Your screws matter as much as your bits. I learned this while working with tough wood like Southern Yellow Pine. Some screws drive smooth. Some fight back. The key point is that the right fastener gives clean work.
Wood Screws
Construction screws work well with an impact driver. I use them for sheds and fence rails. They grab fast and stay straight. The key point is that good wood screws hold firm.
Deck screws are my top pick for outdoor jobs. T25 or T30 star drives almost never slip. This helps a lot on steps and deck boards. The key point is that star-drive screws stay tight on the bit.
Lag Screws and Structural Fasteners
Lag screws also work well. I use GRK, Spax, and FastenMaster for heavy loads. A small pilot hole helps in dense boards found in many U.S. homes. The key point is that strong lags and small pilot holes make hard work easy.
These screws bite deep. The short impacts help them pass knots and tight grain. The key point is that impacts give strong torque for big screws.
Metal Fasteners
Self-tapping screws work well too. I use them on thin steel, brackets, and hinges. Start slow so the tip can drill its hole. Once it grabs, the impacts take over. The key point is that slow starts keep the threads clean.
If you go too fast, the threads strip at once. I learned this while fixing a thin frame. Once stripped, the hole is gone. The key point is that speed control saves the threads.
Automotive Use (Light Duty)
A Ryobi impact driver can remove small bolts. I use it on mower covers, small clamps, and light auto panels. It saves a lot of time. The key point is that the tool works well on light auto work.
But it cannot handle lug nuts. You need an impact wrench for that job. Lug nuts need more torque than this tool can give. The key point is that impact drivers are not for wheels.
How to Maintain Your Ryobi Impact Driver So It Lasts Longer
Good care keeps your tool strong. Cleaning the chuck, clearing vents, and safe storage all help. This matters in humid states where moisture grows fast. The key point is that simple care keeps the tool healthy.
Cleaning the Chuck and Bit Holder
I use air to clean the chuck. Dust builds fast on decks and in old shops. A quick spray keeps the collar smooth. The key point is that a clean chuck locks bits tight.
Check the bit holder too. A small chip can jam the collar. If it sticks, wipe it and try again. The key point is that clean parts stop stuck bits.
Keeping the Motor Cool
Dust in the vents makes the motor hot. I saw this while building a shed with lots of cutting near me. Blowing the vents clear helps the tool breathe. The key point is that cool vents protect the motor.
Insulation dust is the worst. It packs tight and traps heat. When I work in attics, I clean the vents more often. The key point is that fine dust needs more care.
Battery Care Tips (U.S. Climate Examples)
Heat is hard on packs. I never leave mine in a hot garage. I store them inside where the air is cool. The key point is that heat cuts battery life.
Cold slows packs too. In winter I warm them before I start. This helps in states with long freezes. The key point is that warm packs give steady power.
I charge between 20–80% for long life. This keeps my packs strong for years. The key point is that smart charging keeps packs healthy.
FAQs: How to Use Ryobi Impact Driver
These short answers help you fix quick issues fast. They are simple and easy to use for voice search. I had these same questions when I learned how to use a Ryobi impact driver. The key point is that quick answers save time.
Can beginners use a Ryobi impact driver safely?
Yes. Beginners learn it fast. The tool feels simple and easy to guide. Start slow. Use impact bits. Wear eye gear. The key point is that safe habits make the tool friendly.
Can I use drill bits in an impact driver?
Not most of them. Standard drill bits can snap from the hits. Use hex impact-rated drill bits instead. The key point is that only hex impact bits are safe.
What speed mode should I use for deck screws?
Use medium speed. It gives good control and stops deep sinks. This works well on pressure-treated boards used in most decks. The key point is that medium speed keeps the screws clean.
Why is my impact driver not impacting?
It impacts only when the screw gets tight. If it spins free, the screw may be loose or the bit may not sit right. Check the collar and the screw head. The key point is that impacts start only under load.
What’s the difference between an impact driver and an impact wrench?
A driver is for screws. A wrench is for nuts and bolts. A wrench gives far more torque. I use mine on big bolts and wheels. The key point is that a driver is not a wrench.
Final Tips Before You Start Your First Project
These last steps build trust in the tool. Use good bits. Start slow. Let the tool help you. Ryobi’s 18V system works well for most home jobs. The key point is that steady habits make clean work.
Smart Habits That Make a Big Difference
Pre-drill for hardwood. I do this for oak and tight-grain wood. It stops splits and makes the screw glide. The key point is that pre-drilling saves the board.
Use star-drive screws. T25 and T30 hold the bit firm. I use them for decks and steps. The key point is that star screws cut slips.
Keep extra batteries ready. A spare pack helps when the job runs long. This matters in cold months when packs drain fast. The key point is that extra packs keep you moving.
Practice on scrap wood. I do this when I try a new bit or screw size. It helps me feel the speed and torque. The key point is that practice builds skill fast.
As an Amazon Associate, We earn from qualifying purchases